Home Blog Page 28

Eating at Pasture: New Zealand’s restaurant of the year.

0

I do find it interesting that this year, Pasture came first, and Cazador the runner up – truly cementing this notion of the field to fork – whole animal cooking. While in some ways totally at different ends of the spectrum when it comes to the dining experience and even food and presentation, both share similar philosophies a the core of the process.

I tie this into a general observation. There has been a movement towards moving towards using more of (in particular) the animals we kill to eat, and an understanding of where and how that food has been sourced. Now, while I can appreciate that places like Pasture are likely well outside of the normal realm of where hunters would choose to eat (I didn’t feel I was sitting next to anyone else who had their skinning knife in their pocket anyhow). It’s interesting seeing opposite ends of the spectrum actually heading in some parallel directions again.

Introductions

You know you are in for a good night when the head chef personally invites you in and welcomes you to the evening. Now, I am no food critic, I just like to tag along with my partner Alice (it was her birthday treat) to some of the best dining experiences on offer around the country and abroad (my gold standard still being El Celler de Can Roca), so I have had to do some reading up on the background of both Ed Verner (said head chef) and Pasture, his restaurant hidden somewhat, down an alleyway in Parnell.

I won’t go too far into the history of Pasture, as that has already been covered in multiple places around the net, but, needless to say, he and his crew are well established, well qualified and well placed to create a unique and memorable experience.
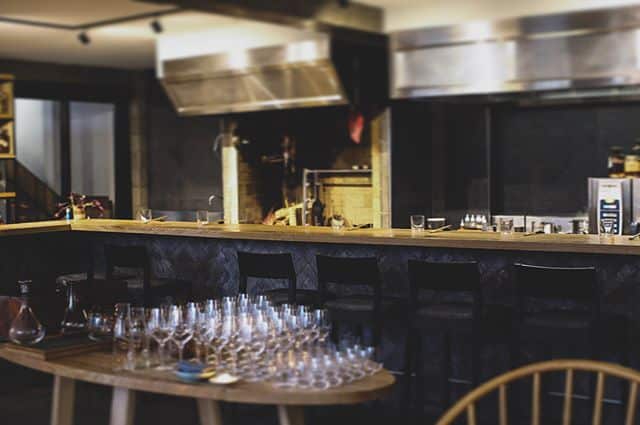
The Venue

Lots of wood, concrete and steel. Minimal, well thought through and with piles of intent. The end of the bar proudly displays the rotary distiller, and diners are seated at a long wooden bar – right in front of the prep area and open fire, where much of the protein is cooked.

Stacked all around the room are bottles and jars of preserves, fermenting stocks and other oddities. Well, I say oddities, but that is only by modern standards. I still remember the jars and jars of pickled onions that my father would make – and every spare space in the house would suddenly become filled with clay pots of various sizes.

Intimate, warm and cozy. Oh, and then there is the music

Give the DJ my compliments!

It didn’t take long for the soundtrack to grab my attention. A lot of synths, a lot of familiar tunes. It seems Ed spent a few years playing music, making music and boasted of a rather well set up studio at one point.

A lot of tunes I recognised, a lot of head nodding, think new wave and related synth pop.

The Drinks

We went with both the alcoholic and non-alcoholic drink matches for what turned out to be a fourteen-course meal.

Both had highlights. What was also nice was the variety. Wine, Beer, even an NZ made Sake which was new to me). I noted was there was a bit of a leaning towards the Australian wines. Sorry – wasn’t taking notes, and, my tip would not be to try and finish everything that is served up to you.

The non- alcoholic option featured a lot of in-house made brews – good use of that rotary distiller on the bench.

A true stand-out was the Sourdough Beer – stunning, and really wanted to take a couple of bottles away with me.

The Food

Yeah, yeah, so how was the food? Everything else, really, is in place to frame the kai.

Well, as you would expect, it was phenomenal. It was served at a brisk pace (with a perfectly timed break just before the Wagyu) and the majority of the final prep was done right in front of you. Interestingly, for Alice and me, there wasn’t much time for idle chit-chat – as there was so much going on to watch, listen and talk about.

But, that’s the point of something like this, immersing yourself in the experience.

You don’t get a menu beforehand, and, for those planning on heading along soon – stop reading now – part of the fun is not knowing what is coming up next.

Instead of just breaking down the entire night step by step – some thoughts and highlights. Don’t kid yourself, the only way to experience this kind of night is by heading along, which, as an aside, since their awards were announced – good luck getting in. We had booked prior to the awards, but I have a funny feeling they are booked out now, for a long, long time.

Seafood

I am not much of a seafood fan, particularly shellfish. I often think this is strange, as growing up with a family batch up the top of the Coromandel, we had access to some of the best and freshest kai-Moana in the country – it just never appealed. My mother and Alice both will destroy a Cray given the opportunity, but, it just never appealed that much to me. Don’t mind it, but not going to gush over it.

So, that being said, I was aware there was a fair bit of shellfish being prepped. However, bar one dish, I was more than happy to down it with gusto!

That one dish was also one of the most interesting – Geoduck – to me – similar to a Sea Cucumber – rather dodgy looking, but, due to my exposure to the Cucumber via the Meateater Show – I was really keen to try it out. Prepared simply, and served beautifully, it was just a little too ‘sea’ for my palette. Alice however, informed me that it was incredible – and – I have learned to appreciate her appreciation for such things.

However, The Clams, Scorpion Fish, Snapper – all sublime – the Snapper, in particular, standing out for me – I think in NZ, it’s actually easy to get over Snapper – and I often prefer other fish to it – but it’s preparation over the wood and pairing with an egg yolk sauce was most excellent (I am going to run out of superlatives based around phenomenal soon, my apologises – time to break out the thesaurus).
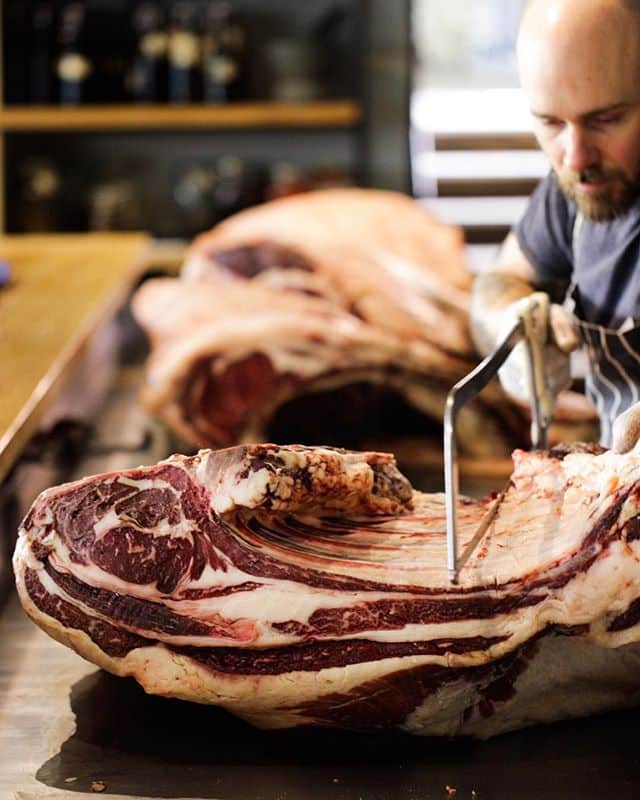
Red Meat

The anticipated highlight of the evening – and it did not disappoint. From the moment I took my seat, I was eyeing up the mighty looking slabs of meat lying on the rack above the fire. It turns out they were Aged Wagyu – and they did not disappoint. Cooked over embers – presented simply, the fat just soaked up the smokey goodness.

However, for me, I think the Pig Crumpet may have been the highlight of the evening. Cooked in Pig Fat, with a form of Prosciutto from the same beast topping the slice of goodness. Damn it was good.

Veggies and Desert

I hope you have realised I am not exactly listing this in chronological order at the point. But regardless, the mushrooms, tomatoes, bread and more – all exquisite (oh – I found another one!).

The desserts – not too sweet to totally dominate the palate at the end of the night. Alice preferring the Mandarin & Fennel Dish, myself the Buffalo Milk Ice Cream.

Overall

I dunno – how do you really provide a sense of an experience that requires you to eat it? For that matter, in the understanding that we all have different palettes, preferences and tastes – how would I rank that for you anyhow?

Basically, if you enjoy culinary experiences, this should be on your list. I have never experienced anything like this in NZ (and it’s not the first ‘degustation’ I have been too in NZ) – with, truly, the only thing I can compare it too is the lunch I got to have at the Red Cellar many years ago now. I still remember that day, and I would consider Pasture to be right up there as well.

The one thing I was expecting (not really through indication, potentially due to more of my projection of thoughts) was more nose to tail eating – that is – oddball cuts, offal and the like – however, if that’s more your thing, then maybe Cazador is a better bet. However, I would like to see a bit of a fusion of the two – forward-thinking preparation and presentation, but the entire animal incorporated into the dish. Challenging perceptions, but not necessarily relying on old or family preparations.

That said, I can appreciate that not everyone’s idea of a good night out is being served up something that would normally end up in the trim or feed to the dogs – I guess it was just my projection based upon the name ‘Pasture’ and the ‘Whole Animal’ ethos.

That aside though – this would have to be the pinnacle of the eating experience in NZ at the moment – and rightly deserving of the recent awards validating that position!

But why no photos?

Well, I was there to experience, not document. Ironic I know, given you have just read through a long document recording the experience. But, the phone intentionally stayed in the jacket in the coatroom, and I was there to interact with Alice, the crew and the food.

If the crew need some more photos I could head back at some point with the camera, tripod and all – because I don’t really think the phone would do justice – and – like Ed and his creative expression through food, I like to be able to use the best tools for the job, it always seems to work out better.

Further Thoughts

Since the experience, I have been pondering more about the restaurant and what Ed and the crew are up to, and it intrigues me, that as an observation, massive generalisation and overall likely to offend a wack of people simplification of the reality of things – but –

Many hunters don’t venture into the realm of gastronomy – meat and three veggies is still the standard – with a ‘marinade’ of sugar and soy sauce being the general stretch of culinary exploration (and don’t ask for your meat less than well-done). On the other side, we have urban diners wanting the field to fork experience, yet will never, and potentially abhor the idea of actually hunting and killing your own protein.

Yet underneath this all, is a very common thread – the desire to have more of a connection with the food we eat, understanding of where it came from, and respect for the life that is taken to sustain our own. Sure – many people won’t be able to express that desire, but I feel it’s there.

Ed and crew, thanks again for a wonderful night, and, by way of my own contribution – if you are reading this, and interested, please get in touch and I will get you up to our next Hunter Education Course – where you truly will be able to see both the field and the fork simultaneously… 🙂

The general public and firearms awareness.

0

Anyhow, I recently had the pleasure of spending Friday and Saturday with the folks from Stager Sports at Big Boys Toys.

Stager is the importer distributor for Meindl Boots, Blaser and Mauser firearms and the LabRadar Chrono – which is kinda how I got involved as I have been using mine for a couple of years now and sold quite a few through the Gearlocker.

For those that don’t know – Big Boys Toys is a consumer products show, aimed at, you guessed it – boys and men products.

This year seemed a little confused as to what age the ‘boys’ were meant to be – not quite aimed at teenagers, not quite middle-aged men – you had plastic toys around the corner from supercars

Something new.

What interested me though, was the fact, I think for the first time, someone was going to be showcasing some firearms, sure, they have always had airsoft, paintball and toy guns there – but this time – real, functional firearms (and nice ones at that).

What really interested me, was what the reaction was going to be from the ‘general’ public. This event isn’t a firearms event like The Sika Show or the Shot Expo, where you go expecting to see guns from multiple companies. How would people react? How much did they know about guns?

As it turns out, not much.

Are these real?

By the second day, we were contemplating putting up a blackboard just so we could chalk up and compare how many times each of us got asked if the guns were real.

Many people were walking up to the racks of guns, putting their fingers up over on the bore, to see what size the hole in the end was. Considering how small the difference is likely to actually be, I wasn’t sure how much info they were really getting from that, but the next question would normally be ‘are these real?’.

Many of the people passing by the booth had only ever been exposed to firearms through movies and games. As such, most had never seen, nor handled a real firearm. And it showed!

It was of interest how many people were fine with just walking up and grabbing one, pulling it out of the rack and swinging it around indiscriminately. Plenty of people wanted to have a photo taken with them, and several, shockingly, pulling a firearm down, pointed it their mate and basically said ‘bang!’.

More than once, I found myself telling people that we don’t point real guns at people, and generally, being meet with the comment ‘but it’s not loaded!’1. I would then correct them, pointing out that isn’t relevant, really.

It’s also against the law.


Arms Act 1983

Presenting firearm, airgun, pistol, or restricted weapon at other person

(1) Every person commits an offence and is liable on conviction to imprisonment for a term not exceeding 3 months or to a fine not exceeding $1,000 or to both who, except for some lawful and sufficient purpose, presents a firearm, airgun, pistol, or restricted weapon (whether or not the firearm, airgun, pistol, or restricted weapon is loaded or capable at the time of the offence of discharging any shot, bullet, missile, or other projectile) at any other person.  

(2) Every person commits an offence and is liable on conviction to imprisonment for a term not exceeding 3 months or to a fine not exceeding $1,000 or to both who, except for some lawful or sufficient purpose, presents at any person anything which, in the circumstances, is likely to lead that person to believe that it is a firearm, airgun, pistol, or restricted weapon.


What that would then, often lead to, was a conversation about firearms ownership in NZ. Responsible handling and safety, and more than once, about the process of getting a license in NZ.

Uneducated, and unaware.

Being this was central Auckland, a very metro area, it shouldn’t have surprised me. I sometimes forget, just how removed our city centres can be from our rural (and hunting) culture in New Zealand. While I grew up in Auckland, my extended family are primarily dairy farmers, and I spent a couple of years on a lifestyle block in Pukekohe.

We had a slug gun as kids, and we had a shotgun at the farm for possums.

However, just how many people were unaware you could own and use firearms was a bit of a surprise. This was just in regards to bolt actions and break-open shotguns. Imagine the response if we had turned up with some Pistols and MSSAs!

Positive, inquisitive.

You know what though, I didn’t have one negative comment on the guns all weekend. There were questions, sure, and a few people had a completely wrong (and understandably scary) picture of firearms here in NZ, but on the whole, what I did get, was a lot of people who had always been interested in shooting firearms, but never knew you could, or how.

We really should have had a pile of License Application forms and even an Arms Officer there with us to answer questions!

And this, I think, gets to the crux of my thoughts on the weekend. Joel, and the folks at Stager, shouldn’t have been the first people to do this.

Advocacy, representation, national bodies.

What I didn’t see, where any of the groups claiming to represent us ‘250,000 licensed firearms owners in NZ’. Rather than an individual importer/retailer, what should be at these shows, is a general firearms information booth, representing hunting, sporting and collecting interests in NZ.

We (as in, the ‘interest groups’) seem to spend most of the time preaching to the converted – a shows that already are going to have a large contingent of firearms owners present. While this is good, if we actually want to ensure the future of fire ownership in NZ, we need to stop focusing on the the edges of the population (the pro and the anti end) and start focusing and educating more of the people who just simply do not know enough about responsible firearms ownership to make an educated observation either way.

Now, while we would certainly pick up some more shooters, I have come to the realisation, that we also need to be doing a lot more to educate the non, but not anti shooters out there. Before the ‘antis’ do it for us.

Gun Culture in NZ is good. We have an excellent track record, and while the laws could be refined – on the whole, we have a fairly liberal, but controlled set of rules surrounding firearms. When you start explaining this to people, in a neutral manner, it quickly becomes apparent to most, that this is no need to panic.

Voting Public

Gun owner or not, the general public get to vote on matters pertaining to ownership. Really, firearms owners in NZ are able to do so due to a ‘social contract’ with the general public of NZ. If we don’t do our part to ensure they are aware we are living up to our side of the contract, it can’t be too surprised if they don’t care if the contract gets changed on us.

I hope, through some of the work I am trying to do, and through a gentle (or not so gentle) nudge – that we see more representation as events like this – it also makes sense to get involved in fishing, car, golf, and plenty of other events where there is a crossover, in sales terms, of our target demographic.


  1. how they would actually know that remains a mystery to me, being they didn’t cycle or know how to cycle the firearm before pointing it at someone 

Hunters Element Contour Pack

0

It is easy to layer clothing to regulate your temperature. But what I now notice is the other elements that contribute to bush stalking. The day bag for example.

I’ve always used a trusty fabric lightweight daypack. I was content with its performance until a recent hike into the Kaimanawas. A hike which caught me a little off guard. It had snowed and I was rugged up for a long hike into the bush. After walking into a Sika stag, I took off my day pack to get hit by a cold blast of wind. Instantly freezing my back.

I hadn’t noticed with all the stalking, but I had created a lot of moisture between me and my day bag. My jacket & thermal top were soaking under my pack. I then decided I needed to look into a pack that created an airflow. Avoiding unnecessary chills after use.

After some investigating online, in walks the Hunters Element Contour Pack.

First impressions were a little troubling. It held less than my previous 27 litre pack. Quoting at 25 litre  capacity (although I had always thought 27 litres was too much) it also had a frame so I was thinking restrictive movement and extra weight. Plus the H20 hole for the water bladder was on the side, not on top of the pack. My concern was that the bladder cable would get caught when I was trying to shoulder the pack.

However, it did boast a rifle scabbard, blaze rain cover, safety whistle & bow holder, none of which were on my previous pack. Things I had actually had to buy, such as the rain cover & whistle.

I was about to set off on a fly in trip into the Urewas and was still umming and rr-ing about leaving it behind, I was just so used to my old pack. “CHANGE IS GOOD I told myself” and thank god I did.

I was so impressed with this new pack it made me wonder why I had put up with the old one for so long. Firstly, the frame which appears to add to the weight of the pack, actually supports it in such a way that you almost don’t notice you are wearing it. I couldn’t believe it.

I had exactly the same things I always do (transferred directly from the old pack to the new). The frame moulds and sits better when worn, evenly proportioning the weight across your back. Not slumped to the side your gear is on, so obvious now. The fabric didn’t rub & squeak on my outer layer which I had encountered a few times with my previous pack.

And the AIR FLOW system is magic. After hours of stalking, I stopped & removed my pack without the cold chill blast id experienced so many times before. One of the best things I discovered on the hunt was when shouldering the pack, the straps are stable and in position due to the frame. My arms effortlessly slipped into position (I never got hooked into the bladder cable either).

I’d forgotten how often my old pack got caught up while trying to put it on. The shoulder straps turning inside out or getting caught behind something. Sticking/ catching to the similar fabric of my outer layers. Often, I imagined I looked like someone trying to get out of a long sleeve wetsuit spinning around looking for the sleeve. Not great when you’re in the bush and trying to be quiet and composed.

Other features I should mention are the zippered pockets. There is a lot which at first I thought were too many but it was perfect. Not just one big cavity for everything to get lost in. Rather spaces that can easily be accessed. An ammo pouch, with mesh zippered pockets for an Eperb or spare batteries, a top pouch for easy access to regular items such as a hat or thermal beannie (it could hold so much more). The main pouch held my pack liner with maps/permits, led lensor, spare thermal, emergency bivvy, first aid, food & deer carry belt. There was a separate compartment for bladder, a pocket down the back of the pack was perfect for food & an extra blaze mesh top, a padded pocket for a spotting scope or as I used it for cell ph & camera, the padding guaranteed protection.

Protection I was thankful for after falling & sliding 20 metres down a steep (very steep) ravine almost over a ledge looking down to a rocky river bed.

I especially loved the looped zip pullies, I could reach behind my head to double check I had closed my pack without having to remove the pack. Over all, I am VERY happy with my new pack.

This is my go to day bag now. Thank you HUNTERS ELEMENT – this pack is the bomb!

Gun Security – Alarm Systems

0

Gun Security – how much is legally required?

“a lockable cabinet, container, or receptacle of stout construction in which firearms may be stored”

I think one of the most common questions I get asked is regarding what level of security is required when applying for your A cat firearms license. Sadly, it is also often underpinned with the unvoiced subtext of ‘how little can I get away with to comply’. This can result in people taking advice from others and doing the least possible for the arms officer check. Safes are not a requirement; a rack mounted bar can be enough, and for A category firearms, a chain around a stud in the garage has been accepted in the past. Unfortunately, sometimes very basic (and in my opinion totally inadequate) gun security standards become the norm.

Furthermore, as a gun owner, there is no legal requirement to have an alarm system as part of your gun security. This remains the same, regardless of whether you have a single rifle, multiple rifles, pistols, E-Category Firearms1, or for that matter, a collection of C Category2 or even a shop full of firearms for sale3. Certainly, it is highly recommended, and I would imagine insurance would be fun, but the fact stands that there is no legal requirement at this time. I found this surprising and little concerning. However, since part of owning a firearm is personal responsibility, I took it upon myself to go beyond the bare minimum and properly secure my guns.

While I was already looking into better security for my humble collection of firearms, several recent incidents prompted me to get things sorted.

Incident 1 – Safe gas axed while owner was away

While in the process of moving house, a gun owner was identified through a moving company (new employee was keeping a list of safes being moved) and while absent from the house, a group of people visited both neighbours, explained they were doing some work for the new owners and would be making a bit of noise, and proceeded to gas-axe an E-Cat safe.

I don’t care how thick the steel is in your safe, or the amount of locking mechanisms on it, if someone can take to it with a gas axe, especially with no-one thinking anything out of the ordinary is happening – they are going to get through your security.

Incident 2 – Collector robbed – didn’t find out until getting back home

A firearms collector has a significant amount of MSSA and C category firearms stolen. From the reports in the media, they didn’t have any form of alarm or monitoring – so were unaware of the theft until returning home several hours later. Reports of ‘mysterious phone calls’ to ascertain if they were there or not also surfaced – but again, rural address, and likely had the security physically bypassed with the use of tools.

Raising the standard

the holder shall take reasonable steps to ensure that any firearm in the holder’s possession is secured against theft:

But what is reasonable? What my level of reasonable is going to be very different to the next person, depending on how much importance we placed on keeping the firearms secure.

Much like the new H&S legislation, where ‘reasonably practicable steps’ has replaced ‘all practicable steps’ there still seems a massive amount of leeway when it comes to the actual, practical requirements. In the new Health and Safety Reform, we do get a bit more guidance –

The new standard is broadly similar to the existing concept of “All Practicable Steps”, except that the assessment of costs must only be taken after the assessment of the risk and the ways to eliminate that risk. This means that costs will only take precedence over safety when the cost of taking a step is “grossly disproportionate” to the risk.

So, we now start to include cost as a gauge of whether we have gone far enough. In a similar vein then, how much is appropriate and how much is ‘grossly disproportionate’ when it comes to gun security?

Placing a value on gun security

Oh, how topical.

Considering, that as I write this, there is a select committee inquiry into issues relating to the illegal possession of firearms in New Zealand. Gun security, or, put another way, stopping people stealing your firearms, seems to be an excellent subject to be discussing.

For me, the actual physical theft of my guns would be an inconvenience – we have good insurance, so the items would simply be replaced, and on my merry way I would go. The ‘cost’ in that case, would be the damage to the house/safe (also covered) and covering off the excess and potential increase in premiums. But that isn’t the main ‘cost’ when it comes to firearms theft.

To me, the main cost is the thought that my firearms could end up in the hands of criminals. I place the value of that, much higher than the actual inconvenience of the physical loss. Much higher.

Gun Security Basics

Because I have an E and B endorsement on my license, I have, to start with, a higher requirement placed on me than most firearms license holders. A compliance document stipulates 6mm steel, multiple fixing points, dual locks, enough actually to make the regular requirements seem insanely simple and trivial. Certainly, getting the safe up a flight of stairs was anything but trivial.

Also, I keep the safe discreetly tucked away in a locked cupboard – this simple makes things less visible, and additionally gives me a place to lock away other things that I don’t need people having easy access to – like my camera gear, knives, spotting scope and so on.

The Guncity Rack
The Gun City rack. Compliant, yes. But shouldn’t we be doing more?

Alarms – pointless?

Gun SecurityHowever, having heard about some recent events, it seemed only logical also to put in an alarm. More specially, though, a monitored alarm – because I am still personally a little dubious about the actual value of an alarm system.

Bear in mind – I am not concerned about an opportunistic theft at this point. No quick smash and grab thief is getting to my firearms in any reasonable amount of time. Certainly, with an alarm wailing at extreme audio levels4 even less so.

However, sadly, modern society means that an alarm, car or house, often doesn’t draw much in the way of attention, apart from neighbours complaining about the noise.5

Monitoring, however, finally brings a proper level of security into place.

A little understanding goes a long way

My brother spent several years in the UK setting up alarms and CCTV for workplace monitoring. Before that, he ran an alarm company in NZ. Also, I have a background in home automation, and we are both sons of a sparky. So I had a bit of a head start when it came to understanding what could be done in regards to an alarm system.

However, what I was surprised to find, is that the cost has come down quite significantly, and the ability to set up a slightly more sophisticated gun security system is all but standard in most ‘out of the box’ alarm systems.

By sophistication – I am referring to splint monitoring or, dual zones.

Two alarms in one

Essentially, with our alarm, we have two systems in place. The first is a standard house alarm – monitored, so if the alarm goes off, the security company calls me (through experience within a couple of minutes) and asks me what is happening. If I know, I give them a password, and either nothing happens, or, if I ask, or they can’t get hold of me, a security guard is dispatched to check out the premises.

However, under that, is running a separate, secondary gun security system.

Even when we disarm the primary system, the safe and the cupboard it is in, remains armed. Separate codes, passwords and a different response for the alarm company.

If the second alarm goes off (silently), and the first alarm is already going off, I don’t get called. The police do. They are informed that there is a theft involving firearms in process and the thieves are currently in the building.

If the second alarm goes off and the first doesn’t, I have a couple of minutes to proactively call the alarm company, otherwise again, the police will be called. However, the message is that there is a theft involving firearms underway, and the owners of the building are also present. I do hope, that course of action is never activated.

Now, that’s not all that is going on, but that’s all I need to put out publically.6

Now, you might think that this sounds complicated and expensive. However, it’s 2016 – that is pretty much standard functionality now. I don’t pay extra for the dual zone monitoring (which traditionally used be called parallel monitoring), and the setup just required me explaining how I wanted the gun security system setup. Which leads me to another important point.

Choose your alarm company, installer and monitoring company wisely.

More specifically, choose someone who owns firearms and understands them. Because it was my brother, even though he was looking a little sideways at me initially, he quickly started to understand what I was trying to achieve. If I didn’t have a little background in the area, I might not have known what to ask for, nor explain how I wanted it setup with the physical alarm or the monitoring rules. As it was, I ended up using a monitoring company run by someone who contacted nearly over a year ago through the bloke – a regular reader, a shooter, and someone with an understanding of gun security and what I was trying to do.

Costs?

But you say… this is all sounding very expensive.

Well. Not really. Not considering the piece of mind for both me and my partner (we also get a house alarm, garage alarm and so on). If I honestly add up what I have in the cupboard, money wise, it is cheap ‘insurance’ (not the wife valuation, the real valuation lads). Oh, and of course, talking about insurance, we get a discount for having a monitored alarm7.

All up, we remained under the 1k mark. This is including wireless monitoring for a stand-alone garage, IP Card so I can monitor, and arm/unarm from my iPhone, extra sensors, sirens, etc.

So, grossly disproportionate? No. Not really. Grossly disproportionate is a padlock and a piece of chain around a stud in the garage. That’s not gun security.

Who to contact?

Well, the bro doesn’t do alarms as a job anymore, and I am not that interested in climbing through your roof.

Gun SecurityIf you are in Auckland – contact Dougall. Member of the North Auckland Deerstalkers, one of the best shooters I know and the man behind Total Security Group. He can also supply the safe, home automation and CCTC while he is at it.

For monitoring – contact Frank at Country Wide Monitoring. Another man with a pile of experience, and very helpful when it came to setting up the monitoring rules.


  1. Those scary black guns 

  2. collectibles including machine guns 

  3. no, not even a dealer is legally required to have a gun security that includes an alarm 

  4. multiple sirens, placed for maximum discomfort 

  5. Its sad, but true 

  6. trained pack of panthers 

  7. if you don’t, consider switching insurance companies 

Cleaning down – my jackets and duvet.

0

Down is something I always get a little nervous before washing – in fact, it’s something I tend to avoid until I have too. This is more because I have always felt down was a little more ‘fragile’ than some other technical garments – and I still have some of the water phobias that down equipment required years ago. Though, as this experience showed – I still won’t want to rely on ‘hydrophobic’ down after it was submerged!

I have a couple of down items these days – all fitting into their own little niche use.

My favourite down pieces

  • A MacPac Supernova Jacket – ideal as a lightweight, packable insulation layer when backcountry backpacking and hunting – it weighs nothing, crumples down to nothing, and is super warm – this is one of my favourite pieces of gear!
  • A Hunters Element Razor Elite Jacket – a much heavier down jacket – this thing really is super-toasty – it’s heavier and packs larger – so is more an around town/truck jacket – but I nearly lived in the thing over Winter.
  • A Thermarest Quilt – mine is one of their first – and I got onto it through the hammock side of things – it has really changed the way I look at most three-season warmth now – and a lot of the time in the bush (or really anywhere) I am quite happy to just lay down, fully clothed (bar the boots), pull the duvet over me, and shut the eyes.

As a result (especially with the quilt) the gear can get a little dirty – and while most manufacturers would recommend minimising washing – spot cleaning with a cloth wherever possible – the combination of a couple of years use, and a bit of sweat in slightly hotter situations, I figured it was a good time to give them all a wash.

Cleaning products

You can’t just throw your down products into the wash. Particularly if they have a newer hydrophobic treatment on them. It’s a case of getting the right product, and ensuring your washing machine is nice a clean as well.

I have always used NikWax products – and generally had good success with them. So when I found myself in Bivouac getting something for a recent trip – I also grabbed a bottle Down Wash Direct.

I broke the washing up into two lots – the two jackets and the duvet – again – the general recommendation is to not ‘crowd’ washing down – so I could have even done the jackets separate – as the HE is a large unit – but figured we would be good.

Use a gentle wash – and only in a front-loading machine – the agitation in a top loader is a bit rough on the down. Lower heat, slower spin cycle – you get the idea.

The clumps. And drying.

When the kit initially comes out of the washer and is sodden, you are in for a bit of a surprise – or – at least – you very quickly see why down is useless when totally wet.

It’s important to understand though – that this gear has just been through a wash cycle – and that is a lot different to a few drops of rain hitting the jacket – or a bit of dew on the surface of the quilt while out and about. Over a couple of days, sure, the down might absorb a bit of moisture – and flatten a little – while the washing does is the extreme case.

The quilt was the most obvious example – as the light fabric and the bigger baffles really let you see the results of the down clumping up – in the photos – the big black ball is basically all the down in that section clumped up together.

Drying down is also a bit of a process.

While you can air dry it – it potentially takes a day or so – and – you need to make sure you are regularly picking up the item and ‘fluffing’ it – trying to help the bits of down separate back out and dry properly.

A dryer significantly speeds things up – but – understand it is a little harder on the gear.

I had to run the drying on a timed programme, low to medium heat (hot could damage the lightweight material itself) – and – the key – is to throw a couple of tennis balls (like 5 of them) in with the object. Just one item at a time to give it heaps of space – and – you still need to regularly pull it out to fluff, check the tennis balls aren’t stuck, and generally give it a once over.

This still took a couple of hours – and I gave them a bit of air dry as well. The result though was jackets and duvet that seem even fluffier than before. Though, confirmation bias is a hell of a drug.

The one ‘casualty’ – if you want to call it that – was the information patch on the inside of the Razor Elite – which – if you haven’t read yet – is a great yarn.

Overall though – a great success – something I may only do once a year – if that, but well worth it for revitalising a few bits of my favourite kit.

Setting up the Lithgow Arms LA101 22LR

0

I have a friendly competition coming up this weekend – hopefully something that grows into a regular 22LR shoot in the Auckland region. Of course – I recently picked up a Lithgow Arms LA101 in a leftie orientation – but also, of course – I didn’t have a scope on it, or zeroed, or any drop data ready to use.

While I was tempted to just turn up and sort it on the fly, I figured I should follow my own advice and get some proper prep done. So – up to Balnagown it was to zero and dope out the rifle.

I have put the Vortex AMG on top of the 22 for the meantime – the intent is to use the one good optic for all my competition rifles – once I settle on the load for the guns – I can also record the zero offset in the Kestrel – theory being, the main rifle will be zeroed, and the other rifles will just incorporate the offset from a true zero in the ballistic solution.

I will try this out and see if it’s workable – otherwise, I will be after a new scope for the 22.

I have a cheek riser on the rifle atm – but we shall see if it stays there – the issue has always been the width of the rest – and as I move the butt of the rifle closer to the centreline, its start to cause an interference there. I have already been in touch with Kalix Technik regarding a more permanent solution – but I don’t think they are going to have a suitable unit.

Zero and Chrono

The intent was to zero the rifle at 50 meters and get some quick ballistic data to form up a drop chart.

While I still have a box of ammo to test out through the rifle – I was a little strapped for time, so just settled on using old faithful – CCI Standard, until I can spend a day out there plinking and testing.

CCI Standard is renown to shoot fairly to very well in most guns – with the occasional flyer keeping it in the realm of standard instead of awesome. And, true to its name – a decent group with a couple of outliers.

I had a 1cm red dot up in the middle of the group that was quickly shot out – and I sent a few extra rounds through the hole. Good enough for what I need out of this firearm for the meantime.

Interestingly, the Labradar didn’t pick up any of the projectiles – which was strange, as in previous sessions it had no issues. Likely an issue with the ‘aiming’ of the labradar – I will have more of play when I have some more time.

No major though. That’s why we have maths!

Not-so basic math

If you have the distance to shoot too, then you don’t really need a chronograph to calculate velocity. As long as you have a known distance, and can shoot and record a known drop – you can then go into your ballistic calculator and shift the velocity up and down until the expected and actual drop to target matches up. And there it is! You have your ballistics sorted.

On the Kestrel, it will actually do the calculation for you. So for the .22, I simply backed up to 100 meters, shot and recorded the drop, entered in the data and got a 994fps expected velocity.

Now – to me, this seems quite low – so will be checking out to further distance as soon as possible – the cool thing with the Kestrel is that this is easy to do on the fly. If the first stage in the comp shows me I am out on elevation (actual vs. predicted) I can just update the Kestrel and it will recalculate the rest.

This is an advantage of using a digital system – but – of course – it means my printed charts and turrets will be wrong. However – this is really still the setup stage of the gun – so no major there – as I collect more data and record it, these figures will stop moving and solidify.

Spoilt for choice – the Leatherman Signal vs Leatherman MUT

0

Now – for some context. I have a Leatherman Skeletool that has been nearly permanent EDC1 for years now. Enough that most of my pants have marks on them from the clip. It’s been (and still is) a great unit – but there have been times where I was keen for something a bit heavier duty – without having to resort to carrying a full tool kit around.

I have managed to snap the plier head off my Skeletol. To be clear – I was abusing it at the time – trying to cut a thick piece of hi-tensile fencing wire in half. Hence the though a heavier ‘field’ multitool might be in order.

At the range, I generally have the Fix-It Sticks kit on me for scope/action/other screws – I firmly believe that a Torque Drive of some kind it really important when it comes to precision rifle setups. But a pair of pliers, cutters and knive is also very handy.

While the two units seem similar on the surface – they both have an intended use, and I guess it ultimately comes down to you which one makes the most sense.

The MUT

The MUT has a military intent – specifically – firearms maintenance and adjustment.

Of course, this immediately appealed – but – using it a bit reminds me that several of its specialised features really will be of little use to me.

I shoot bolt-guns. So the ‘bolt override’ feature has little use to me – nor does the punch takedown pin – as I don’t own a firearm that necessitates it. Realistically – I can’t see me using the carbon scraper on a precision rifle crown – and I sure as hell won’t be using it to clean the rifle with the cleaning rod fixing.

However, it should be noted that the MUT is simply more heavy duty than the Signal. This is apparent when you pick it up, and obvious when you put them side by side. The overall unit and blades are longer, the pliers are more robust – this really is a hard use item.

The intent would be for this to live either on my shooting bag or potentially on the ‘duty belt’ – the belt I am setting up to carry my rangefinder, Kestrel and IFAK on the range. So the extra weight isn’t an ‘everyday’ consideration.

The bits and blade are made beefier – the bits being the bigger S7 longer options, and the blade is 420HC steel.

The Signal

The Signal is intended for the ‘outdoors’ folk and incorporates a firestarter and knife sharpener as part of its key features. I think the ‘Signal’ part of the names comes from the inclusion of the firestarter and the inbuild whistle.

Now, I carry a firesteel on me in the bush. Actually, no, I will admit it, I don’t. I carry a lighter. With a backup one in the pack next to a sealed box of matches. I have used firesteels, and, well, I carry a lighter. They work well – even wet, they work as a firesteel. Sorry, had to say it. Like getting a fire going quickly. While I am all for bushcraft – there are a few modern developments that really do work better.

The inclusion of a diamond knife hone/sharpener does also interest me – but – again – I actually just carry a spare knife anyhow – I have an EDC blade on me all the time, and generally, a skinning/work knife in the pack if headed out hunting or bush. Yes, I do also carry a small pocket diamond stone in the pack as well. I could combine them, I guess…

So. Which One?

Well, because ultimately I am looking for a heavier tool – the MUT wins out. But, while doing this article something else occurred to me – Leatherman makes other heavy tools as well. And one, in particular, has caught my eye – the Surge. Stay tuned. 😉


  1. everyday carry 

Hunters Element Razor Elite Jacket

0

Snug as a bug in a…

I get cold. Which is odd, because I sleep hot – but I do find myself often reaching for a jumper or jacket, and the Macpac Supernova has always been close at hand for a few years now.

I find it hard to beat down for the ultimate weight to warmth ratio – it traps the heat being generated by the body quickly, and create a snug environment. Whenever I head out into the bush, the Supernova is packed in a dry bag, right next to the sleeping bag – in fact, its become a standard part of my sleeping kit – I can get away with a lighter sleeping bag, in the understanding that I will just wear the jacket at night as well. Tested several times, works well.

However, the Supernova is also a little delicate, and, well, bright orange – so as the season got colder this year – I got myself one of the new Hunters Element Razor Elite Jackets. Now – most people likely already know the Stoney Creek equivalent – but – there we a few design and functional elements of the HE version that caught my attention.

We had the new range heading into work, so I had the opportunity to check things out in the flesh – and first impressions were good. The design caught the eye – and I decided on the green/grey version.

Initial thoughts – it fitted well (I wear the large), the cuffs (a smart double system) worked well, and there were heads of pockets. I initially thought the hood was a little ‘small’ – but it grew on me.

Snug, not stuffy

One thing, which is, I believe more a function of material choice over design – is that this jacket is, undoubtedly warm, too much soo sometimes, but it doesn’t get stuffy and clammy like many soft shell designs too. I can only hypothesize, that the material is letting the water vapour from sweat get out a lot quicker than some of the more waterproof materials might – I have several other jackets that quickly clam up – you feel the sweat trapped against you, while the Razor just gets to the point where it is too warm to wear anymore, but not where you immediately feel like you need to turn it inside out to dry out.

I have been pretty much living in this first thing in the mornings – many would know this routine – get up, put something on – turn on the kettle – head off for a piss. I have found the Razor is the first thing I generally reach for – and the material is quite comfortable over bare skin – not overly plastically or sticky feeling, apart, from the care label in the upper centre of the back. 😉

However, and this can’t really be a criticism, it’s just doing its job – I do find by mid-morning, this jacket is already too warm for wearing around in the Auckland climate. However, this would also lead me to think it’s going to be phenomenal further down south – and look forward to a few more roaming adventures in it.

In the hood

Initially, I thought the hood was a bit shallow – but then realised it was more a matter of mindset. While this jacket is water ‘resistant’ – and the down is hydrophobically treated – it’s not a raincoat – and as such – the hood doesn’t need to come as far forward as those jackets do – in fact, but keeping it a bit shorter – it remains tucked up under your waterproof layer hood, should the need arise – however- it’s also a rather thick jacket – so if you are planning on incorporating this as an insulation layer – it might pay to check you aren’t just going to compress (and therefore reduce the effectiveness) of the insulation under a rain jacket.

Zip it all the way up though – and the hood on the Razor traps the heat around the neck and noggin – and does a brilliant job of keeping this warm. If you added a buff to keep the lower face and nose warm – you basically have yourself a coffin style sleeping bag on your upper body!

Off the cuff

The double cuff works as advertised – keeping in the heat and also keeping the jacket from riding up the arms – unless you want to push the sleeves out of the way, then it keeps them there nicely as well. This cuff ends are starting to show a little pilling now – but then I also have a watch constantly brushing up against it, so I would expect that anyhow.

Pockets. All of the pockets.

I tend to carry a lot of stuff around with me – so the extra pockets on the jacket are a welcome feature – in the front ‘hand warmer’ pockets – well – I warm my hands, but also carry wallet and phone – while the inside pockets have space for the beanie, gloves, buff and a length of paracord. Check pockets hold a small first aid kit, notebook and a few other bits and pieces – loaded up – the jacket happily carries the weight – without any weird sagging of the hang.

Cut, look, fit

Is all top-notch. I have been wearing this near constantly for a couple of months now – and my only observation would be that a bit of the down ‘fluff’ seems to try and work it’s way out through some of the stitching on the front of the jacket – this is probably highlighted by the white down against the dark material – and I have found it common over several down jackets I have worn over the years. No major, just an observation.

I have worn it in a couple of showers, and, lo-and-behold – the down didn’t just instantly collapse into a sodden mess, and the material just seems a little more robust than the admittedly more lightweight Supernova skin.

Ethical hunters, ethical kit

The folk at Hunters Element are on a bit of a mission – one of sustainability, traceability, and ultimately, just being nice to the planet we live on. Like many things, a little bit of knowledge is a powerful thing – so as I heard more about some of the questionable live-plucking methods of the down collection – this video really caught my eye.

While I am sure plenty of companies are starting to do their bit as well – Hunters Element have proudly presented the ethical production of their garments as a core part of their company ethos – and, for ethical hunters – this is something we need to get behind and support. Without going into it too much – hunters really can be the bastions for sustainability and ultimately, conservation – in fact, more ‘branding’ that way would help several causes a lot.

[fvplayer id=”37″]

So – in use, down or synthetic and the pinch…

As already mentioned – I have worn this jacket a lot – however, as of late, I also haven’t been headed bush much – though, the cold in urban and the cold in the wilderness is still cold. I have stood on a few ridgelines, and the wind doesn’t cut through, walked through a few showers and the jacket has dried out, it’s basically become my favourite, general purpose jacket.

For lightweight hunting though – I will likely stick to the Supernova – it’s lighter, packs smaller, and for the amount of insulation I need – more than enough. I can see the Razor coming with me on all the truck-based trips in the future though.

In regards to the down vs. synthetic debate – I did also look at the Switchback Jacket – which is more a technical jacket aimed at the lightweight hunter (I feel) – it reminds me in principle, of the First Lite Sawtooth – insulation just where you need it. But – for what I was after, I knew the Razor would just get more use.

So – the jacket is awesome. Urban, Maimai, cold tops – it’s going to provide the ultimate warmth in an ethically sourced, well-designed form. Get one.

A spotting scope for both sports and observation (the Swarovski STR80)

0

[fvplayer id=”19″]

Wants and Needs

I realised this week, that the last three times I went out ‘shooting’ – I didn’t actually pull the trigger and spent more time watching the shooter than the targets, and the time on target was all behind a spotting scope.

The challenge is, that while certainly not ‘horrific’ – my current spotting scope is a budget option. Comparing it to either my Vortex AMG or many of the other scopes I get to play with, you notice the lack of optical clarity. However, people get nervous (understandably) when you set up a rifle behind them between their legs.

Also, it doesn’t have a reticle. For observational spotting, not really an issue – but if you have ever listened to a conversation that went something like ‘come 2 meters up and half a meter to the left’ – you might understand that a calibrated reticle, especially one that is in the same language as the shooter, can result in much more accurate and quick adjustments.

We pay good money to have well built, accurate scopes, this includes the reticle in them – be it in MIL or MOA, these are calibrated angular rulers right in front of our noses, and it makes a lot of sense to use them. It makes even more sense to have the observer utilising and talking in the same language.

The STR80 Reticle

The STR80 is also unique in that you can totally turn the reticle on or off. This means you can observe with no reticle, and when you need to measure something – flick it on.

I get torn with reticle design. Especially when mulling over spotting scopes. I have used the Mark4 a bit, as well as looked through the Swaro and Bushnell offerings. While I don’t like the idea of permanently having a crosshairs style reticle smack in the middle of the scope (I tend to try and have the impact in the lower quarter so I can also watch trace), I am also wary of the heavily gridded lower quarter reticle that the Horus options often provide.

So, the notion of something I can simply turn on or off, appeals – though, I suppose, an ideal world would have it offset towards the bottom as well.

Though I say it in the video, I don’t actually understand why you can’t have both a MIL and MOA reticle option in the same system – if it is digital – surely it could be switchable? I am not sure if there is an etching on the glass somewhere, or if it really is a digital projection. Certainly – a unit that let me switch between MIL or MOA depending on the client/shooting would be a phenomenal option and basically make this scope the ultimate (and unique) solution.

The List

So – the Swarovski STR80 is on the list. I would love to also have a play with a Hensolt Spotter45 – but it does seem a little unlikely I will be able to get my hands on one to try out, and it’s quite a commitment to just purchase one and have it sent down to NZ.

In the meantime, hopefully, I might be able to wrangle one to have a proper play with, actually on a firing line. JP?

Hang on. How do I dial 3.72 MOA?

0

I got this question recently, and it’s one of my little bugbears about MOA.

Oh, I can hear the cries of derision already. So just chill. I am not bagging MOA on the whole, but in modern times, with modern ballistic calulators, using math, that works in decimals…

A quick primer on MOA

So, MOA, like MILS, MilRad or various other names, is an angular measurement that we use within our scope systems in order to align our magnified optics with our projectile path in order to hit things out to distance.1.

Many hunters and, erm, older folk, will be used to MOA, or might have only ever used MOA – it’s the default, common term – MOA is a common way of describing the precision of a firearm – “the gun shoots 1 moa all day long” – generally, used in that way, it means it shoots a group under 1 inch in size at 100 yards.

MOA, when implemented on most scopes, is set up that every four clicks, results in the scope being adjusted 1 MOA. Another way of looking at it, is that each ‘click’ is a 1/4 MOA. Sure, some scopes have 1/8 MOA adjustment, but I am picking 99.9% of you have never used, or even seen one2.

Traditionally, when zeroing a rifle, it was a case of set and forget. It’s only relatively recently that people have begun to regularly dial their holdover3. The process was (basically) – shoot on a piece of paper at 100 yards, and each ‘click’ on the MOA scope would move the impact a 1/4 inch. Line the reticle and the impact up, and you are good to go!

Enter the Ballistic Calculator

However, many ‘long-range’ shooters are now using a ballistic calculator on their phone to give them the drop or holdover information they are then dialling into a scope with a target or exposed turret, in order to stretch out and shoot further.

These calculators, oddly enough, use a decimal, instead of a fractional method of representing this adjustment, and often, presents it in a might higher level of precision that the shooter or the equipment can actually adjust to.

So, for the example in the title (and one I recently got asked over the phone) – the shooter was given a correction by his app of 3.72 MOA.

If we do some quick fractional division – we know that 1/2 = .5 but 3/4 = .75

That means we can only dial 3.5 or 3.75 – what are we to do!

Simple. Round. In that particular case, I would likely round up and forget about it, because no-one I know can actually shoot down to a resolution of .03 MOA anyhow.

We do actually get the same thing with MIL – as some calculators are giving us a solution with two decimal places, and, thinking in simple terms – MIL on most scopes only gives us one decimal – i.e. .1 MIL per click.

Don’t just use clicks

What I suggest, you don’t do, is set up your ballistic calculator to just give you a result in clicks.

Yes, in theory, it’s simpler – but – much like standing on a firing line with guys giving ranges without telling you if it’s in meters or yards, it leaves out an important part of the communication (and thinking) that should be involved in the long range, precision shooter we are doing.

Much like if you are spotting for someone, don’t tell them ‘2 clicks up’ – stop, think about it, and tell them the unit of measure as well – because 1/2 MOA and .2 MIL are both two clicks on both scopes, but are very different corrections.


  1. I am getting sick of having to provide so much context for people, but will have to – we are talking long range shooting, with magnified optics, yes, I am aware that’s not the only use for MOA or angular measurements in shooting – this is a simplified use of the term 

  2. including myself 

  3. the adjustment to shoot out further