Home Blog Page 16

Down the rabbit hole with a pocket knife.

0

I love how the further you explore the rabbit hole, the deeper it can become. Even something as simple as replacing something lost can lead you through an interesting path of discovery and adventure. Such was the case when I tried to replace my lost pocket knife.

Pocket-Knife

The pocket knife prelude

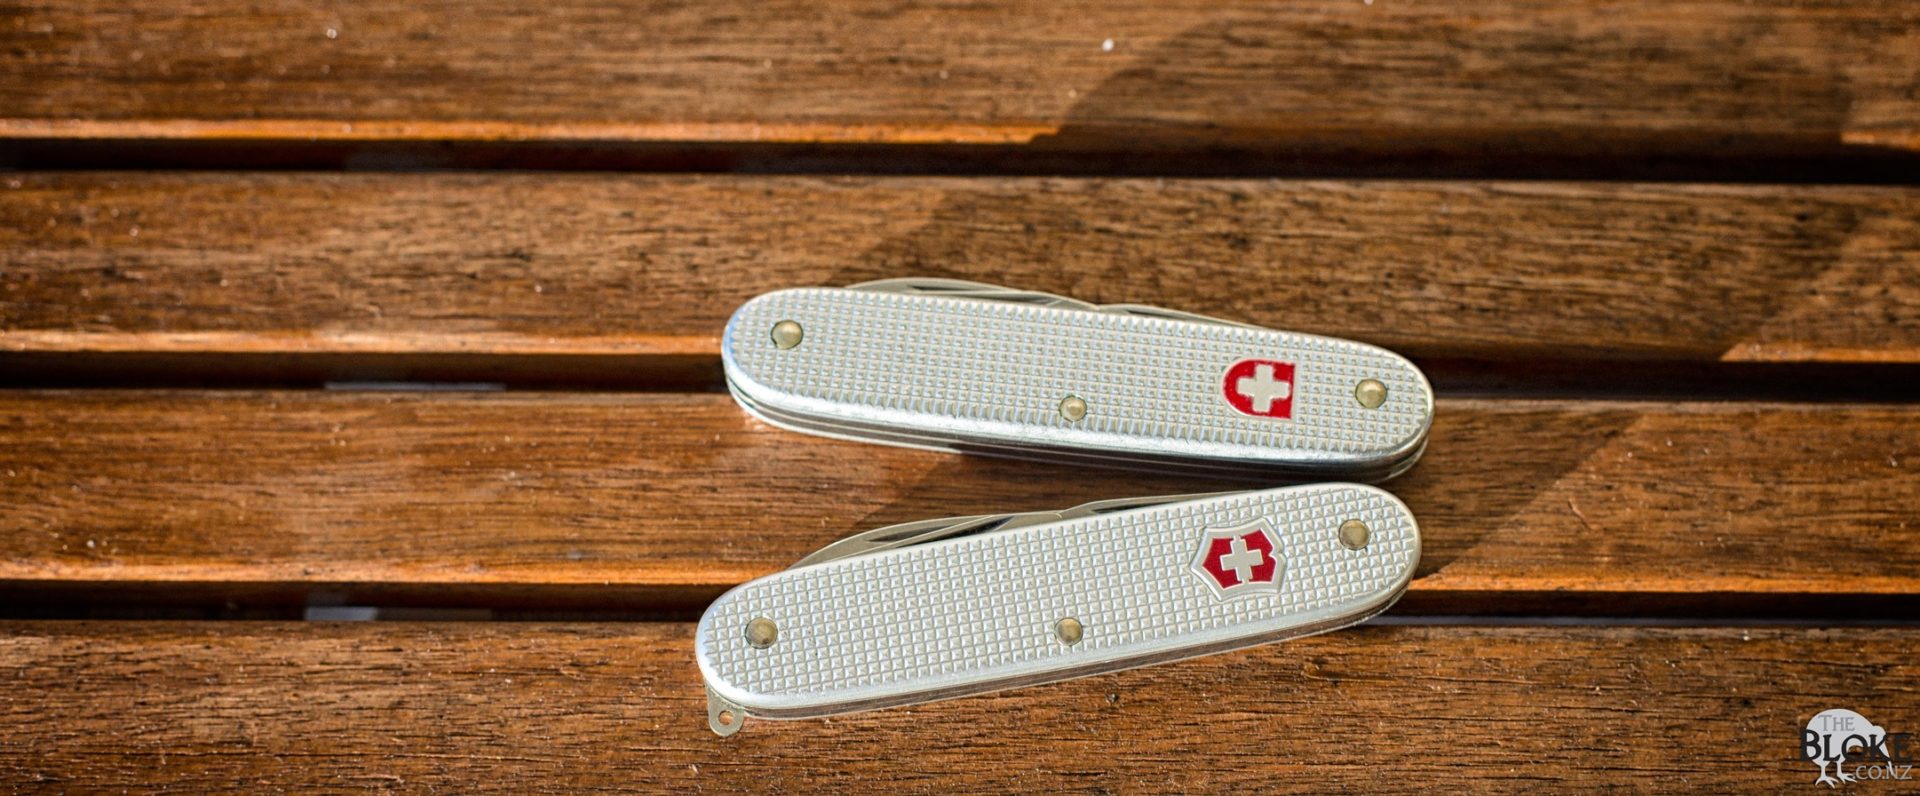
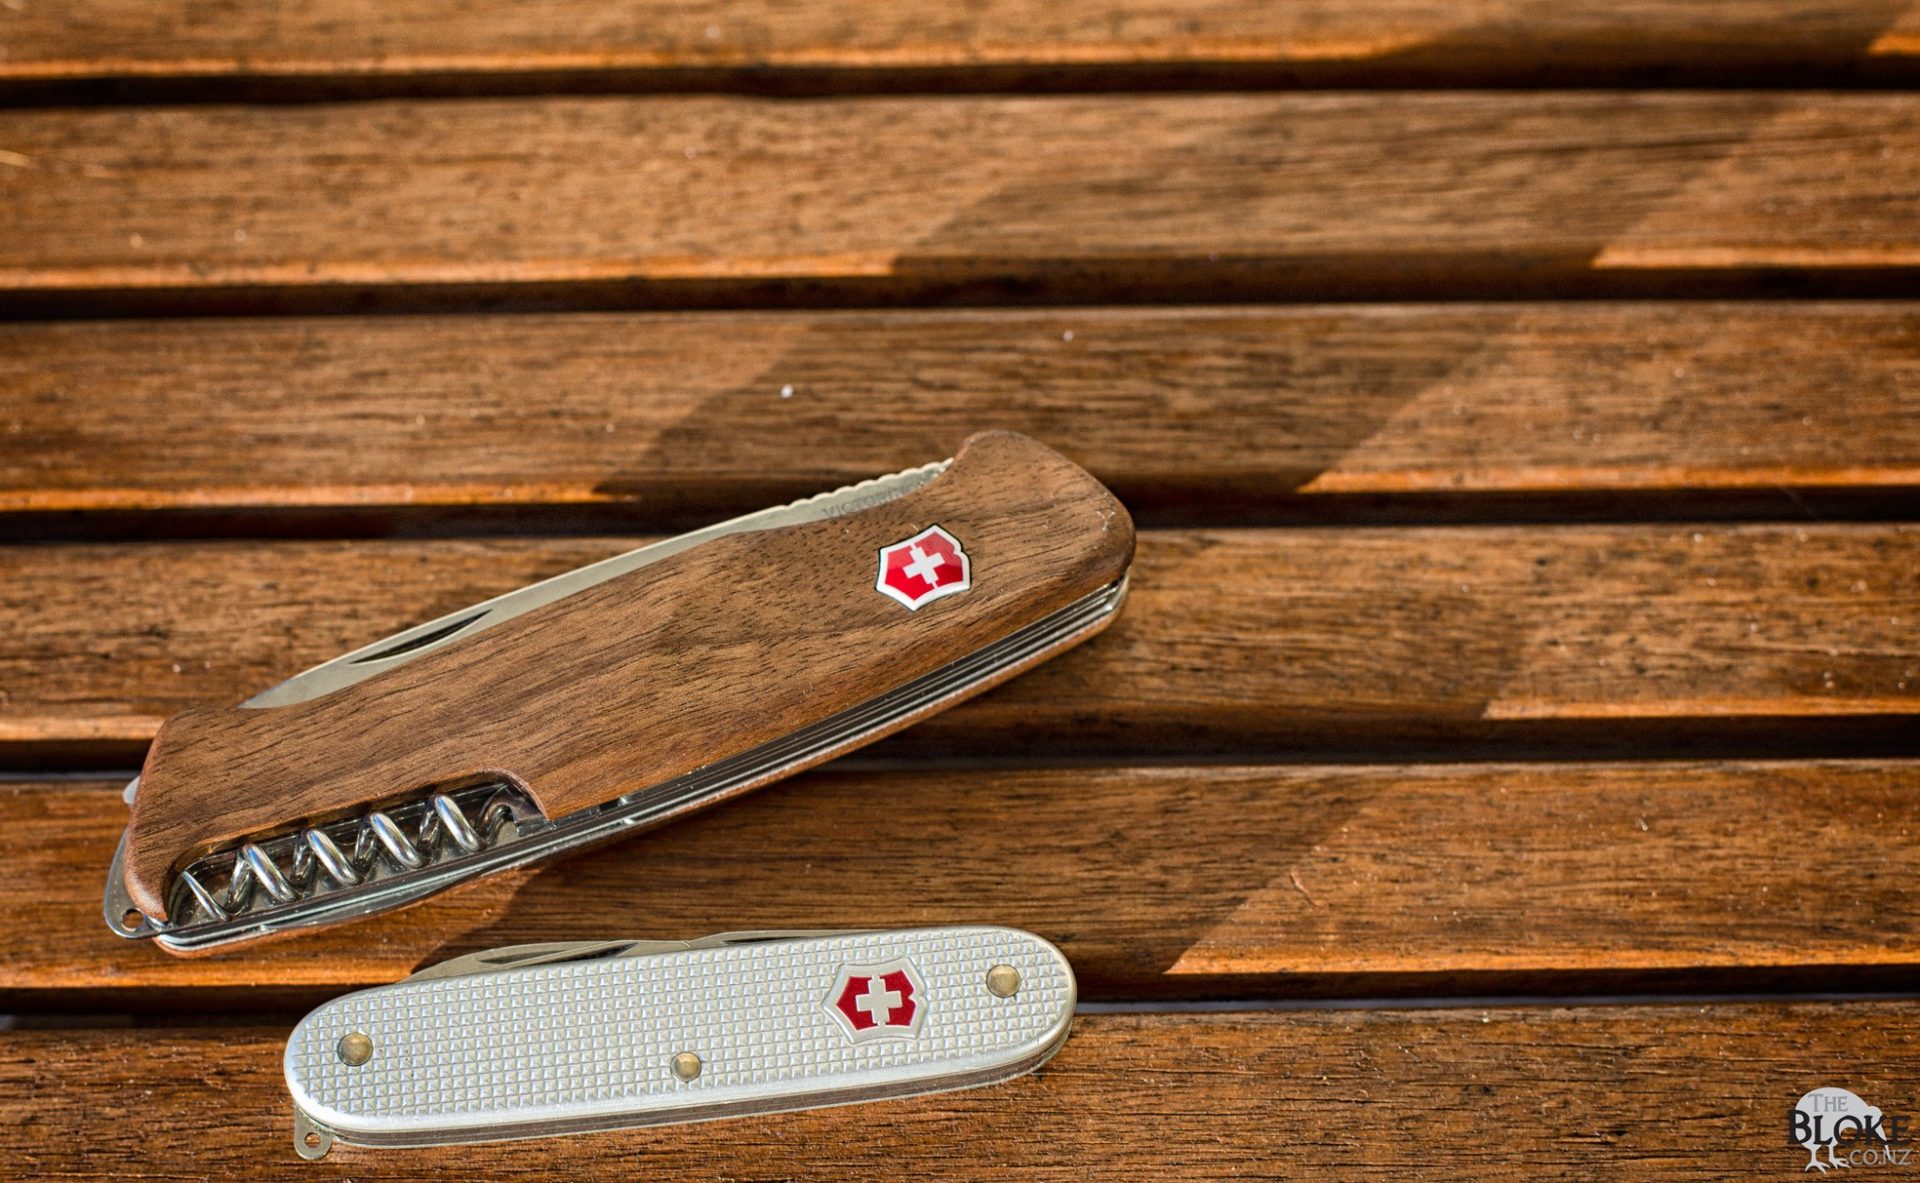
That’s my ‘lost’ pocketknife up the top there. A Victorinox Pioneer. Or so I thought.

We all will be familiar with some form of the SAK1. The red multifunction knives would boast every tool for every situation, all in one ready-to-go unit. I watched MacGyver, wanted one, had several as a kid, lost them, and wish I still had them now. As I grew older, I started to appreciate the stripped-back versions. I didn’t need a wood saw for most things, living in town. If I did – I had bigger, better, purpose-made saws to serve that purpose.

I found myself gravitating towards the above pocket knife. It became my EDC2 knife. The silver ‘checked’ scales and thinner profile worked better. Felt a little less MacGyver3

I have had this knife for close to eight years. Generally, if I am out and about, this is in my pocket. It is a small, unassuming, inoffensive, classic pocket knife. Carrying enough to cover 99% of all the needs I have for a pocket tool. There are four parts to it – a knife, a reamer or punch, a can opener and a bottle opener. Both the can and bottle opener also work as small flat-blade screwdrivers.

I haven’t used the wire stripper at all, but all the other tools have, at some point, come in useful to me.

To lock or to not?

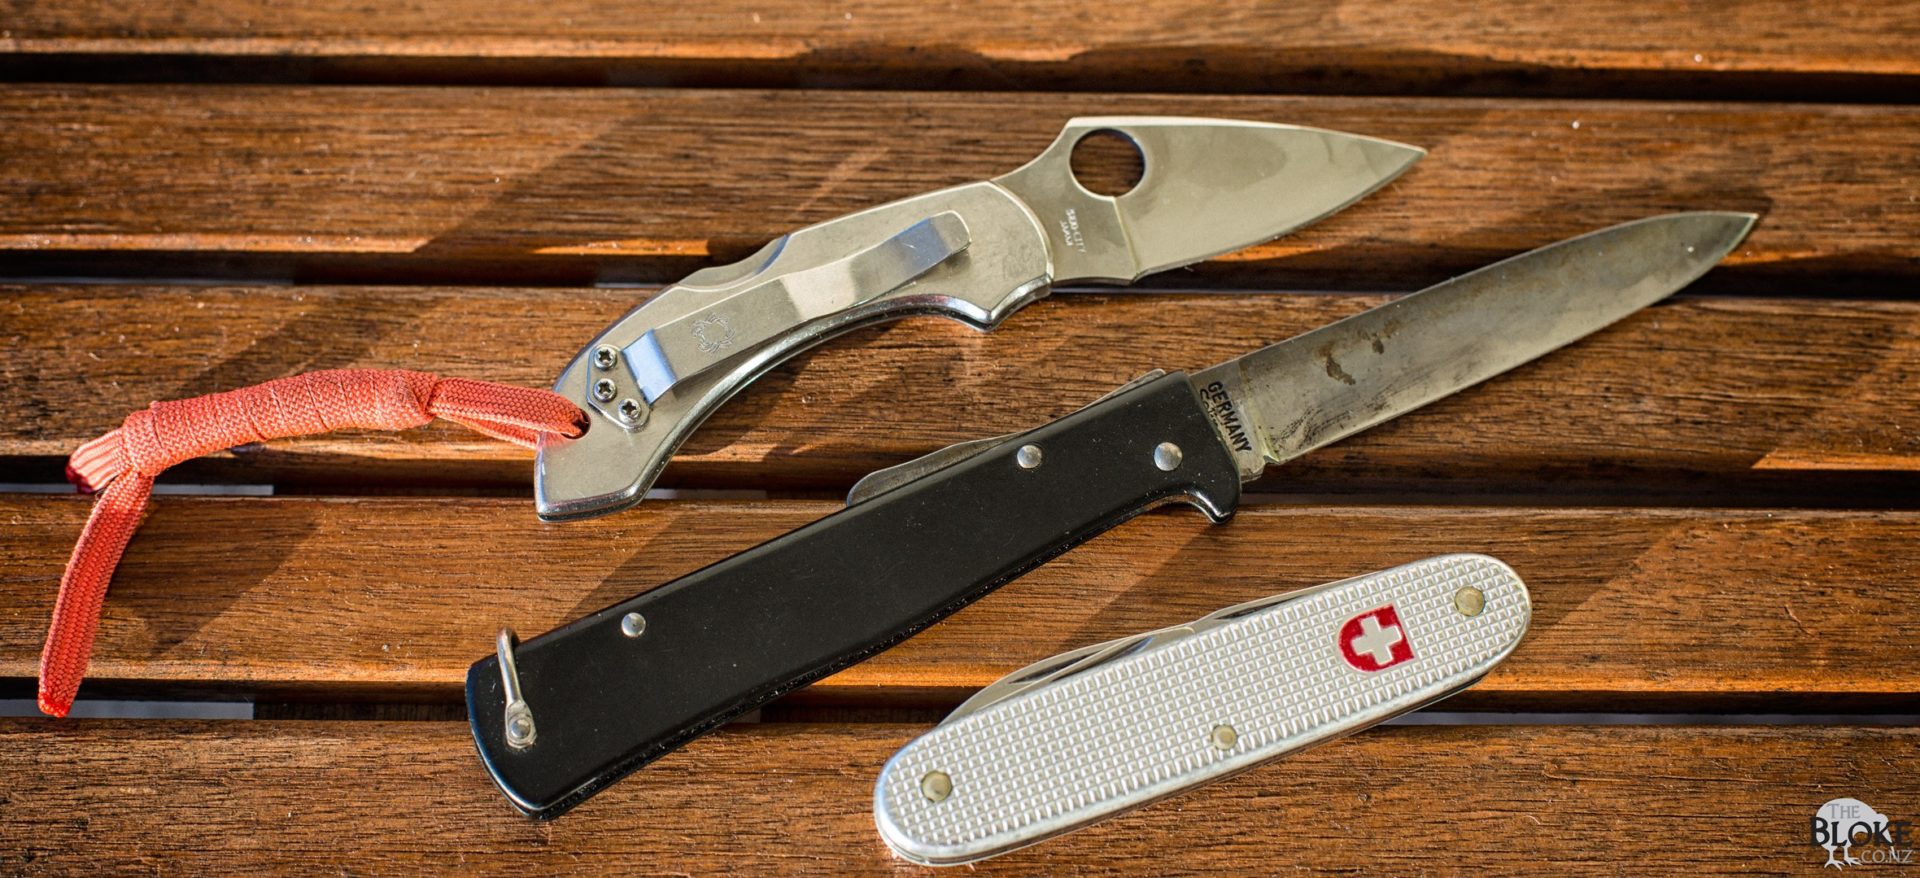
I have long gone between a smaller multi-purpose pocket knife and a larger single-bladed lock blade. Still, I will, depending on my mood, swap out the smaller knife for something like the Mercator. Sometimes, I carry the SAK in my pocket (week side pocket for some reason), and a Spyderco Dragonfly clipped onto my belt.

pocket knife options

For certain tasks, I still like the security of a locking blade. For the vast majority of what I use it for daily – it doesn’t matter.

It gets to the point where you are so used to having it in your pocket that the day you realise it isn’t there, things feel a little strange. As was the case recently when I noticed it had gone AWOL. After doing a thorough 4 check of all my pants, my dresser and normal EDC bags – I couldn’t find it.

Pioneer – or is it?

After a little pondering (about five minutes), I ordered another one. But I couldn’t. As far as I was aware – I was looking for a Pioneer. Looking on the Victorinox site, the form that I wanted wasn’t available – the Pioneer had a keyring hole on it!

Now, I realise this might sound like a trivial point. But if you don’t have it on your keys, why would you need a keyring hole? The whole idea of this SAK was minimalism. Having something extra on there didn’t appeal.

two great options for a pocket knife

I questioned the difference – and had pointed out to me that the Pioneer has always had a keyring hole. But there have been occasional other versions that didn’t.

I needed a new knife and figured I would learn to deal with it5. I ordered it and, at the same time, picked up a RangerWood 55. I liked the unit’s look – not as an EDC knife, but as a potential bridge between the Pioneer and my hunting knives. A little bigger, with a locking blade and a wood saw (that was big enough to be useful).

Research on variations

While I waited for the knives to turn up, I did a little research into what exactly the differing Pioneer versions were. As it happened (as is always the way), my original knife also turned up. So, I had my original to compare to and research. Down the rabbit hole, I went.

Like any iconic design – there is a massive online community based around the history and many variants of the SAK knife. I was soon reading forums and sites feeding me a lot of interesting info.

Not a Pioneer, after all

And lo and behold. I never had a Pioneer in the first place!

As it turns out, what I actually had was a Soldier 1961. A true ‘Swiss Army Knife’ in that this was the official design issued to the Swiss Army since 1962.

A couple of things were different from the new version I received. The logo wasn’t the Victorinox logo; it was the Swiss Army Logo. The knife itself had 08 stamped onto it (as it turns out, that is the year of manufacture). Finally, the scales were missing the blank, flat section that is on the new knife.

In fact, it turns out, the one I had must have been near the last ever made. The model got replaced in 2008 with a new knife; it had a keyring added to it and got renamed, you guessed it, the Pioneer. My 08 stamped knife was one of the last manufactured before the swapover.

So there you have it

If you have made it this far, well done! You must have as an inquisitive mind as mine!

I have ended up with both knives (not a bad thing) and a little bit more insight into the history of my old knife. I think I can remember where I got it from as well, so I am going to head back and see if they happen to have any new, ‘old stock’ still sitting around. I think it may be the case that what I have is the last of them. But you never know!

More reading

Soldier model 1961

http://www.sakwiki.com/tiki-index.php?page=Soldier+1961


  1. Swiss Army Knife 

  2. everyday carry 

  3. not hating on MacGyver though! 

  4. even more thorough than normal 

  5. oh, the problems! 

Lightweight Hunting: clothing

0

The final part in the series: part three – I discus the clothing I took out with me on my lightweight hunting trip.

Essentially, I was utilising Icebreaker Base Layers with Hunters Element on top.

I was trying out HE’s new Crucial Top – and was very pleased with the amount it breathed. Certainly – there was points where I would have had to take off other tops or jackets to vent heat – the the Icebreaker shirt, Prime Top and Crucial Top just seemed to be bang on when it came to the staying warm while stationary and not overheating while on the move. Very, very impressed with it.

I am thinking that in warmer times I might simply leave the merino shirt in the pack and that should be just right temp wise.

Overall, very pleased with the system – just need to remember to take my belt next time!

Lightweight hunting: system review intro

0

I managed to sneak a night out recently into the Kaimanawa forest.

With a little girl now refocusing my attention to home, it was good to head out for a night and spend some time in the bush. It also gave me a chance to try out an idea I have been kicking around for a while – ditching the traditional pack and ‘camp’ idea, and instead travelling lightweight enough that I could keep everything on me while I hunted and just set-up camp whenever it got to dark to stalk any more. As it turned out, it was also forecast to be a very cold night, so during the warmer months, I would be able to get away even lighter.

Lightweight hunting works for me. The confidence of knowing no-matter how far I wandered I had everything to remain comfortable overnight was comforting – and it certainly made it easier planning the stalk knowing I didn’t have to round trip at any point to get back to camp.

It also reinforced the importance of navigation skills. Once I realised that the Garmin simply wasn’t going to be of any help, I had to break out the map and compass, try and ascertain where I was (not easy when surrounded by trees) and plan a way back out. Simply put, I realised that no matter what, West would take me either to the road or too the main track, so west I went. In the end, I was a lot more north than I thought. No matter, a simple understanding of what the map was telling me, and being able to walk on a bearing soon got me back out.

Lightweight hunting as a concept. Yes. Could I shed even more weight? Yes. But it’s always a balance of comfort, safety and how much you are really wanting to carry.

Part one covers a bit of an intro, describing how major my Garmin Tactix failed me and covers some thoughts behind the trip out.

Part two is the gear, part three is the clothing.

Hunters Element Edge Pouches

0

As regulars to this site would know – I tend to think a lot about how I carry equipment around while in the bush. On every trip out, I have been trying to reduce weight and achieve the goal of being able to hunt while carrying everything I need on my back. The ability to stalk all day, then stop and set up camp whenever it suits, means a lot more flexibility in where you go and how you plan your trip. No need to head back to camp at the end of the day; no need to return to any centralised point.

So – in the quest to reduce and simplify, I got a couple of the Hunters Element Edge Pouches to play with.

Hunters-Element-Pouches-(1-of-11)

The Three Pouches

Hunters Element Edge Pouches

I had a particular plan for these – but wasn’t sure what I would need – so I got one of each.

You won’t fit a box of ammo in the small, the medium, one and nearly a second, and the large will take three – with space on top – I tried putting a fourth box in there, but it won’t zip closed at that point.

All the pouches have a mesh divider on the back face and sewn-in ammo holders.

Hunters-Element-Pouches-(5-of-11)

All are made out of the same material as the packs, the DRYstealth water-resistant material. So – not going to make too much sound when pushing through the bush.

They are all designed to be put onto a belt (generally a wide one) and have a decent amount of padding on the back where they will be pushing into your hip. Of course – I was never planning on using them as originally intended!

Replacing the Ribz

Now, those who know me, know I do love my Ribz Front Packs. In fact, I import and sell them over at the Gearlocker – however, never content – I was interested to know if I could get away with leaving it at home – considering I was now planning on carrying the pack with me at all times. The Ribz Pack weighs 315 grams – so it’s not that heavy – considering it gives me around 11 litres of storage, readily accessible. I think that was the main consideration – readily accessible. The one issue with just using a pack – I would have to stop to get things like the map, GPS and so on out of it. Sure, you can put them in a front pocket if you are wearing a jacket – but most of the time, I am in a long-sleeved shirt – not something that can carry a lot in it.

So, while the Boundary Pack I use has a front hip belt pocket on it – I was keen to increase the amount I could carry on my hips – in the hope, it would be enough to replace the front pack.

Hunters-Element-Pouches-(6-of-11)

So, only the large pack will fit over the hip belt. The medium is just going to be too tight. Not really an issue, though, as I quickly ascertained I would want to use the large pouch anyhow.

One of these is on each side, and I think I will be a long way towards enough storage. Map, compass, snacks – that’s all I need to have handy. It’s not a lot, but I don’t want to have to stop to get them.

Hunters-Element-Pouches-(8-of-11)

That’s the medium on the left, large on the right – the medium doesn’t slip back far enough to be usable. Initial impressions are that it won’t be sticking out too much on the sides – but it will take a couple of days of bush bashing to assess that.

Hunters-Element-Pouches-(9-of-11)

While playing around – I also found I could put the small pouch up on the shoulder straps. It sits up high – just below the collarbone – but could be another spot for a few small items. I initially thought the GPS – but I would prefer not to have it on the pack – just in the truly dire situation where I need to ditch it for some reason.

Realistically – I would now have a pile of unneeded padding going on – but it should achieve what I want it to do. Ideally, the bag would come like this – without the too-small to-be-a-useful pocket on the left and the (personally) useless rifle-carrying system on the right. Mount the pockets directly to the belt and make the pack that much more friendly to an overnight lightweight bush-stalking rig.

However, one little issue would remain. One of the awesome aspects of the RIBZ pack is the ability to be able to drop the main pack and still have the essentials on you. This certainly decreased as an issue as I have reduced the pack weight and made it viable always to carry the backpack anyhow – but I am still wary of having all the kit in the pack. I still liked the idea of at least having the basic survival essentials separate and on my person at all times.

It occurred to me that due to the low weight of the pack, I tend to lift the whole system up a bit higher – not needing to sit on my hips to transfer weight. Therefore, I have the trouser belt available underneath the hip belt of the pack.

Hunters-Element-Pouches-(10-of-11)

As it turns out, a simple solution – the small pouch will be enough to carry the PLB, compass and first aid/survival basics. It can live on the belt and will mean that those basics are right there when I need them. No. I won’t be wearing jeans out into the bush anytime soon. Cotton kills – remember?

Overall, while not made for it – it does look like the pouches will work. However, now I need to find a spare weekend where I can head out and test the theory!

Half Cock, just half assed?

0

For those who aren’t aware ‘half-cock’ in New Zealand refers to loading a round into the chamber then ‘half cocking’ the bolt open. On some rifles, there is a position between fully closed and open (bolt can slide back) where a detent will it will hold the rifle in a state of ‘semi-ready’.

This came about by it becoming ‘acceptable practise’ over the course of many years in New Zealand. There is nowhere else that I am aware of in the world that considers this good practice. For most, it is either closed and ready to shoot or empty.

The Enfield 303 (a popular rifle with Deer Cullers of old) was one of the few bolt rifles ever to have a true ‘half cock’. I suggest you have a read about it over here – does it sound like these guys would accept it as a ‘safe’ way to carry?

http://www.enfield-rifles.com/practiceatches_topic5893_page2.html

Regardless, when most people now talk about half cock, they mean half open – there is a round in the chamber and the bolt it backed off as another layer of protection.

Which is fine, if, as per the Arms Code / 7 Rules of Firearm safety you only load the firearm when ready to fire. If this is the case, then you are in an active, very aware state of firearm handling, about to aim and pull the trigger.

What the concern is, which to be totally honest, hadn’t even registered to me that people were doing – was walking around with a firearm in this state. Shouldered, for example.

To me, it comes down to this – your top priority has to be gun safety. If this means losing animals that surprise you and you don’t have a chance to chamber a round, then so be it.

In the first ‘version’ of the Arms Code, written in 1968 – we have this poem:

You may kill, or you may miss

But at all times think of this,

All the game ever bred,

Won’t repay for one man dead

Stay safe out there folks.

How do I renew my firearms license?

0

A person who is the holder of a firearms licence may, before the expiration of that firearms licence, apply for a new firearms licence.

Membership Required

You must be a member to access this content.

View Membership Levels

Already a member? Log in here

The Feldon Rooftop Tent has gone. Why?

0

I purchased the Feldon Crows nest in 2017. Like anything, this resulted from a long bout of researching and pondering how to solve a problem. In this case, a quick set-up, mobile shelter for trips by myself and with the family. By memory, I had not long had the Ford Explorer (everyone needs a V8…

Membership Required

You must be a member to access this content.

View Membership Levels

Already a member? Log in here

A day out in the 110…

0

Anyhow, we packed up the truck, grabbed some food, and headed out west, were most of our adventures for the day were based.

Club Grading

The first point of call was the grading day for the Land Rovers Owners Club of Auckland. This is a regular ‘audit’ of the club vehicles in regards to suitability to head out on club adventures.

I recently joined the club, because I figured it was a good way to find some adventures to go on, and, for me, its also a fact finding mission – as a group of fanatic owners, in person, in one place, is a wealth of knowledge, things tried (both good and bad) and a great way to sift through the piles of knowledge you can come across online.

I knew the major thing I need to get sorted out was recovery points for the new truck. From factory, in some ways, strangely, the Defenders don’t really feature solid enough points for a recovery – lash points, yes, snatch points? No.

So, I talked with the folks, and we now have a couple of options. Because the front of the truck already has a steering guard in place (of sorts), the standard Jate Rings quite possibly won’t fit into the factory spots. Which is a pain.

While I intend long term to replace the bumper on front with a winch bar and have the recovery points on there, I do need to get something done in the meantime. If I can find a slightly wider than normal Jate ring, we are all good. Mission on!

Longer Laders

We then made a quick detour over to the folks at Feldon Shelter – we have been running one of their rooftop tents for a couple of years now, and it’s awesome – but it’s been on the Ford Explorer – which is a lot shorter (like, a lot) – so the first time I set it up having moved it over, I was a little surprised to find that the ladder up to the tent wouldn’t even touch the ground!

A quick eMail, and an extension was sorted. Now it won’t be floating and not supporting the tent like it was!

Polaris 4WD Park

I had wanted to head out to the Polaris 4WD Park for a bit – I had actually been out previously – but managed to get the opening dates wrong – so, having double checked on the website that it was open, that was our final destination.

After a quick stop in to see Roger and crew (I have to assume that is your twin Roger!) we had our map (quickly seconded by my 3 year old) and we were off.

This Park, really is a park – it’s a lot larger than I realised. Nestled in the heart of the Woodhill forest, it really is a 4wd playground.

I really wasn’t sure what to expect. And was impressed. It’s not just a drive down a dirt road, so don’t take anything that doesn’t have some decent clearance – but – at the same time, the tracks are clear enough that, unless you really do something stupid (just take your time) – you won’t get stuck on the main tracks – and – have a great adventure as the same time.

I do admit, I got a little lost – I think partly because I didn’t quite understand how the park and the supplied map was laid out. I will head back soon, with mapping software in hand (or on app at least) and see if I cant make things clearer – for both myself and any of you folk headed in there.

If you want to really see what your 4WD will do – there are many different grades of track available – and along with trucks, or all types, there were a couple of side by sides and some very modified trucks. Several petrol Landies with a distinct lack of mufflers were also there!

There is dirt, forest, mud, sand, some man-made challenges – a bit of everything. We spend around three hours there, and I don’t feel we explored even half of the park. I also note they do some night driving – which would also be a lot of fun.

We drove a bit, stopped, snacked, drove some more, had lunch, it was a good day out. I can imagine, especially if there were a couple of trucks and a couple of radios, that it would be even more fun.

I will be back, with a couple of cameras, and my tour guide voice at the ready I think!

And here it is. The Defender TD5 110

0

I have been looking online for one of these for quite a few years now, and, seeing the pricing on them seemed to be getting more and more ridiculous1 – we bit the bullet and grabbed one.

By why a Defender? It’s old, clunky, square, leaks, drips oil and seems to be a really expensive vehicle for the money.

Well. Yeah. I suppose.

It’s also Iconic, well documented, well resourced in regards to parts and modifications, easy to work on, and well, a hell of a lot of fun to drive! Besides that, ever since I had my Stage One, I have wanted another. Despite that project being somewhat of an absolute nightmare – it got under my skin. The boxiness of the design, the clunkiness and single purpose-ness of the vehicle, the smell!

The Development of a Name

The Defender was the ‘evolution’ of the Series range from Land Rover, with the Stage One, well, being the stage between the two. Starting to roll out in 1983, the Defender design changed very little, right up until the last unit rolled off the production line in 2016. It wasn’t called the Defender until 1990, where the introduction of the ‘Discovery’ Series necessitated a new name for what had previously been known as the Land Rover 90 and Land Rover 110.

There have been engine changes, a few things in regards to suspension and certainly some improvements in the electronics2 – but the design has remained fundamentally the same. Many of the parts are still totally interchangeable, regardless of the year of manufacture, and that, in some ways is one of the great charms of the Defender series. When I hopped into the 2001 110, it really was just like jumping in the 1984 Stage One I had previously owned. The seating position was the same, the dash was the same, the boat-sized turning circle? Just the same.

But, why?

Well, apart from a standing answer of, why not? We had our eye on a Defender, specifically a 110 for another simple reason – the Feldon Rooftop Tent.

We had already grabbed one of their tents, and it was living on top of the Ford Explorer – and we loved it. It was quick to set up, the kids considered it their own mobile tree hut, but, we were aware, that, as kids do, they were getting bigger, and the initial plan of having Alice (my partner) and the two kids in one tent, with me in a bivvy on the ground, was going to have a limited lifespan. It’s hard to sleep with two pairs of feet kicking you all night long.

So, with the intent of putting two tents onto a truck, the options became very limited. As it is, the Feldon Tents have basically been designed and are manufactured by a couple of Defender nuts, so it’s one of the few vehicles that happily sit two tents on top of it.

The intention is to set it up as a travel and exploration vehicle to take the two girls around the country in. The eventual goal is a decent wack of time exploring the South Island.

I did it many, many moons ago with my parents – and I have always wanted to take the kids on a similar trip. Though, we intend to go a little further backcountry!

The Plans

All of them.

While this isn’t meant to be a trails, or travelling across Africa for months type of vehicle – there is a lot I want to do to it over the next couple of years – yup – it’s going to be a slow burner of a project (money) – but keen to fit it out with the dual-battery-fridge-lights-winch etc setup.

However, just going to do it one step at a time, to also ensure that it ends up setup how I want it. More than once (and I am sure I will do it again) I have done modifications to things, only to realise that in a practical sense, I work a different way.


  1. it’s us Aucklanders buying them for latte runs, apparently 

  2. though some would no doubt argue that 

A trip to Hot Water Beach in the Defender

0

Setup, setoff…

It has also become (recently) a good opportunity to test out a few bits and pieces in regards to using the new Defender for camping with the kids – while we aim to be self-sufficient, it’s nice to know that there are all the facilities still around should you need them.

First of all, though, I needed to add an extension to the Feldon Rooftop Shelter – as previously it had sat on the Ford Explorer, which is a good half a meter shorter than the 110 when it comes to tent height. After some horribly drilled holes (and a bit of Dremel work to fix it) the extension slid on and we packed the truck and were off.

Sleeping Setups

Basically, at the moment – the setup works like this – Alice and the two kids sleep in the Feldon on the truck, and I sleep, well, somewhere else. For the first night, it was in a bivy bag on a Thermarest NeoAir – which – while lightweight, wasn’t that comfortable. Acceptable when backpacking into the middle of nowhere and not wanting to carry extra weight. Not so much when right next to a truck that could have carried an airbed instead.

The problem with the Thermarest is that, unless you are lying straight on your back, you tend to sink down into the ground. Sleeping on the side (for me) results in my hip just sitting on the ground. Not painful, but uncomfortable enough that I need to rotate around every hour or so – meaning I wake up, move, go back to sleep. In the morning, I also end up with a stiff and sore back (though, that could also just be me getting old!).

Night two, and I decided to go back to old faithful – the Warbonnet Hammock. I have slept many a night in the bush in this, and have the system pretty much sorted. Underquilt and overquilt (though this time I just had the heavier sleeping bag), nice and warm, nice and snug.

I simply slung it up in a couple of trees behind the campsite, didn’t even bother with the tarp over the top, and woke up the next morning, without the backache and without even any condensation on me or the rig. Win!

Camp Cooking

While there are full kitchen facilities at the camp, I wanted to try and do as much as we could by ourselves – after all – the long-term plan is to be heading remote, not holiday parks with this rig.

While eventually, we may have a fancy, pullout camping kitchen in the back of the truck, for now, the Katmandu Retreat Kitchen Unit works well for us. I picked up some non-slip pads when we got back, and, will likely look to get a double burner stovetop sometime soon, but all in all, it worked well.

Pancakes are a family favourite – but – I think I will just use a couple of ‘gym’ shaker bottles next time to help get rid of some of the flour lumps – realistically though, enough maple syrup and no one complains.

Coffee wise – I took the Aeropress and the Clever Dripper, and simply ground enough beans for a couple of days. Sure, grinding on site would mean better coffee – but it’s a case of weighing up convenience verse a slight, and ultimately, not that important improvement while camping. If I can find a good 12v grinder I might use it – but suppose I need to weight up using a proper grind vs. a fresh grind. Could be an interesting experiment I suppose. Though, long term an invertor is on the cards anyhow. Though, not planning on taking the heavy home grinder, ever.

Ultimately, it was a great getaway, with some good friends, good food and good company. A long list of things to add and change, but that’s the point of actually getting out and doing it, isn’t it!