Home Blog Page 39

Range Day – March 7th

0

As it turned out…

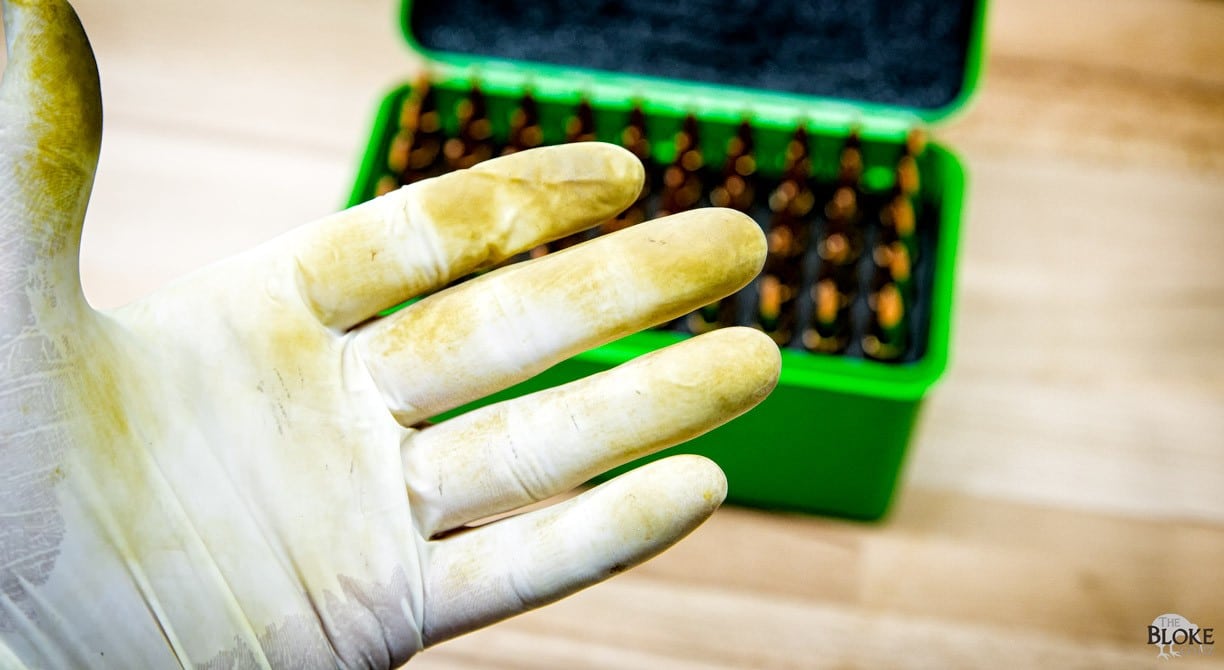
I ended up with around 100 rounds of 7mm08 and .308 to put down range over the weekend. Got to be happy with that.

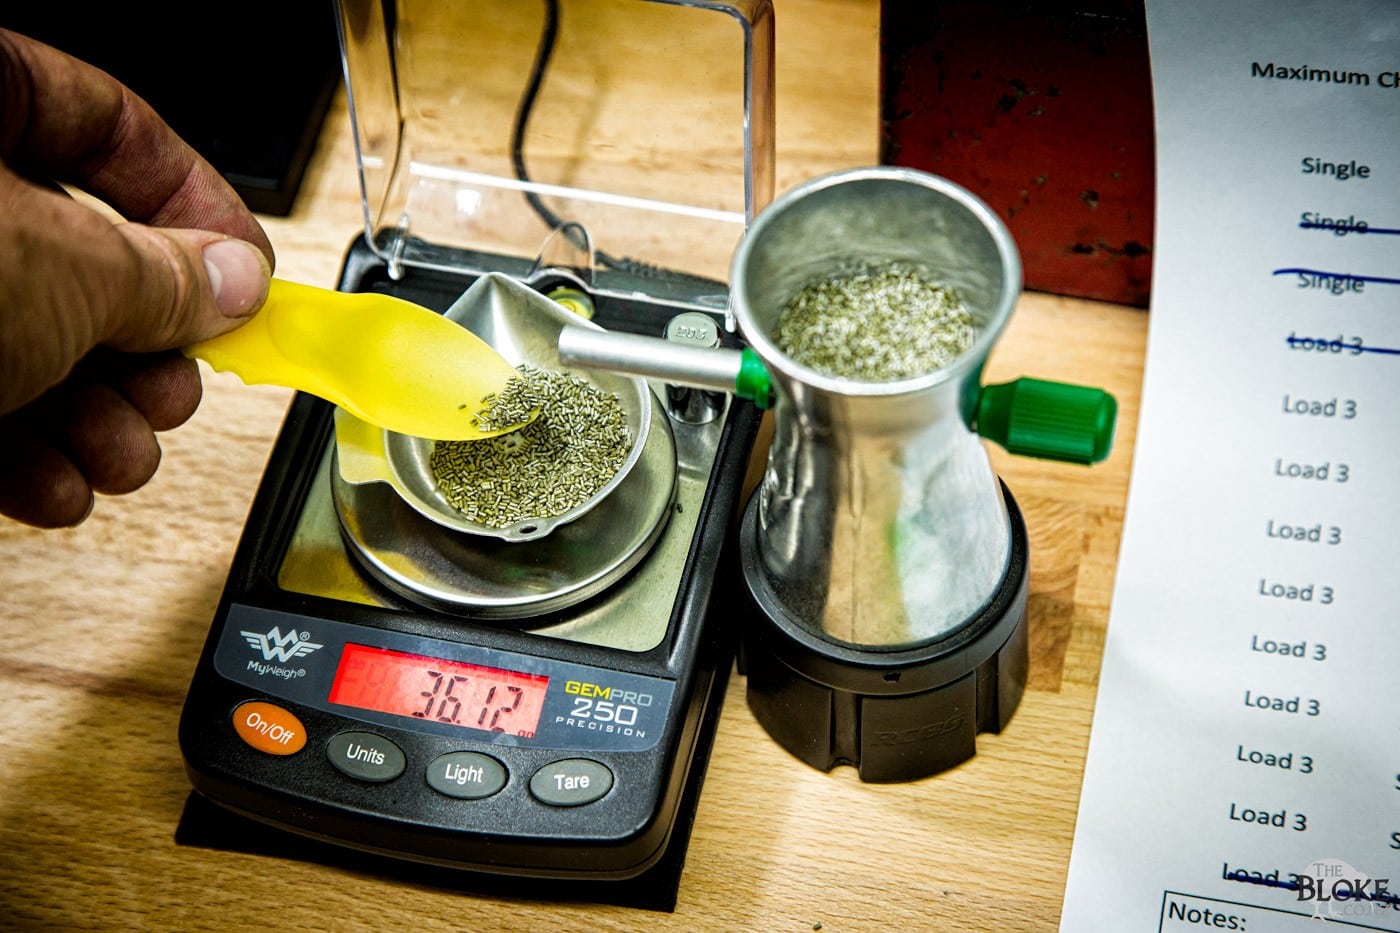
It was a combination of load development with the X-Bolt, and sighting in and fireforming with the 700.

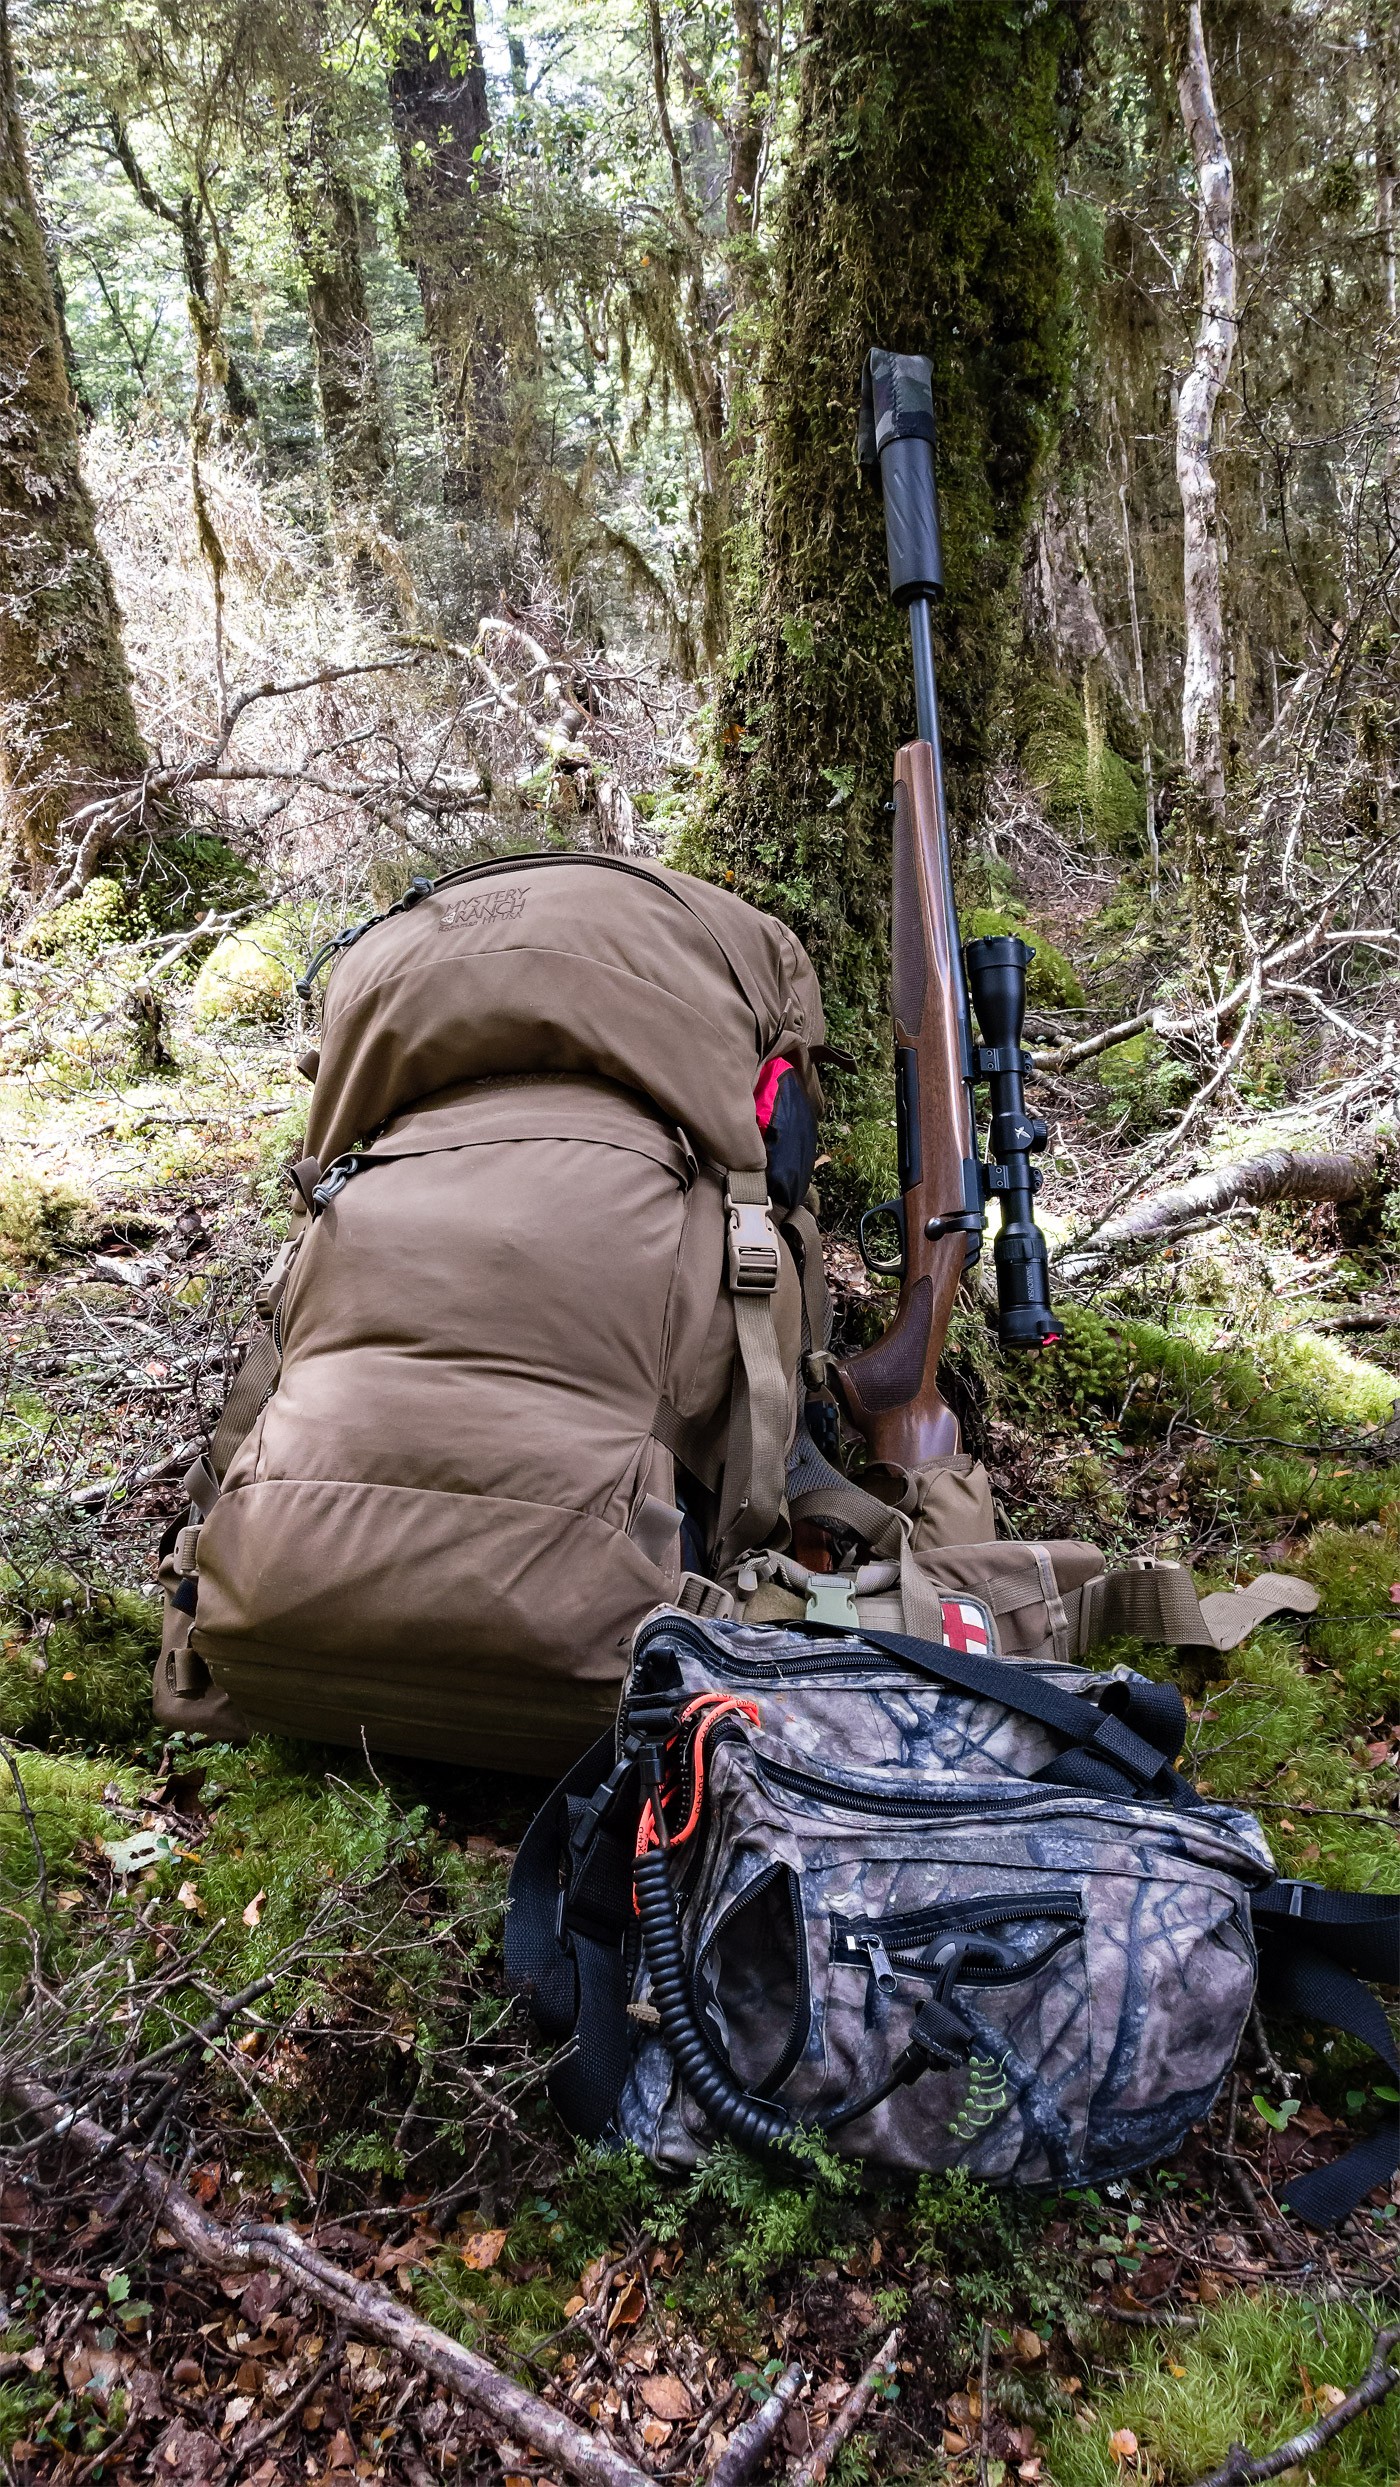
I knew I was in it for the long haul, so headed off to the 25 meter to start by sighting in the new Vortex Razor HD 4.5-27 on my 700 build.

“My first concern was fitting the bell of the Vortex under the barriers in the 25-meter range..”

Too much scope for so little range

As it turned out, I had two slight problems bore-sighting the scope – firstly, the 25m meter range at the North Auckland Deerstalkers has a barrier above the firing point – enough to normally fire through – not necessarily with a massive scope mounted high up on the action. I have it down as low it will do anyhow – but the combination meant the top of the scope wouldn’t fit under the barrier and ended up just over the bottom edge. It didn’t really cause any issues as I only needed to see the centre of the target anyhow – the shadow was hardly noticeable.

The second minor issue was parallax adjustment – basically, the scope can’t focus that close. Again, not critical really. After a bit of amusement, I lined up the bore and the optics, put a couple of rounds close enough to centre on the paper and shifted to the 100-meter range.

“I do quite like to idea of being forced to break and rebuild your shooting position repeatedly.”

Cyclic shooting

I should point out – having two firearms at the firing line is not something that is generally encouraged by the club. Unless you have a good reason for doing so, leave the second in the vehicle and bring it out when ready to shoot. In my case, I was OCW testing with the X-Bolt, letting the thin barrel cool in between shoots, and primarily shooting with the 700. I was probably shooting in a ratio of 1 to 5 – with regular breaks to stretch the legs and think about what was happening with my shooting.

I do quite like to idea of being forced to break and rebuilt your shooting position repeatedly. For hunting or practical target shooting – you do not get to sit in the same position for any real length of time – unlike Olympic Shooting you need to build and execute the shoot with a bit of pace. In addition, the repetition allows you to evaluate and correct any issues you might be having.

An issue I have

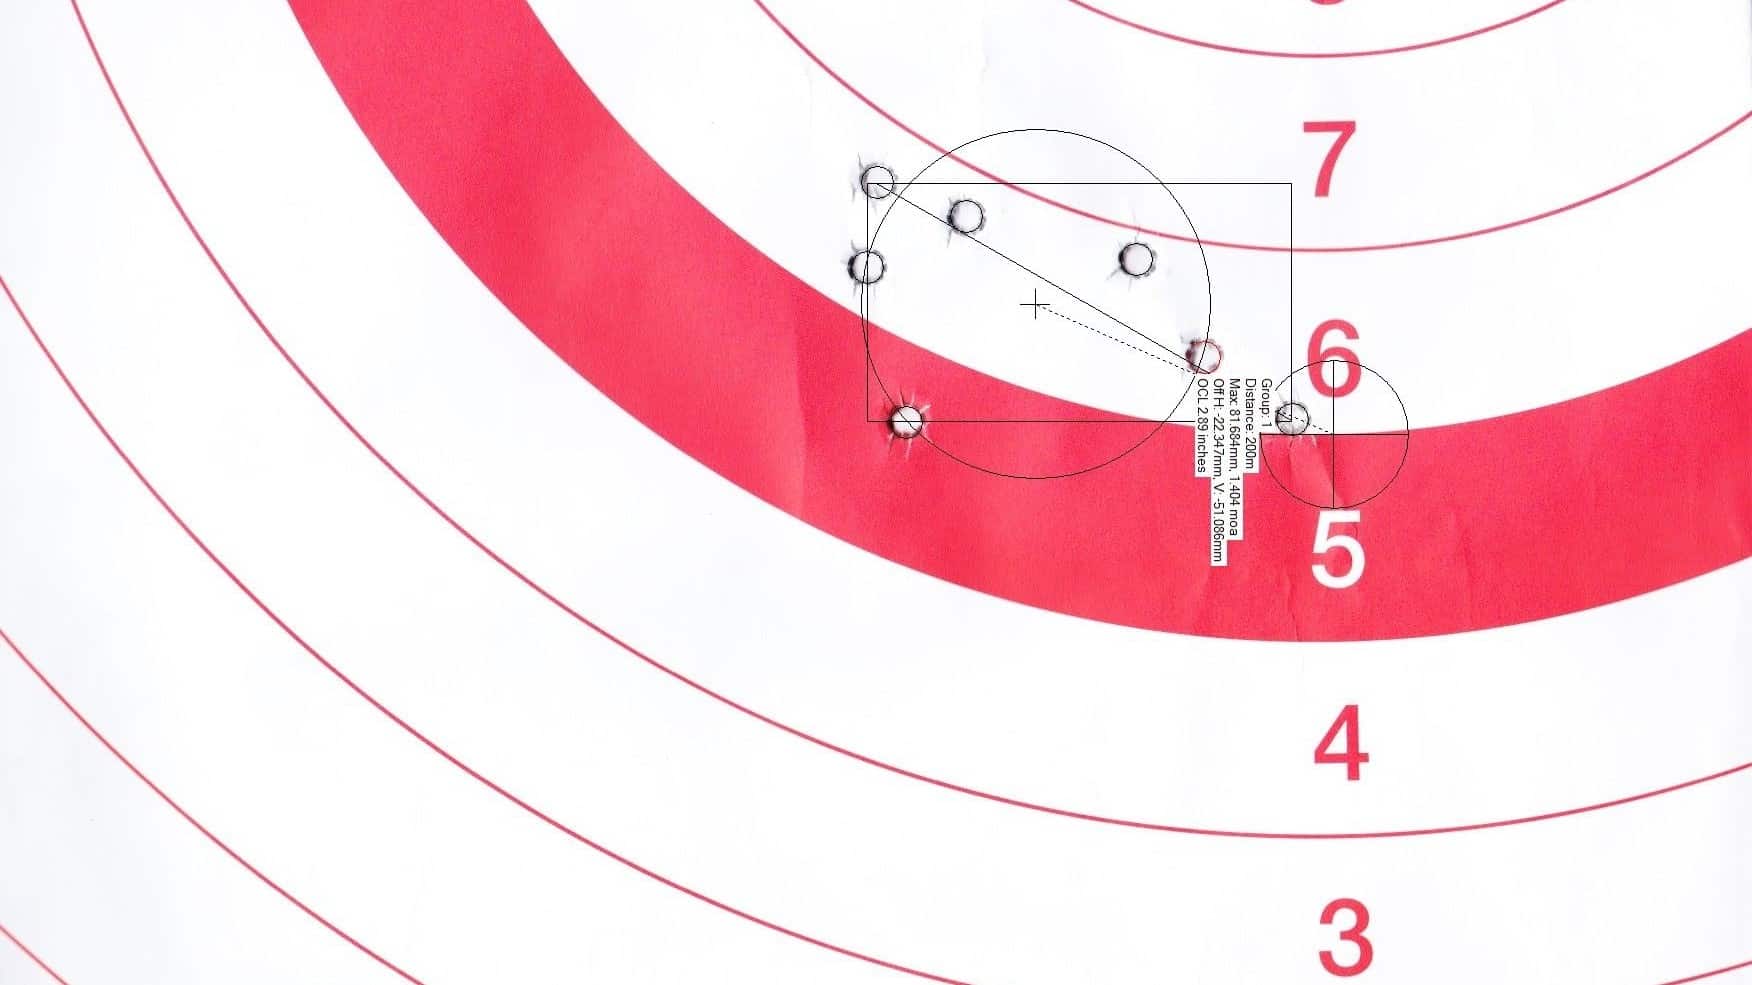
I am still having a little trouble getting square behind the rifle.

I tend to follow the train of thought that suggests getting square behind the rifle helps mitigate the effects of recoil and lets you stay on target during follow through – my long-term goal being able to see the bullet impact through my own scope.

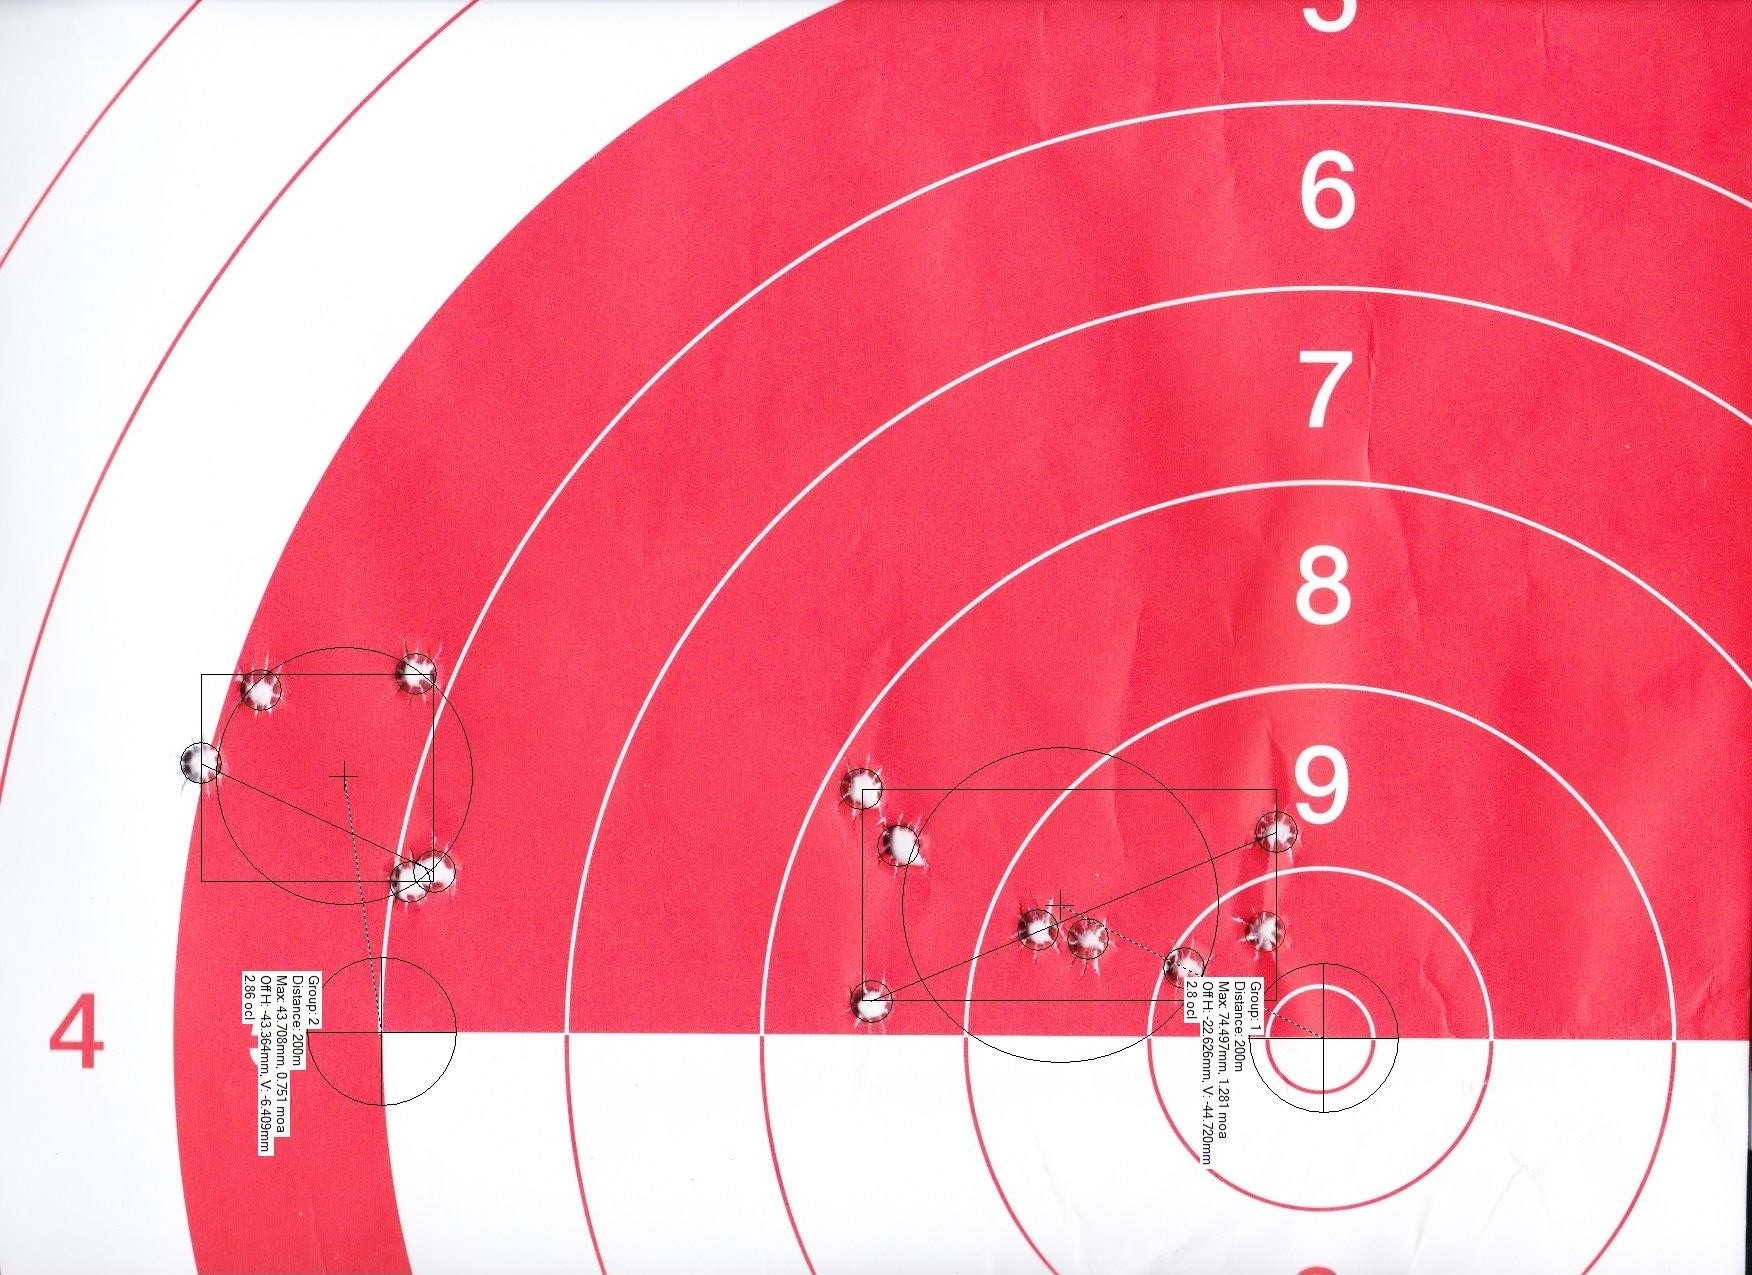
However, essentially I believe, due to a length of stock that is a bit short for me, I tend to have to crane around the rifle to get comfortable. This puts my left1 shoulder back. I pull the trigger, the shoulder, already in a weakened position, ends up shifting back, and the rifle ends up going up and to the right. The string of fire and where the scope ends up both seem to confirm this.

The obvious solution is to either extend the butt length with an insert, though I am also going to see if I can find a comfortable position on the rifle and see if I can get the scope to fit. One of the easiest feedback mechanisms I can think of is putting the GoPro up and behind me and essentially be able to watch myself get into a shooting position and adjust until I am correctly behind the rifle. Then, and only then, look to adjust the optics to suit the proper position.

Groupings

On the whole, though, I am very happy with how things are going with the rifles. I can see some good areas to further develop on the 7mm08 and even though I was essentially shooting some ‘out of the book’ fireform loads for the .308, it seems to already be grouping well for something with no load development time put into it.

At the end of the day, I had a decent Sunburn going on, and a pile more time behind the rifle – which is as important as the rifle itself.


  1. I am shooting left handed 

Range Day Prep.

0

Preparing for the next range day.

“Ultimately, it’s a hunting rifle – so ‘minute of deer’ is all I need”


New primers, new load development.

I was quite surprised on a recent range trip to discover how much changing a primer brand effected the load in the rifle. What had been a mild load in the 7mm08 X-Bolt was now showing signs of over pressure1.

I had decided to switch to the Federal 210M Primers for my rifle loads – as previously mentioned, the CCI primers had given me a high failure to ignite rate – may be due to a light striking pin – and the idea of a more consistent build appealed to me.

As a result, I am going to start from scratch and work up the load again. Remembering that the X-Bolt seems to shoot even the worst of loads well, it’s more a case of me tinkering to see what I can get out of the rifle. Ultimately, it’s a hunting rifle – so ‘minute of deer’ is all I need – and as I generally bush stalk – we are talking about 75 meters distance max.

Opening up my Excel spreadsheet – I used my previous ideal load at the basis and proceeded to load up a box of rounds to try out.

“There is still a bit of contention as to which method is more accurate.”

Fireforming, Neck Sizing, Full Length Resizing.

There are two primary ways to resize fired brass for reloading. Like so many things, there is still a bit of contention as to which method is more accurate. What method you take is going to depend on your ultimate goal, or at least, your focus at that point in time.

In short, fireforming causes the brass to take on the shape of your chamber. Brass, when heated2 ‘flows’ – it expands. By then taking that brass and only neck sizing in the future, the theory is that it increases brass life3 and the brass fitting the chamber means more accuracy.

The counter argument by some benchrest shooters is that by full length sizing each time, you ensure conformity of the brass which ensures consistency. Besides, they say – who say’s your chamber is perfectly round? Do you then make sure you load the brass the same way each time?

For my Remington Project I have decided to fireform and neck size only. At the moment, the tiny amount of accuracy I may get out of full length resizing isn’t going to be my limiting factor. My shooting is. Once I feel that I could eek out that little closer grouping – I may switch to Full Length.

Fireforming Loads

You don’t want to be trying to do load development while fireforming your brass. Once the brass is in it’s ‘final’ shape – then start worrying about getting the right amount of powder in there.

Many people will use some cheap bullets and cheap powder, I have even read of some guys fireforming without a projectile at all – essentially putting in a wad and forming the shells in the garage!4 Probablly not for me at the moment, so I used what I had on hand.

Instead of buying sacrificial bullets, I loaded it up with the Lapua Scenars and the minimum load recommended for the ADI 8208 powder, out of the ADI manual.

Next weekend will be spent practising my shooting fundamentals, while not worrying too much about how the target is looking.

Aiming for consistency

Consistency means repeatability, repeatability means you can take the equipment out of the equation and focus on what’s going to be the biggest factor in your shooting – yourself.

For my .308 700 project I decided to go with the Wilson Dies. Reading up online, it seems a lot of the Benchrest community like the Wilson Dies for their simplicity. They are well engineered pieces of steel that can’t move much and therefore lend themselves to producing consistent loads.

I had already neck sized and prepared the brass previously, so it was just a case of filling with powder and putting in a projectile.

Kiwifruit Measuring Devices.

After reading Nathan Fosters awesome bookThe Practical Guide to Reloading‘ I also realised I was probably overthinking my powder measuring. For rifle, I measure each charge. This means, really, I can skip the powder chucker completely and just use a spoon to transfer powder onto the scales.

Nathan talks of the importance of finding just the right spoon for the job. My current contender is one of the spoons out of a box of Kiwifruit. I like the weight, and should I need to – I may be able to defend myself from an unexpected zombie attack with the serrated edge on the rear side.

Ready to go

I have a box for the X-Bolt and a box for the 700. Good to go.

It’s going to be a busy weekend! The 700 has a new scope on it, so I will be zeroing that in as well and the Magnetospeed has turned up – so will also be having a play with that. I don’t really have anything I ‘seriously’ need to measure this weekend. But will plug it in and have a play anyhow.


  1. mild, but still the beginnings 

  2. like during a controlled explosion 

  3. you don’t have to work it as much 

  4. http://bulletin.accurateshooter.com/2012/02/tech-tip-fire-forming-with-pistol-powder/ 

Training for the Hunt

0

Well – the Roar comes around again.

While I don’t necessarily consider the roar to be ‘peak season’ for my hunting – in fact, there are a few good reasons to stay away from public land during this time of year – it’s also a good time to revamp the related fitness regime.

While it certainly is possible to simply head out on the weekend – for some of us1 out level of fitness is going to be what holds us back from really getting the most out of our time in the bush.

While some of us are active enough in our day jobs to maintain a decent level of fitness, for those of us who aren’t2 we need to devise a method of keeping our bodies ready to provide the levels of strength and endurance required for a hunter.

This is required for functional reasons (so you can carry anything you shoot out), enjoyment reasons (if you are in pain climbing that hill, you won’t enjoy yourself) and safety reasons (incase you need to carry yourself out, and heart attacks are never fun).

For me, I have an additional motivation – as I qualify to become an active LandSAR member – I want to make sure I have the required levels of fitness to get out there and be a help should I be called on. Ruining yourself through fatigue while out in the bush looking for someone else and requiring rescue or even just being a drain on the team, isn’t really an option.

 I am a big proponent of functional training – doing the same movements and exercise you will during the actual activity you are training for. Really, for a large part in the case of hunting, this means humping a pack around.

So, I have started putting on the pack and heading around the block in the mornings. Currently the pack weighs 25kg and I take that for a 5 km stroll every other morning – this takes just under an hour. Where I can, I walk off the asphalt, which, being in Mt Albert, means I go walking around Western Springs, trying not to get attacked by those overly aggressive Swans.

25kg of sand.

This isn’t going to set any records. That’s not the plan. The plan is to progressively increase the weight on my back. I intend to end up with a weight way beyond what I ever plan on humping in (or out) when actually out in the bush.

The other advantage of doing this, is you very quickly start to identify the strengths and weaknesses of your carry system. Some packs work well with moderate loads, but crap out on you when filled with a heavy load, other packs just seem to take more and more weight without ‘seeming’ to have a whole lot more in them once on your back. It gives you time to learn how to pack your pack right and importantly, how to wear your pack right.

This is basically my ‘cardiovascular’ training. The plan is to increase weight and increase pace. If I am not sweating a lot at the end of it, then one (or both) factors need to be increased.

I will be doing a bit more at the gym – but more as a warmup before strength training.

Strength Training

To supplement / compliment the pack walks I head to the gym. I am luck enough to have a gym literally within sixty seconds of where I work. So it’s a resource well worth utlising.

I have a simple, but varied workout. 3 routines that I cycle on a Monday and Wednesday, with Friday being a class put on by an ex Navy-PT instructor. It’s a brutal end to the week, guaranteed.

My weights routine again focuses on the functional – large muscle groups, big movements. Lots of Legs. Squats, Lunges, Farmers Walk, lots of things to build up those mobility devices. In addition, deadlifts, planks, bench – all tried and tested exercises to hit large areas of muscle, stimulate strength increases and increase endurance.  The other exercise I tend to throw in there is forearm curls. Basically, carrying around a rifle all day can take it out on the arms. Especially when I carry it primary in a two handed ready position (I was taught not to use a sling – rifle – in hands, all times).

Sets/Reps? Well, I am not trying to bodybuild, nor strip-fat, nor really gain muscle mass – I want endurance and strength. Generally, high reps, though, I tend to up the weight and drop the reps for the last set. Just because.

Do I need a program?

Well. You need a plan. I don’t personally think you need to measure everything, record everything and program everything down to the last detail. I just want to increase my overall fitness. I do track the amount of weight I lift – so that I don’t have to figure it out every time I go to the gym. For that I use an app called JEFIT on the iPhone. I am sure you can do a lot more with the app than I use it for – but I really am not interested in sharing my workouts, tracking my measurements or showing off how much I can lift. I really, really don’t care what you bench, bro. I do care with how far and how far I can carry a fully packed backpack in shitty terrain.


  1. by that I mean people like me who have desk jobs 

  2. desk jockey / weekend warriors like myself 

Range Day – 1st Febuary

0

Range Day

200m Zeroing and fun with primers.

3

I am heading away this weekend – so it was time to confirm my zero.

Zero’s can, and do change. A good knock while cleaning or taking the rifle out of the safe1 can alter your zero. In my case, I had transferred the scope over to the 700 build, swapped it back, but just wasn’t 100% certain it was on. In addition, I wanted to play with differing OCL2 for my hunting load, and thought it would be a good opportunity to get down to the range for a shoot.

OCL Play

First of all – this is a hunting rifle – it’s currently shooting at close to 1 moa – myself probably being the limiting factor. I want a load that is reliable in varied situations and will simply put down whatever it is that I shoot.

However, I am always one to tweak things – so I figured I might as well see if I could further tweak my load by playing around a bit with OCL. The magazine length limits me to 2.89 inches – so ended up building 3 loads – 2.80, the SAAMI standard, 2.86 and 2.89 overall lengths. This is still short from pushing the projectile into the lands3 – but I won’t single load this rifle, so it doesn’t really matter.

Short version – the 2.86 OCL seems very minutely smaller – but it could as much be my shooting as the OCL itself – so it’s not something I am going to panic about. I am sure as I shoot more, these things will become more and more relevant.

1 and 2

OnTarget TDS and Zeroing

I use some software called OnTarget TDS to record my shooting. I have covered it before on the site.

What is basically let me do on the weekend, was zero my rifle based on a ‘group’ of 20 shots, not 3 or even 5. To me, it makes sense to not be constantly tweaking the turrets – rather, put down the entire box of ammo, and adjust as an average overall. Otherwise, you could simply be adjusting for your own shooting on the day, not getting a true ‘average’ zero. End of the day though, each to their own.

Regardless, I am now a lot more comfortable with the zero on the X-Bolt – and looking forward to getting out this weekend for a hunt!


  1. for dry fire practice – you do dry fire practice don’t you? 

  2. overall cartridge length 

  3. like .308, 7mm08 rifles are generally made with a pile of free bore in them 

Sika Hunting – Kaimanawas, January.

0

The final week of the holidays.

I thought I really should head out for at least one trip over the Christmas Break. I only had one and a bit weeks and with a four month old baby at home, it wasn’t a realistic option to be heading away for any length of time. But, I wanted to get out and stretch the legs and also keep my mind in it, so I decided to head on down to the Kaimanawas for the quick stalk.

So at five in the morning on Saturday, I packed up my Crew Cab and headed south.

I decided to head to roughly the same spot I was in last time – around an hours walk from the end of Clements Mill Road. Half an hour in, heading East off the main track onto a smaller ‘hunters’ track. I am not sure if it has any form of official name – but it is certainly well traveled.

First thing I noticed – which I sometimes forget – if I don’t get the Crew Cab high enough into the small of my back, it quickly starts pulling down on the shoulder – making it somewhat uncomfortable to wear.

It’s an important lesson to learn – each and every pack likes to be worn in a different way. Some pack belts like to be down over the hip bones, others sitting high up on top of them – and if you wear them the wrong way, you will never get the performance out of them. After remembering this fact, the walk becomes a whole lot more comfortable.

I headed into to around the same area I was in previously – but decided to head a little to the west side of the ridge – pushing up a little more and camping at a slightly higher altitude. We had previously seen most of the sign at around the 800m mark – so I figured I might as well get a little higher initially.

I ended up getting into camp at around one in the afternoon, after setting up and a quick scout around,  I figured the best option was a cuppa and a rest – waiting until dusk before any serious stalking.

It was about this point that it finally registered just how tired I actually was. Lying down in the hammock, I really, really didn’t want to get back up. I think the body (and mind) had finally realised just how much a good sleep would serve me well.

It was only reminding myself (repeatedly) that I had just driven four hours to have a hunt that finally got me back up.

After an ultimately unfruitful stalk, I returned to the comfort of my hammock and crashed for the night. Only to repeat the struggle of rising back out of it the next morning.

No sightings of animals in the morning either. There was a lot of ‘old’ sign. Nothing I would date less than a couple of days old though.

No matter. It’s good practise getting out and I always come away with something new to think about. In this case, it was reflecting on the necessity to reduce pack weight. Basically, I am going to need to split ‘filming’ trips with ‘hunting’ trips. Focusing on the task at hand, essentially.

How to chill your beer. Fast.

0

It’s Friday afternoon, you have just got home from work, ready to open up a beer and celebrate the end of the week. There isn’t any cold beer. Fail time.

_MGL0026_RX100

Chemistry to the rescue.

What you need is some water, some ice and some salt.

Fill a vessel with the above – lots of it – enough salt so it stops dissolving. Then fill it up with heaps of ice. The salt lowers the freezing point of water. The water distributes the cold of the ice because there are so many more contact points with the bottle of beer. Using this system, you can drop the temperature of a room temp beer to cold in under ten minutes.

However, you will need a lot of ice. The cold packs also work well.

Homemade Venison Sausages

0

Homemade Venison Sausages

Previously I had taken my animals to Kumeu Homekill – Mark had processed the first couple of Deer I had shot and delivered a pile of cuts and sausages back to me. Really good venison sausages. However, after taking my brother up to Balnagown to get his first Deer, I decided to 1, process it myself and 2, make some sausages.

So, for the last month or so, I have had a bin of trimmings in the fridge, waiting for me to make into sausages.

Essentially, making sausages means mincing up the content then stuffing it into a casing. Some quick reading up online, and I was ‘ready’ to go.

The machine

I needed a good way of mincing up the meat and sausage stuffing and we already had a Kitchen Aid mixer at home – so I picked up the mincer and sausage making kit add-ons.

Essentially, the mincer attaches to the front of the Kitchen Aid and provides an option of two sizes for mincing. I went with the larger option. One note here – it’s important to remove as much sinew, silver and anything else other than meat from the Venison (or whatever it is you are grinding up). This all gets stuck in the grinding plates and slows down the process. I cleaned the plate halfway through (right after a large section of meat with the silver still on it) and things went much smoother.

The sausage nozzle goes onto the end of the mincer attachment. While you could mince and stuff at the same time, instead I minced all the meat up, added in some herbs and spices and then sent the mixer back through when stuffing the sausages. Initially, I left the grinding plate in there – it seemed to be holding in the mincer ‘screw’ – but after a bit, I removed it and had no issues.

Grind

The Ingredients

One of the wonders of Venison is how lean it is. There is very little extra fat on Deer Meat. However, venison sausage without fat means a mouthful of sand. So in addition to the Venison, it is generally a good idea to add some fat from another source. In my case, I just got a pile of Pork Belly. Yes, Pig is next on the hunting list.

You are aiming for a ration of about 4:1 for the fat – or 20% fat, depending on how you want to look at it.

Herbs and Spices was – I kept it simple – I found an online recipe for some breakfast Venison sausages which had Sage, Chilli, Salt and Pepper. Nice and simple and really just focusing on the taste of the meat itself.

Of course, I also needed some sausage casings – casing is, in the case of ‘organic’ options – part of the intestine of animals – essentially collagen. While synthetic (or at least ‘man-made’) options are available, it’s generally considered that the traditional version is going to give you better taste. I decided to start with some Hog Casings from the Casing Boutique.

Done

Making the Sausages

I was going to just put up a slow-motion video of me making the sausages – complete with some porn-funk-bass heavy music.

Anyhow. The process itself was easy enough. Like I mentioned above – I would suggest the larger mincing option and try to keep anything ‘stringy’ out of the mincer. It severely slows things down. I think the biggest challenge was stuffing the meat and then mince into the machine through the top. Two people, one feeding the casing, one stuffing the tray could make things a bit easier.

_MGL0018_RX100

Regardless, it was a worthwhile process and the resulting venison sausages are excellent. There is nothing like knowing exactly what is going into the food you are eating. One of the few ways of doing that is making them yourself.

_MGL0020_RX100

Torch Interfaces – why bigger isn’t always better.

0

You need a good torch

A good torch is one of the key bits of equipment for outdoor adventures. Nothing is worse than stumbling around in the dark not being able to see – well, except maybe stumbling around in the dark not knowing where you are.

It’s easy to assume that the more powerful the torch, the better it must be – certainly, Lumen ratings has become one of the latest bragging points whenever you get a group of  (generally guys) talking about outdoor gear.

However, more is not always better. To me, heaps of power is totally useless without a good way to control it. This makes the torch interface often even more important than overall power.

Torch Interfaces

Since the majority of torches these days are LED, the majority of torches also have PCB boards. This means the ability to utilise more complex control methods – which has meant many torches have multi output levels, different strobe patterns, the ability to automatically adapt to your surrounds and more. However. Again, more doesn’t always mean better.

To me, a torch that you can’t turn on, then off, is an instant fail. Especially in LandSAR, where you may be turning the torch repeatedly on and off for sound and light sweeps, having to cycle through multiple modes repeatedly quickly gets annoying. Rather,  like the 4Sevens torch I have, the ability to independently turn the unit on and off and chose the power output is a simpler, but better torch interface.

LED

Ande Whall Buffalo Jeans

0

About a month ago, I finally retired my old pair of Mr Freedom Jeans. I had worn them nearly non-stop for four years – so it was time to start on a new pair. It was an obvious choice to try and hunt down a NZ made pair of Jeans. Luckily, we have one of the best right here in little ol’ NZ. Ande Whall!

_MGL0026

Ande Whall

I first came across Ande through the net – found out that that we actually had a guy hand-making jeans in NZ, using some of the best selvage denim from Japan! This was just before the Christchurch earthquakes. Which flattened his workshop and apartment.

Thankfully, with support from family, friends and customers, he slowly got the workshop back up and running. I wasn’t sure if that was the case when I decided to retire the old jeans, so was very happy to find I could actually get a hand-made pair of jeans here in NZ after all.

I got in contact with Ande – I wasn’t quite sure on the fit of things – and actually ended up sending down my old jeans for him to measure and make some recommendations off of. This is what I love about the smaller cottage/boutique/traditional companies – you can actually talk to the person making the product you are purchasing and there is no-one better qualified to talk to about things that the creators themselves.

After a couple of emails, we nailed down the sizing and on his recommendation, I actually switched from one of his special rolls (limited run denim) to his ‘standard’ run, and actually went from the normal fit to the ‘loose’ fit Buffalo Jeans. I should say, loose fit really means relaxed. It’s certainly not baggy. Ande’s reasoning was that the special roll was a lighter Denim, and since I was looking at an everyday, high wearing pair, the heavier material would likely be a better option. It’s rare to have someone ‘down-sell’ you. That is a sign of truly keeping the customers needs above all – and the advice was appreciated.

I confirmed the order, and around a week later, they turned up!

handmade jeans

I am now the proud owner of a pair of Ande Whall jeans.

First stop was a soak in some warm water. While some ‘purists’ would likely suggest this as blasphemy, I had already experienced the fun of having blue indigo stain everything (including my legs) for a week or so, therefore I was happy to trade off a little bit of ‘fade’.

I am not going to be doing some weird ‘photo of the week’ on these jeans. I am just planning on wearing them, wearing them and wearing them. Will update you in four or so years!

_MGL0028

These aren’t ‘budget’ jeans. But then, they are handmade and they are likely to be on my legs for the majority of the next couple of years. I consider them an investment. Though, I realise I am probably going to end up with one of this special editions as well!


Why every Bloke should carry a notebook.

0

untitled-(1-of-1)

Why every Bloke should carry a notebook.

This has been a habit that I have formed over several years. I have always been the guy carrying a pen around with me, and slowly it dawned on me that carrying a notebook to write in was probably a local addition. Now, I hate being without one. The more you have one on you, the more you use it, the more you like to use it.

To carry a notebook means you are a little bit more prepared. It’s also funny to watch how people suddenly actually consider what they are saying once you start writing it down. It keeps us all honest.

All good reasons to carry a notebook.

Dont try to remember everything.

Unless you are gifted with some form of supernatural memory, you are going to forget things. A simple couple of words written down can be enough to prompt you to remember (and take action) on a conversation you had, a promise you made, and idea that formed.

By recording this things down, then getting on with you day until the appropriate time to review things, you don’t clutter your mind with a million and one things that you vaguely remember you need to know. Live in the now. Not in the ‘oh I must remember to that’. Get all the things of your head to free up your brainpower (it is limited) for the task at hand.

You are likely to remember it wrong.

Just ask a Police Office, Search and Rescue Operator, or anyone else that has to rely on people’s recollections have out of shape our memories can get. From details like a phone number or a rego, through to what color shirt someone was wearing, the human brain has a tendency to twist our memories and then, convince us that what we do remember was totally right. If it needs to be remembered correctly – write it down.

Keep a track of all your ideas.

Similar to my first point – most of us have ideas all day long – sometimes about things relative to what we are up to, sometimes about things we would like to do, sometimes just random, but brilliant ideas. That great idea for a project you have just before you fall asleep? Carry a notebook, leave it by the side of the bed with a pen, ready to write it down. There is a real good chance you won’t remember it in the morning, even if you have the best intentions to do so.

It can track progress.

When you carry a notebook and recording any activity details – the gym, the shooting range, anything, it enables you to track and measure your progress – this is key if you genuinely want to improve. It can also save time. For example – recording your weights in the gym ensures that you get right back to your optimum/maximum lift – without having to try and remember, the go up or down on the second set. Get it right first time. Save time, save energy and make the most of your workout. Tracking these things can be a great motivator as well – either because you can see improvement, or because you can see where you can make improvement, then celebrate when you achieve it.

You never know when someone will need paper and a pen.

More often than you think, probably.

You get to be the helpful, organised guy who is will actually carry a notebook and a pen. While you probably won’t lend out your notebook, mine generally have removable pages and pens are always useful. If someone has one on them. While you are at it – get yourself a small torch, a knife and a lighter. It’s amazing how often you find uses for tools when you actually have them on you.

But, but, but smartphone?

Yeah, and? I guarantee it’s not going to be fast as just taking out a notebook and writing in it. Believe me, I have tried. I have Evernote, MLO on my phone and have tried a pile of other apps – while some are quite – nothing is a quick or as natural as writing something down. There is something awesomely physical about taking pen to paper.

What should I use?

Well, it’s a little bit of personal preference here. I have been using the small Moleskin Notebooks you get in packs – right at the moment I am experimenting with the Evernote Integrated versions. If I have a pile of notes I want to capture, I can take a photo and Evernote automatically sizes the sheet, can autotag and runs letter recognition on the sheet – so I can include it in my searches later. It’s working well.

If I am out bush – I have my Rite-in-the-Rain. Essentially just a notebook – but made out of waterproof paper. It seems to be guaranteed to be raining during any outdoors training I do, so having something that doesn’t end up as a soggy mess is critical.

However – if I find myself without my notebook (left in the other pants maybe?) my time honoured fallback is a simple piece of A4 Paper, folded into quarters and kept in the back pocket. It doesn’t really matter. As long as you get into the habit of writing things down, and processing/reviewing them later.