Home Blog Page 37

Portion Pack Foods – Hungerbuster Combo Ration Pack

0

Portion Pack Foods

Portion Pack foods is a company based in Upper Hutt, New Zealand and they produce ration packs for a different range of uses and customers. Rather than freeze-drying their food, it is presented ready to eat – reducing fuss and preparation time, in exchange for an increase in weight. They offer four flavours, which includes BBQ Beef, Beef & Vegetable, Chicken Pasta & Vegetable and a Vegetarian Pasta Salad pack. Their ration packs have a 3 year shelf life, providing that the storage temperature is kept under 20 deg C. You can order the products on-line here. The tube of condensed milk that comes in these ration packs is a personal favourite of mine, it’s almost a vice. This might sound strange, but I do find their packs fun – because there is so much variety with each pack, you are always sifting through just to see what other goodies are in there! I have been talking to Duncan from Portion Pack a bit over the last couple of weeks, having the opportunity to try out a new product forthcoming from them. Nice guy.

Ration Pack don’t necessarily make all the food in the packs, for example; The plain sweet biscuits are Arnott’s Nice Bikkies, and the cream crackers, are, well, Arnott’s Cream Crackers. Though I am not sure of the brand, the muesli is a decent serving size – though remember to leave some skim milk over if you want it for your coffee or tea afterwards.

Bloom

One thing worth noting at this point – and I have come across this before – white discolouration on the chocolate. In short, it’s not necessarily bad – it is called bloom. I also ended up getting the ‘menu’ wrong – so if you try this ration pack just make sure you eat one of the noodles at lunchtime. Otherwise, you will get hungry. Overall though, these are good packs. The majority of the ration pack is the same and the only difference between the four different varieties is the main meal. I might try to see if I can get hold of all the ‘mains’ separately to do a taste test. The BBQ Beef was certainly good. So no worries there. Of course, what you prefer will also come down to personal taste.

So, in summary – the weight of a days worth of food is 1.1kg. It’s more than enough to keep you feed, and also, keep you interested, with a bit of variety. Would certainly have no problems eating these. The weight for tramping is a bit high – but in the case of vehicular transport – no worries.

ration packs

Additional References

The Tikka T3X – exclusive first look!

0

I would pick, that if you live in NZ, you already know about the Tikka T3X. I would say it is a safe bet that its predecessor, the T3 it is one of, if not the, most popular hunting rifles in New Zealand.

So, when something as popular as the T3 Lite gets an update, it is worth checking out. The price has gone up, are the changes worth it?

Improvements to the Tikka T3X

For the Lite model, again, the one the majority of us end up going for, there have been some significant alterations. I don’t think I need to copy over the list of changes to the rifle – pop over here and read it on Tikka’s page. Instead, a few comments to go along with the video above.

Modular Stock

This one if for the Target Shooters – of at least, the guys now used to a pistol grip through using a pistol or an AR style platform.

Since starting to shoot a pistol, every time I go back to the traditional grip on my X-Bolt, I can’t help but think that my finger position is less than optimal on the trigger. It feels like my finger goes down over the trigger and ends up pulling it backwards but also upwards. Everyone will accept that the best way for a trigger to go is straight back, so to me having my grip twisted less, the finger can travel directly back to the trigger stop. Again, for me, it just feels more natural and optimal.

tikka-t3x-lite-stainless-1

So, the ability to choose between the two is great. The question, for some of us, is whether it now decreases the desire to put the rifle into a chassis system – often the first step for guys wanting to accurize a target/field/practical shooting rifle. Maybe, maybe not. There is apparently a forthcoming ‘adjustable’ version – so maybe so.

The front, flatter foregrip… maybe? I don’t know if the T3X Lite would be the first choice for a bag resting target rifle anyhow?

New Recoil Pad

Well, never going to complain about better recoil mitigation – I guess we will have to wait until we start hearing back from the guys who decide to use a lightweight T3X 7mm Rem Mag as a hunting rifle. Though I expect everyone will benefit from it.

Stock Noise Reduction

To me, this is the big one. Probably the biggest complaint I have ever heard about the T3 (apart from one guy complaining he had nothing to complain about) was the noise of the ‘hollow’ stock. For a hunting rifle, having a stock that makes ‘tok tok’ sounds every time it brushes against something is a pain. Enough that many guys put a stock pad on it to dampen it down. This new one is a LOT quieter than the model it replaces – so think this alone is going make people happy.

tikka-t3x-lite-stainless

The Rest

Improved Grip, Redesigned Ejection Port, Improved Rail Attachment, Metallic Bolt Shroud, Steel Recoil Lug, all good upgrades, all worthwhile. They may be a personal pet peeve of yours or they may not be. Regardless, nothing to detract from the new upgrades here.

[fvplayer src=”https://vimeo.com/162802249″ splash=”https://i.vimeocdn.com/video/568637883_1280x720.jpg?r=pad” caption=”T3X_1080″]

The overall result?

The Tikka T3 platform has been getting a lot of excellent traction internationally in the last couple of years – even the Americans – often the Remmington 700 Action stalwarts, have started using the Tikka Action as a base for precision and long range rifles. They just work! So it could have been considered a risky move by Tikka in changing something that was working so well.

However, the changes all look good. It seems like they have been listening to their customers and made changes requested. Is it worth the extra (roughly) $100? I think so.

Many thanks to Christian and the guys at Beretta NZ for letting us have a look at the T3X.

Bush Legends: Skellerup Ashley Boots

0

Talk with any of the ‘old guys’ and they will happily tell you about their pair that lasted them 20 years and are still going strong. Numerous forum articles attest to the popularity of the boot.

In this series of articles, I am going to explore some of these Bush Legends: What made them so popular and are they still relevant today? First up. The Skellerup Ashley Boots.

Looking for a lighter boot

_MGL0232

I was after a lighter weight option to my Meindl Makalu boots. When I first got the Makalu, I was after the biggest baddest boots I could find.

Now I will admit I am over carrying around what feels like 10kgs of boot on my feet all the time. I am certain, for alpine, South Island hunting, they would be excellent. For most of where I actually spend my time out in the bush, they are way over the top.

So. Lighter option it was.

Having recently joined the North Auckland Deerstalkers, I was able to start observing what some of the more experienced guys were wearing – and one boot that kept on popping up, both through observation and conversation was the Ashley. While it was a bit of a departure from what I was used to, I was also interested in what made these boots so popular.

The Build

The Skellerup Ashley is a Mid-calf length lace-up rubber boot with waterproof tongue gusset. It has a built-in rubber foam cushioned innersole and a calendered sole. Essentially, the Ashley is the high top version of the Buller Boot, another Skellerup option.

These boots are essentially laced up gumboots. Totally waterproof, fairly soft and somewhat bullet-proof. Their simplicity in design means there isn’t a lot to go wrong with them, and because they are all rubber and canvas (the liners) – you can pretty much take them off, hose them down and let them dry out – there isn’t much in the way of maintenance.

_MGL0012

The Fit

Talking to a few hunters, some guys prefer the Ashley height, some the Buller. It seems to depend a bit on your feet. In fact, I know of several guys who will take an Ashley, then cut it down to their preferred height and you soon start to realise that ‘customising’ these boots is all part of their ownership.

I decided to get the higher Ashley – I am used to Hiking Boots – and prefer high tops. No real specific reason – it’s just what I tend to get. Part reason I guess was due to ankle support – and it should be noted – the Ashley (and the Buller) isn’t really going to do much in the way of supporting your ankles – they are too soft and loose – the fit being closer to a snug gumboot than a hikers boot.

This has both advantages and disadvantages. Advantageous in that  it’s a really easy boot to take on and off, even leaving the laces undone, the boot becomes a great option if you need to quickly throw something on to go outside (when you want to put something on your feet when you wake up in the middle of the night and need a piss) and then you can all but kick them back off. Need them a bit more secure to go into the deep mud? Just tie up those laces and you are good to go.

Big Socks

One thing I did need to adapt too – was the need for some decent, thick woolly socks to wear under them. If you don’t wear thick, high socks, you are going to find two things –

Your foot is going to move a lot around in them.

Think gumboot. This isn’t generally an issue on the flat, nor on uphill, but start walking downhill and you might find, like me, that you start getting toe strike against the end of the toe box. I have had bruised toes from badly fitting boots before –  so this is something I am acutely aware of. Even with the socks, I still find I am getting the occasional bang against my toes. This is something I don’t get in the Meindls, now most tramping boots – as the tight lacing on them holds the boot snug against your foot – minimising movement. The Ashley shifts. The reality being, it’s probably not the best choice for long walks in the mountains.

You need to be aware of chafing

_MGL0008Especially when new, the inside of the Ashley can be a bit rough on the legs. So a high pair of socks is needed to act as a buffer between the abrasive inner, and you skin.

I have no doubt they will ‘soften’ with a bit of time, but big tall woollen socks are the go.

It’s also a great excuse to go buy some new socks. Fun fun fun.


How hot do they get?

Interestingly, not so much so. At least for me.

My current Meindls are hot. To the point where you only really need to wear boot liners (thin, thin socks) under them. Even then they tend to sweat. Because of the thick socks I was wearing with the Ashley I was a little concerned that it meant my feet were going to get uncomfortably hot.

I thought I was going to have two little sweat boxes on the end of my feet – but kicking around the Waitakeres in them, up a hill with a heavy pack, while I was certainly sweating, my feet were fine. This might have been different in the middle of summer, but in around 22 deg out, it wasn’t an issue. I think, due to the ‘loose’ fitting nature of these boots, you tend to get plenty of air moving around, keeping the feet well ventilated.I have heard people having the opposite issue – but sweaty feet has not be an issue in these.

On the other hand, I would probably be a little cautious about wearing these out into the cold. Or more correctly – I wouldn’t be expecting them to hold much more heat that your socks are going to. So no snow tramping in there for me. This is sort of what the Makalus are for anyhow, so no issue there for me. These boots are more for stalking around in the Bush with.

What’s the stealth mode like?

Really good. Because the boots are so soft, you tend to get more ‘ground feel’ with them. The soft soles are also a little less likely to snap everything underfoot – unlike the rock crushing steel shanked goodness of my Meindl Makalu. In addition, if you forget to wax them (because you don’t need to) – you are never going to get that leather creak that some boots are known for. It’s a running joke with some of the guys I tramp with now – my Meindls have a nasty habit of turning into frogs just when I need to be quiet. Wax fixes them – but after day two, when I have forgotten to pre-wax – it’s a little bit of a problem.

_MGL0005

Stickyness – What is the grip like?

I have given the Ashley boots a good workout in the mud, over rock and root and would say they are on par with my Meindls. The nature of them is a little different.

The Meindls you can essentially bash through anything with – the sole doesn’t move. You need to think a little more with the Ashleys – and I have had a couple of decent ankle bangs on rocks when I forgot I didn’t have quite the same level of protection going on, but over most things they stick nicely.

With the Ashley you still need to be careful on slippery roots – but unless you start wearing crampons, that’s common across most bush footwear options.

Value

I think one of the big reasons for the Ashley getting so well established in the minds of hunters has been it’s price. At the moment, you are looking at about $150 for a pair of Ashleys and $120 for a pair of Bullers. This (like everything) has increased over the years, but for a long time, these boots were some of the best value for money options out there. These days, there are a few more options popping up – boots like the Boonies Kaimai are really direct competition.

So, any shortcoming I might have with these boots (mainly the loose fit) I temper with the fact they cost about a quarter the price of the boots I am comparing them too. Realistically, if I was on the flats – I would pick the Ashley Boot. Lighter, easier on the feet and quieter for stalking. More expensive is not always best.

Modifications and improvements

One thing that always pops up in conversations about Ashley (and Buller) boots are the modifications guys make to them to make them work a little bit better. I have already mentioned cutting down the tops to suit your own preferences, but another option that I am going to look into is punching drainage holes in the instep of the boot.

These boots are going to be used in the Bush, often worn while crossing stream and while totally waterproof, like all boots, they still have one large hole in the top of them – once the water gets in the there, you either stop and wring out the water, or you have two buckets on your feet.

A common modification is to push two small holes into each instep – essentially creating drainage holes for the water to get out of. This is also seen on jungle boots – and some guys will even get a small rivet installed into the boots to give a tidier finish. Yes, you have little holes in the boots now, but the amount of water that is going to get into them is a lot less that the amount of water that is going to get pushed out. Reports are that you will get a bit of a bilge operation going on – with footsteps pumping out water once you are back on dry land.

I am going to try the Ashly out with some decent gaiters, then try with this little mod.

Another common mods is cutting down the inside of the tongue in order to enable a tighter fit. Again, you slightly reduce the waterproofing of the boot, but gain a more snug fit. It will be something I also consider in the future.

I like pottering and tweaking things, so all this appeals to me.

In Summary

I will admit, I was a little hesitant going into this review. My current boots were/are expensive German designed super-boots, and I was worried I was going to end up with a pair of sloppy gumboots on my feet. In reality, I have found a relativity cheap, quiet, easy to maintain boot that I am going to have fun tweaking to suit my feet even more.

I think this is part of what has been responsible for the Ashley and Buller becoming part of the NZ Hunting heritage. it was cheap, easy to look after, and you could fix it with a piece of ‘number eight wire’.

Sure, there are more modern designs out there – but for a cheap, functional option – they are hard to beat!

The Carry System – Concepts of ‘lines’

0

carry systems

What got me thinking about carry systems? On an MSC organised Bushcraft trip earlier this year, after a group of us wandered out in the dark for a night tramp, we reached the lookout, and we were posed the question by the instructor…

“If something should go wrong right now, what do you have on you to help you survive the situation?”

The answer for most of us?

Nothing.

As it happened, one of our party had just slipped down the stairs, thankfully not hurting themselves, but it did highlight one vitally important point – we had all just walked straight out of the hut, leaving our packs, and therefore all of our equipment behind. The only person still carrying anything of any use above a flashlight was the instructor, who was carrying their belt-pack– a pouch that never left their side when in the bush.

This got me thinking. While it’s all well and good carrying everything bar the kitchen sink in your pack, it all becomes relatively useless if you leave that fully loaded heavy pack when you head out for a quick side trip, or in a worst case scenario – lose the pack in a river crossing or some other unplanned event.

So, what can you do to prepare yourself for these kinds of situation?

After a quick bit of online research, as it often does, the military came up with a predefined solution to this problem – The ‘Line Gear’ concept. Carry systems.

While I will go into a more detailed description of the separate lines in subsequent articles – the overview of the concept goes like this:

No-one knows a stupid heavy load like the Military.

1st Line

The bare essentials you permanently carry upon your person, in your pockets or clipped directly to your belt. This is also known as your EDC or Every Day Carry. This is your bare minimum carry.

2nd Line

In military terms, this is your ‘fighting load’ – your weapon(s), additional ammo and tools. Still lightweight, this is the stuff that is going to make your existence a lot easier beyond just having the basics. Often this is carried in either a small belt-pack or vest. This is what you are likely to carry, even when you leave you big pack in the hut or at camp.

3rd Line

Also known as ‘sustainment’ level – this is all the additional equipment that you are likely to carry in a pack, not essential for survival, but certainly a lot nicer to have. In the case of a backpacker – sleeping bag, tent, additional food and cooking equipment and so on – the equipment we probably spend the most time thinking about.

While it is nice to always assume you are going to have your pack on you, the idea of line carry systems, in regards to backpacking, means that you can drop or leave your pack, and still have the majority of what you would need to survive for a period of time in the bush. Should you also lose the 2nd Line, then you still have the bare essentials on you.

Spartan Precision Equipment – Javelin Bipod, Kapita Tripod

0

The Reason

Weight. For some of us, the quest is to reduce weight down further and further. Why? Less weight, less fatigue, ability to go further, longer and more comfortably.

However, there is a point where you start having to justify pieces of ‘nice to have’ equipment for the sake of weight savings. If an item isn’t always needed, you start ‘weighing up’ the necessity to carry it around at all.

The Bipod is a good case of that. For certain types of hunting (bush) the bipod is often not needed. Many shots are taken in offhand of semi-supported positions, or, the pack is used double duty as a support. It becomes hard to justify carrying that extra weight for an item that you may, or may not use.

Javelin Bipod

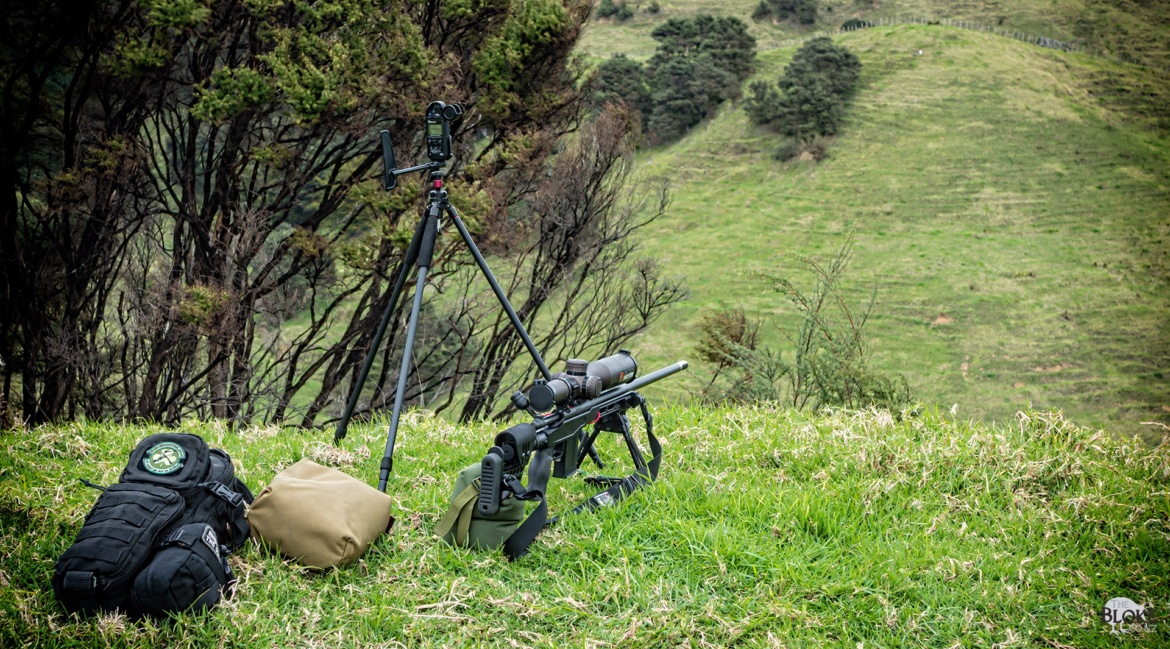
So, when Joel from Stager got in touch and asked if I would be interested in checking out some new super-lightweight support systems, I very quickly said yes. It coincided with two thoughts I have had floating around in the head lately – one, the fact I much prefer to shoot off a bipod, and two, I have been keen to try out some shooting sticks.

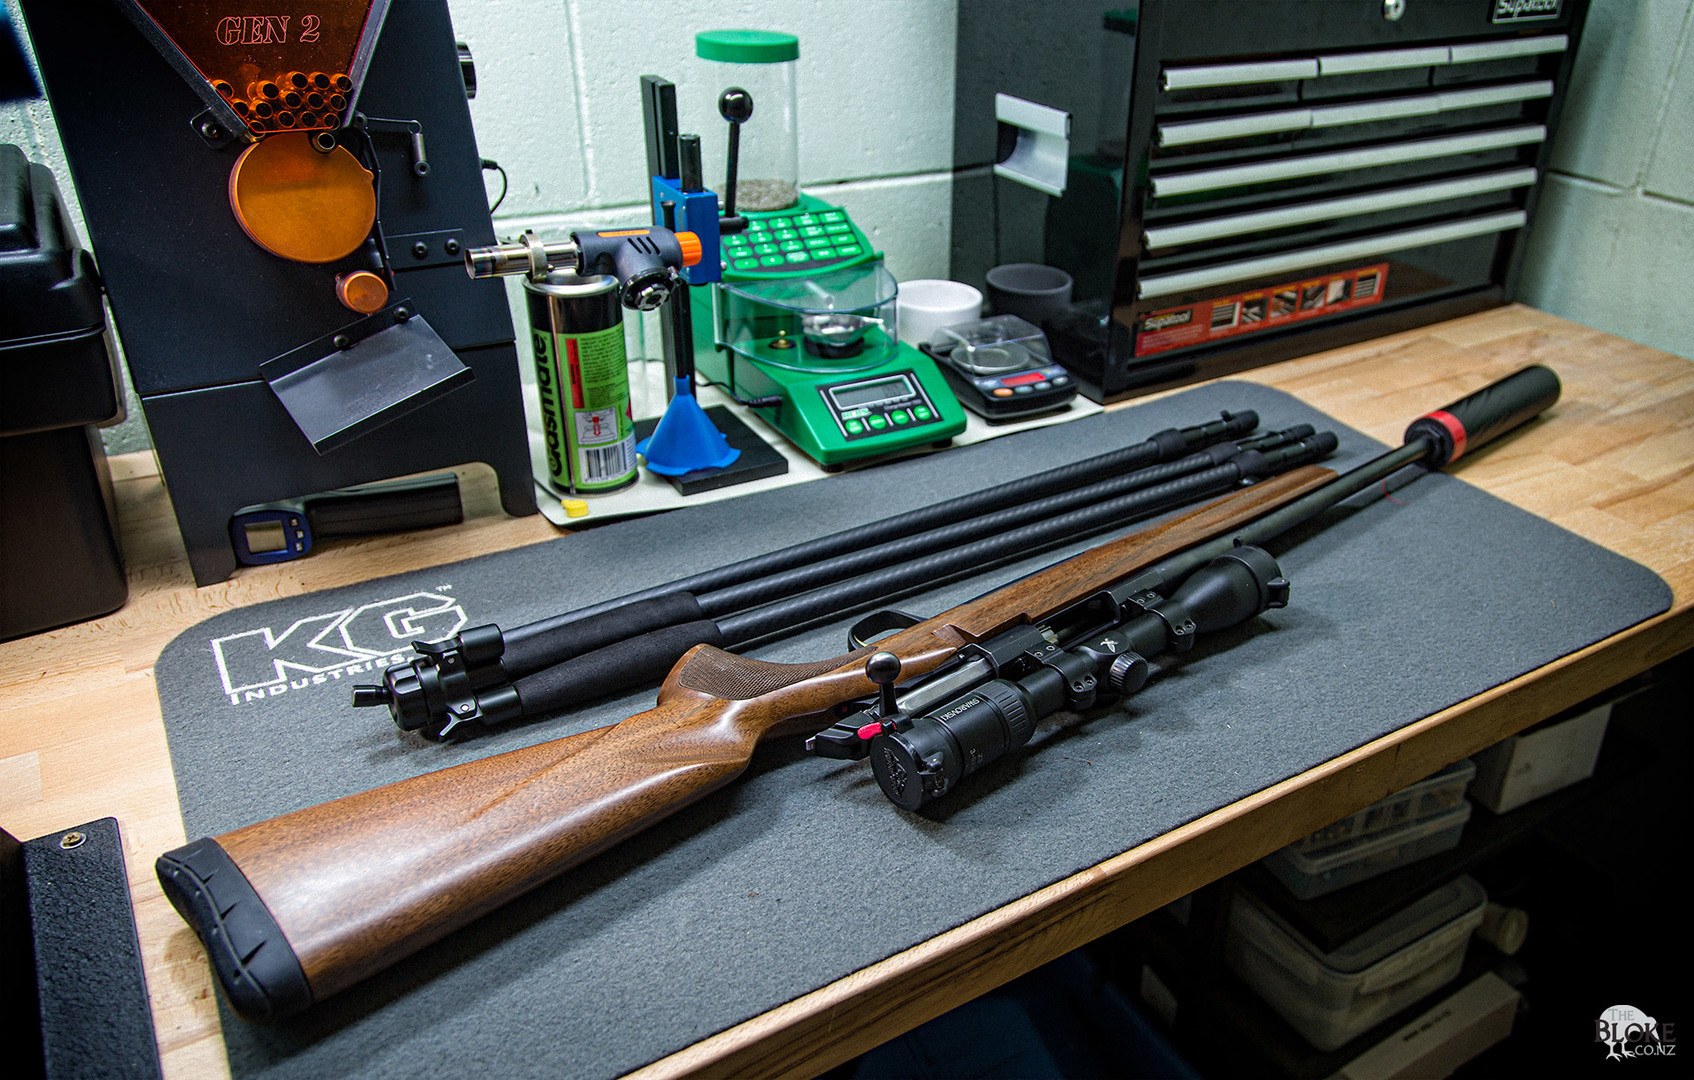
A couple of days later, the Javelin Bipod and Kapita Tripod from Spartan Precision Equipment turned up in the mail.

Spartan Precision Equipment

Spartan Precision Equipment was founded in 2012 in Sussex, Englan, run by Rob Gearing, who, well… this is Rob…

[fvplayer src=”https://www.youtube.com/watch?v=Z8LYtdZIwro”]

image039Rob has an engineering background and set up his own business in Aviation working with Air New Zealand, Rolls Royce and GE along with some other large and small companies. If he isn’t hunting, he is climbing and mountaineering, shooting from the age of 12, he just knew there had to be a way to fuse modern materials with basic hunting principles. Spartan Precision Equipment was born.

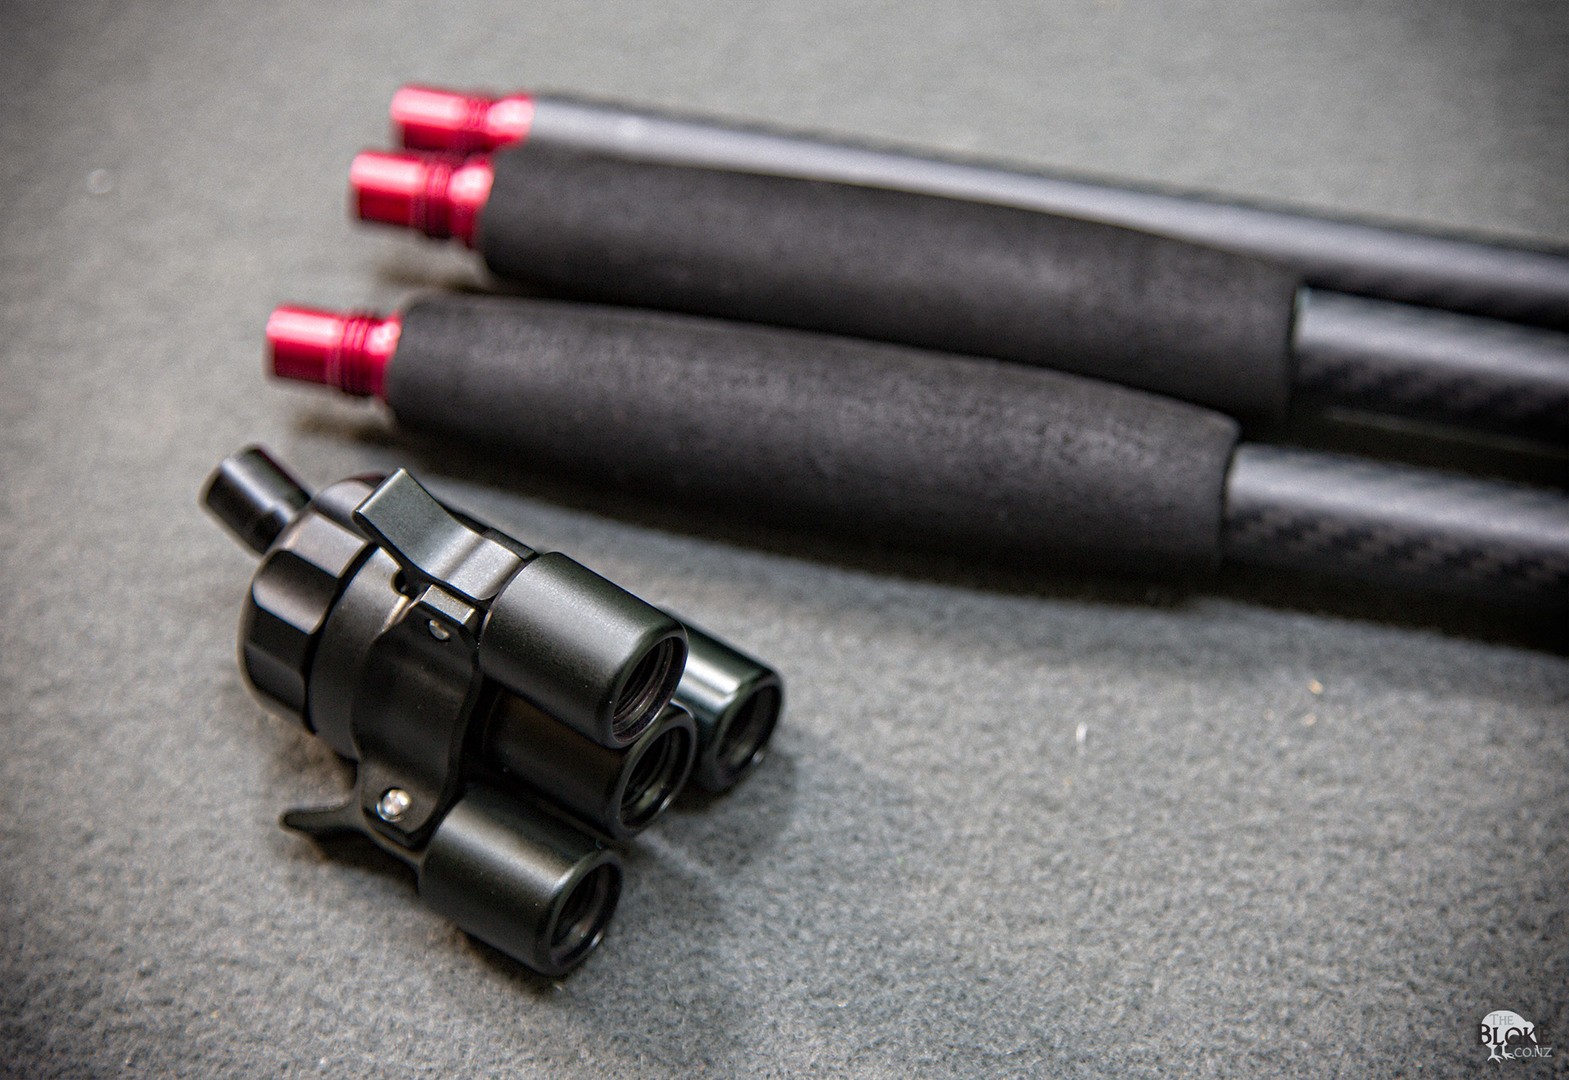
These lightweight supports are the result of many years of development, testing, and refinement. It shows. The moment I opened the – very – lightweight packages, you kinda realise these are not your average pieces of equipment. I would liken it to some of my more specialised camera equipment – there seems to be just a little more attention to detail that only comes from the ‘smaller’ specialised and boutique companies.

To give you an idea – Blaser, that company that makes those rifles we all lust after, had Spartan develop a bipod specifically for their R8 rifles. You seem to see a lot of photos of these bipods on expensive, wood stocked, European firearms.

The metalwork on these is machined from solid billet, not cast, not pressed,

The finish on the Carbon Fibre (yes, these are light, lightweight bits of gear) is gorgeous and the aerospace grade aluminium fittings and brackets just scream premium product. Oh yes, these are definitely a premium piece of kit, with a matching price, but we will get to that.

Kapita Tripod

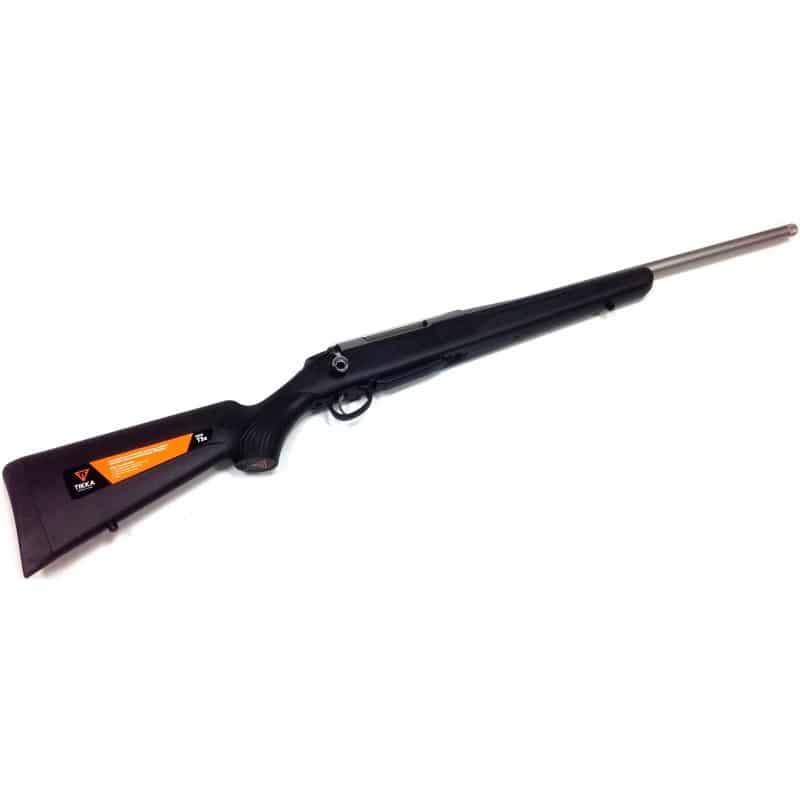
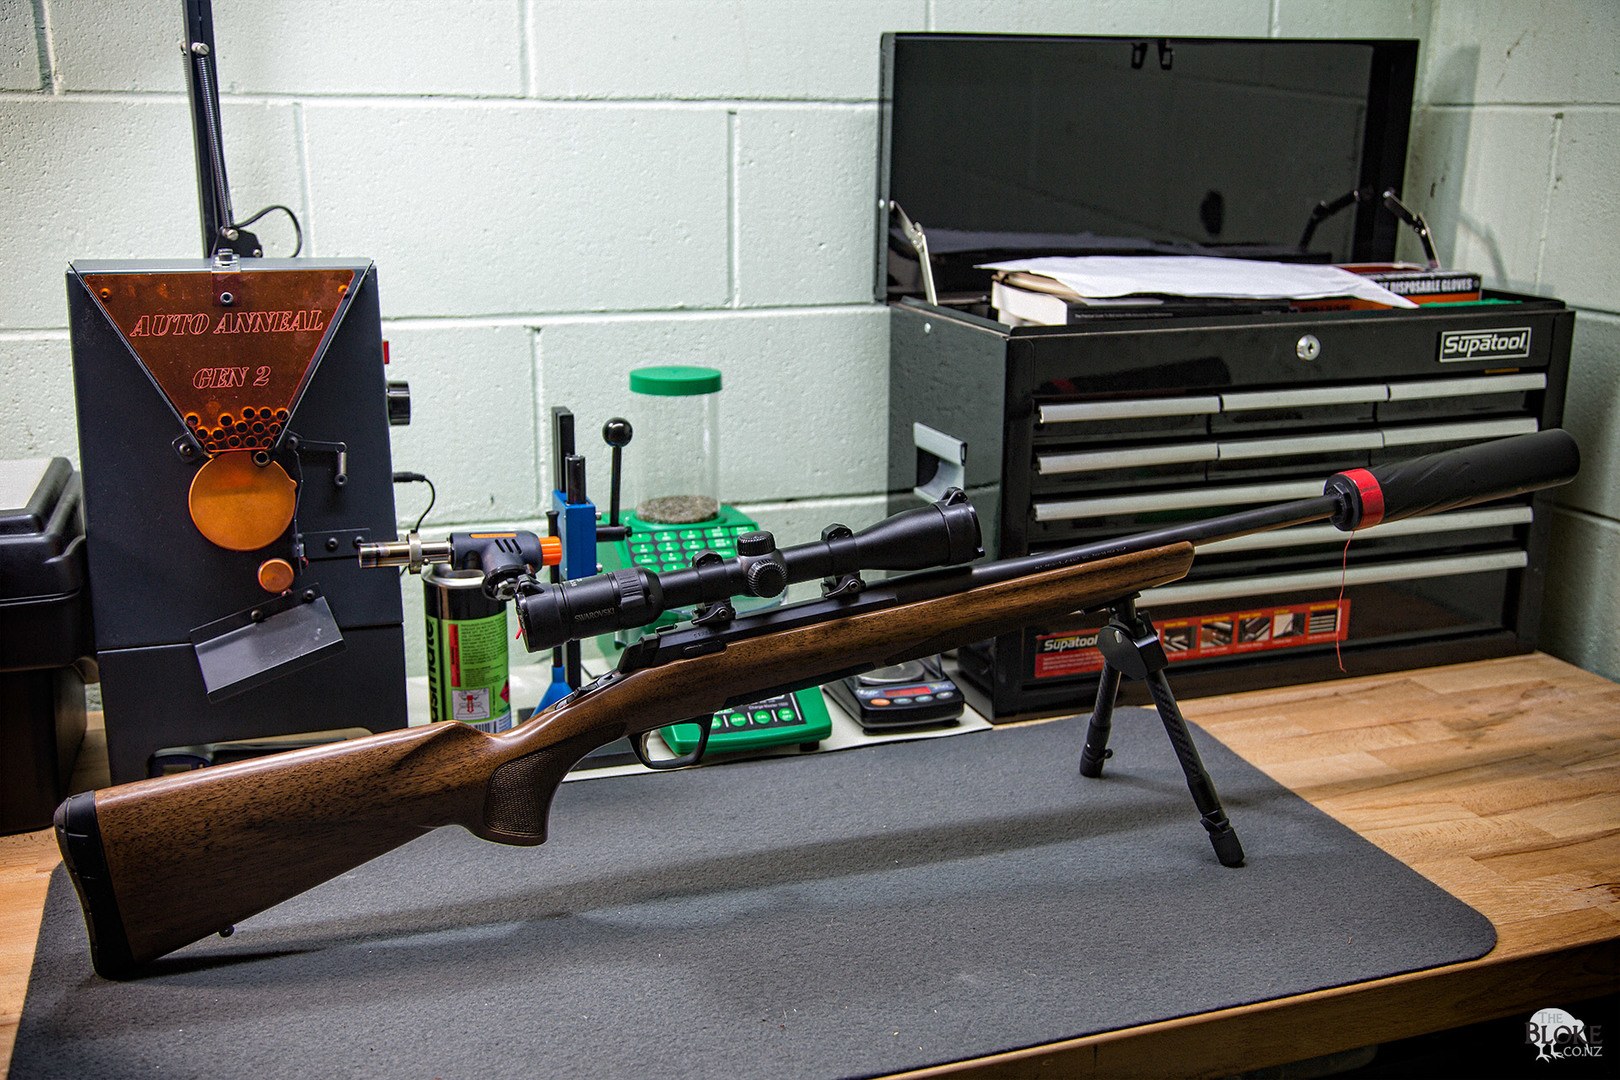
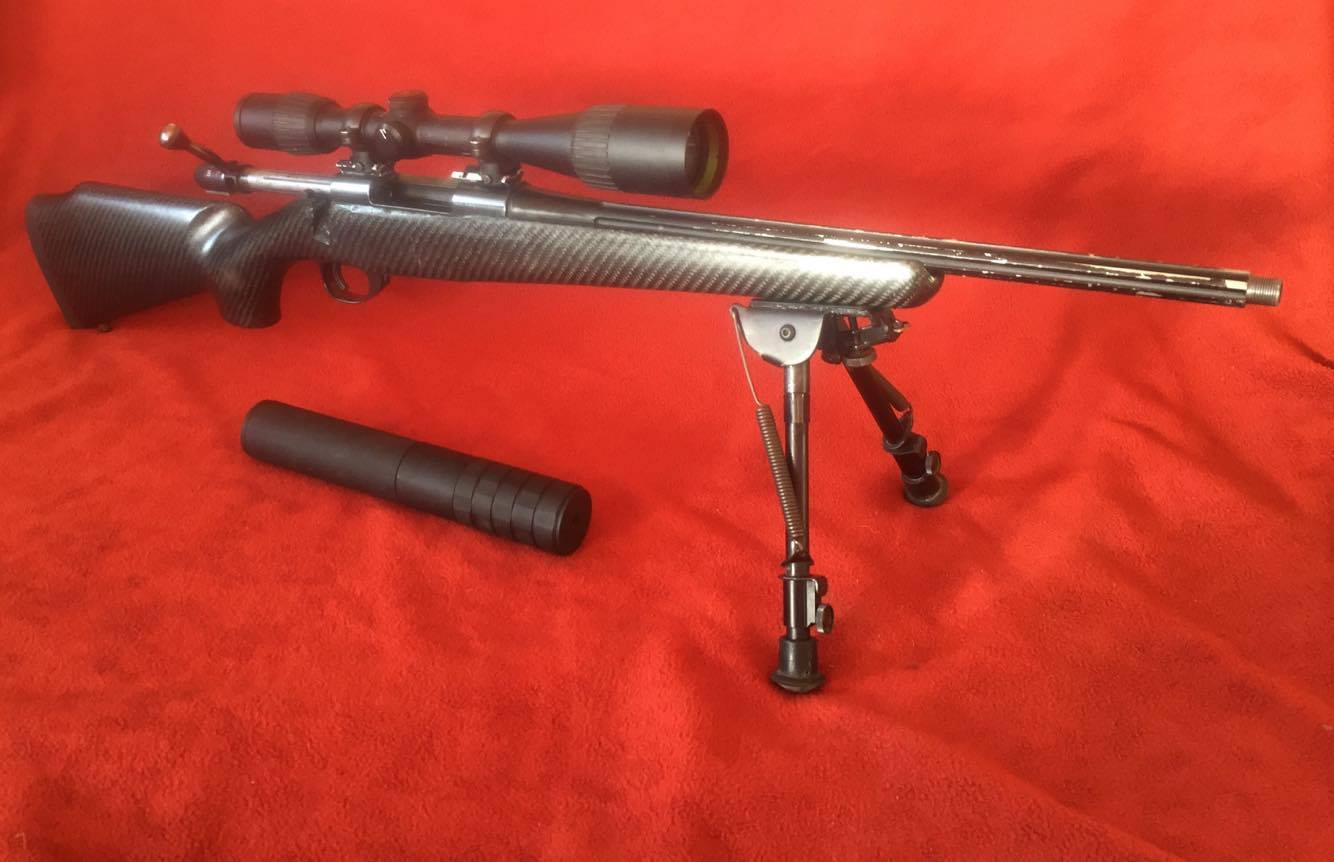
I was keen to get these onto the rifle (my Browning X-Bolt) – so headed down to the shed to install the mounting onto the rifle.

Mounting Options

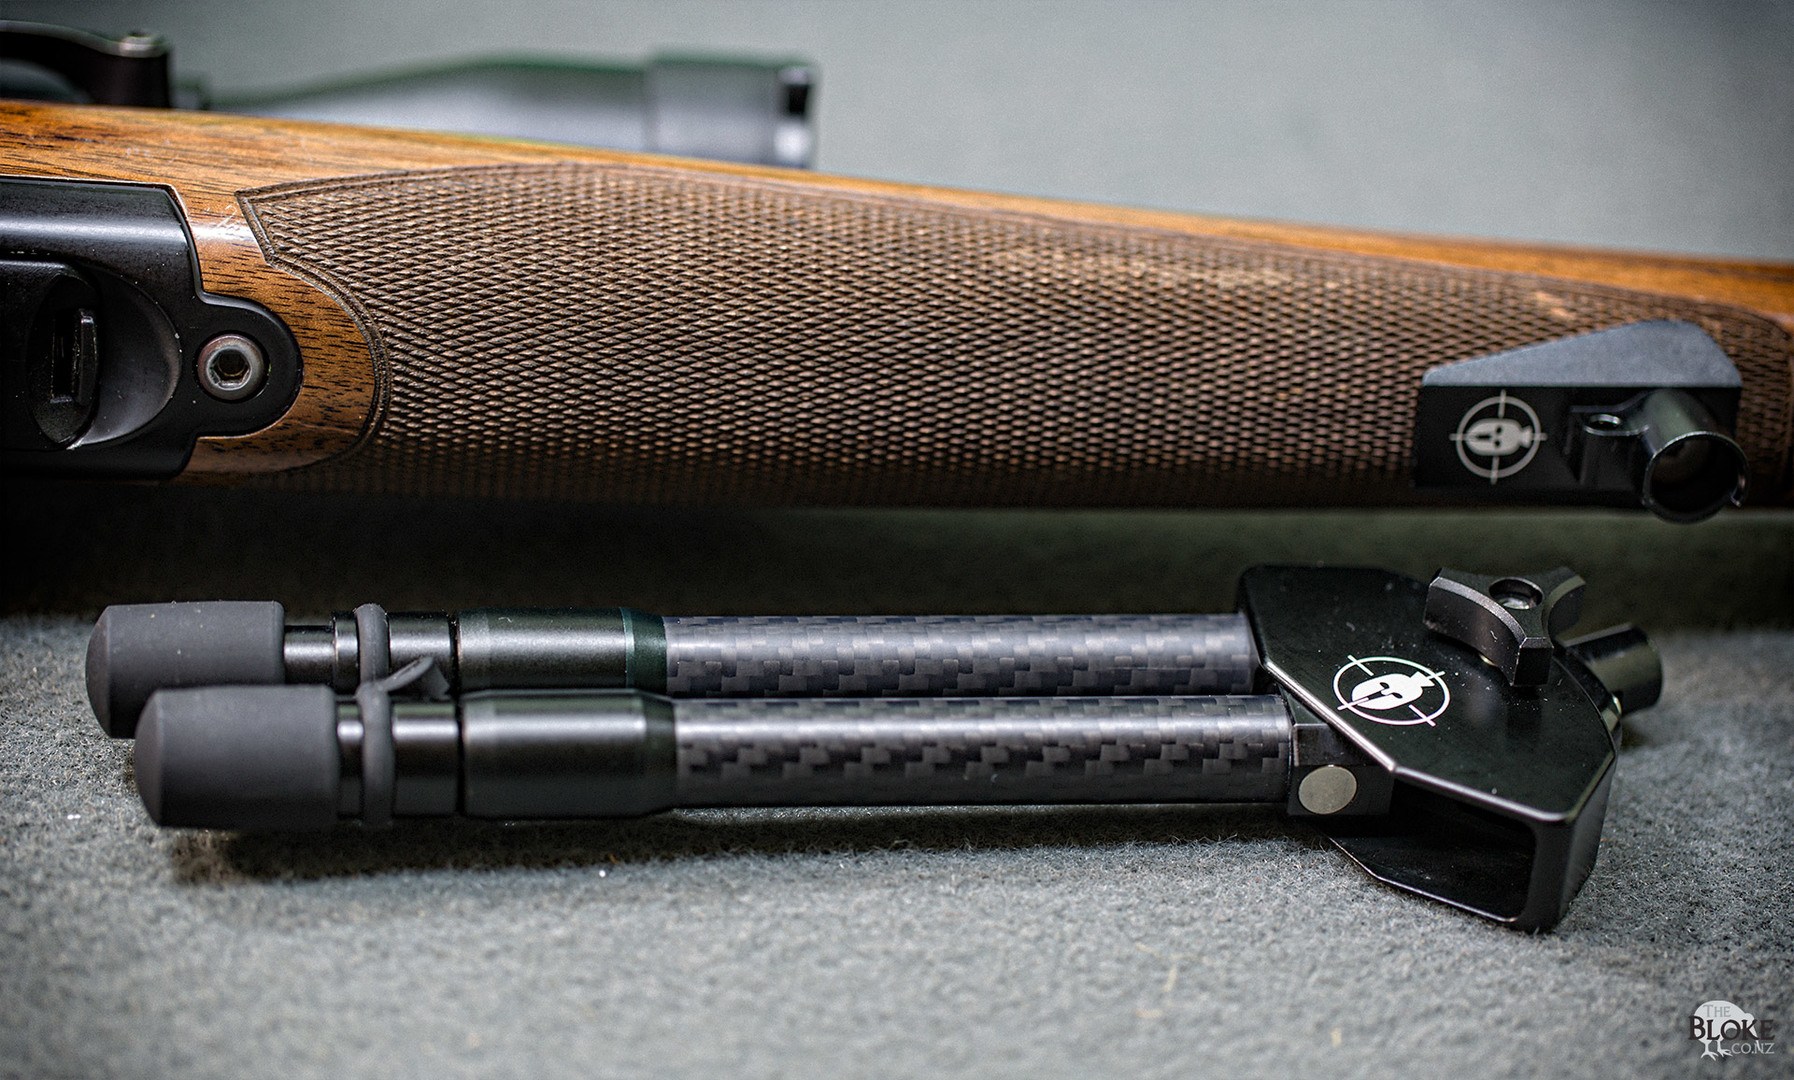
I had discussed with Joel that I would be keen to try these out on the hunting rifle. It’s a Browning X-Bolt Leftie in 7mm08 with a Walnut stock – my first rifle and my hunting rifle. This is what goes into the Kaimanawas with me.

Spartan has a range of fittings available to you – a couple of different adapters available – flat and curved for mounting on the bottom of your rifle (I opted for the curved for the X-Bolt), a flush mount gunsmith mounted option and for those wanting to put them on rails – a Picatinny adaptor. In addition, and I will talk a bit more about this later – there is an optics adapter – so enable to you to put, well, anything with a standard thread mount on it. Think, camera, GoPro, kestrel, rangefinder, spotting scope…

untitled-(6-of-13)

The mount I picked simply replaces the standard sling swivel mount. Off and on in under a minute – you can see you still have the ability to mount a sling on it as well.

This is where the system starts showing it’s uniqueness and a rather cool side.

The bipod (or tripod) doesn’t physically lock/click/fix into anything. On the top side of the support is a rare earth magnet. This simply pushes up into the mount, which has a steel screw holding it in there, and viola! Instant connect. I initially thought this might be a bit of a ‘weak’ connection – but, after trying to flick the thing off, it wasn’t moving anywhere, however, the attachment and removal is all but instant.

That is the point of the system. The bipod doesn’t permanently live on the gun. It doesn’t fold up, rather, the whole idea is to store the bipod/tripod in a pocket or on the pack and simply pull it out, attach and setup for a shoot. The fact the gear is so lightweight, means you don’t have to worry about carrying it and not using it. However, if you have a shot where you can take a bit of time to setup, the bipod is out, attached and deployed way, way quicker than you could every do with a Harris.

Javelin Bipod

The Javelin Bipod

The Bipod comes in two option lengths – standard and long. The standard (what I got) gives you 17-24cm of adjustment. Metric! Yay for metric! The long is 22-32cm. Your choice is going to depend a little on where you are going to shoot. If groundcover is minimal, or at least, short in most places, the shorter gives you the ultimate in portability and convenience, the long, more suitable if you expect to be shooting in some grasses or covering. Ok, ok, standard – 6.5-9.5″, long – 8.5-13″. You can, if you want, also get extra long legs to set the bipod up as a sitting solution for long grass. Weight? A measly 144 grams for the standard.

The bipod has a magnet in the top, and the sides of the legs, so opening the legs can be as silent (no springs), provided you don’t simply flick them open.

Cant and swivel adjustments are available on the unit. The cant tension is controlled by a small knob on the front of the unit. Me personally, I just tightened it up as much as I could. I tend to muscle bipods – so it worked perfectly for me. I think they say it’s a 45deg rotation both ways – so more than enough to set up and follow a target.

Javelin Bipod

Both the bipod and the tripod have spiked feet covered over by rubber caps – the caps themselves being attached to the bipod with a removable ring – either take them off permanently or take off as needed – the caps won’t be going missing when you quickly try to set up for your shot.

untitled-(5-of-13)The spikes, while not ‘pointy’ still are enough that you would probably want to protect the inside of a pocket on a jacket or pack. But certainly, while using them in the dirt, the spikes let you push the bipod into the ground so you can really load it up.

My initial concern with this system was actually just that – how much could I load it up? I have adopted the technique on the 700 of putting most of my upper body weight into the bipod – enough if I sit up a bit, the rifle sits firmly into my shoulder pocket. My concern was this lightweight system just wouldn’t have the stiffness to allow me to do this. But there turned out to be no issue. The bipod happily took it and shot well when under tension this way.

untitled-(8-of-13)

The Kapita Tripod

The Bipod was easy to get my head around. I have used bipods on my rifles since I started shooting. The notion of a lightweight, quick to setup bipod was easy to adopt and utilise. The tripod in the context of hunting took a little more consideration.

Certainly, the notion of a tripod, or even shooting sticks for hunting, to me, seems a very British sort of affair. Wandering through the game estate, seeing a sprightly Roe Deer off in the distance, setting up the sticks, and popping off a shot, what-what.

Certainly, clambering through the Kaimanawa Ranges seemed to be a strange match for them. But then, here is the thing.

I often carry at least one trekking pole with me. This can serve double duty as a walking stick, a fly pole, a makeshift monopod for the camera and so on. It’s kinda handy.

The Kapita Tripod, which is a full tripod, weighs less than my single trekking pole. That is – 650 grams.

untitled-(12-of-13)

It’s essentially an extremely lightweight ball head on a tripod. But, the legs are simply removable by unscrewing them, and then you have a set of shooting sticks, which in turn can unscrew and become a pair of trekking poles!

Because you can also get the optics adaptor I started to realise it could serve multiple roles. Put the Go-Pro or Camera on it (it happily supports the 5DmkIII on top), quickly swap it out with the rifle if a shot presents itself. Use it as a tripod for a Kestrel on its weather vane, swap that out with spotting scope, and use it for the occasional standing shot with the 700 and a pPicatinnyadaptor – sure, it’s not going to be quite as solid mount as the heavier tripods with a Hog Saddle on it, but the whole setup would probably weigh less than a single leg on my heavier (still carbon) tripod!

Suddenly, the system starts becoming appealing for use even without putting a rifle on top of it.

Kapita Tripod

tripod-major1_grande
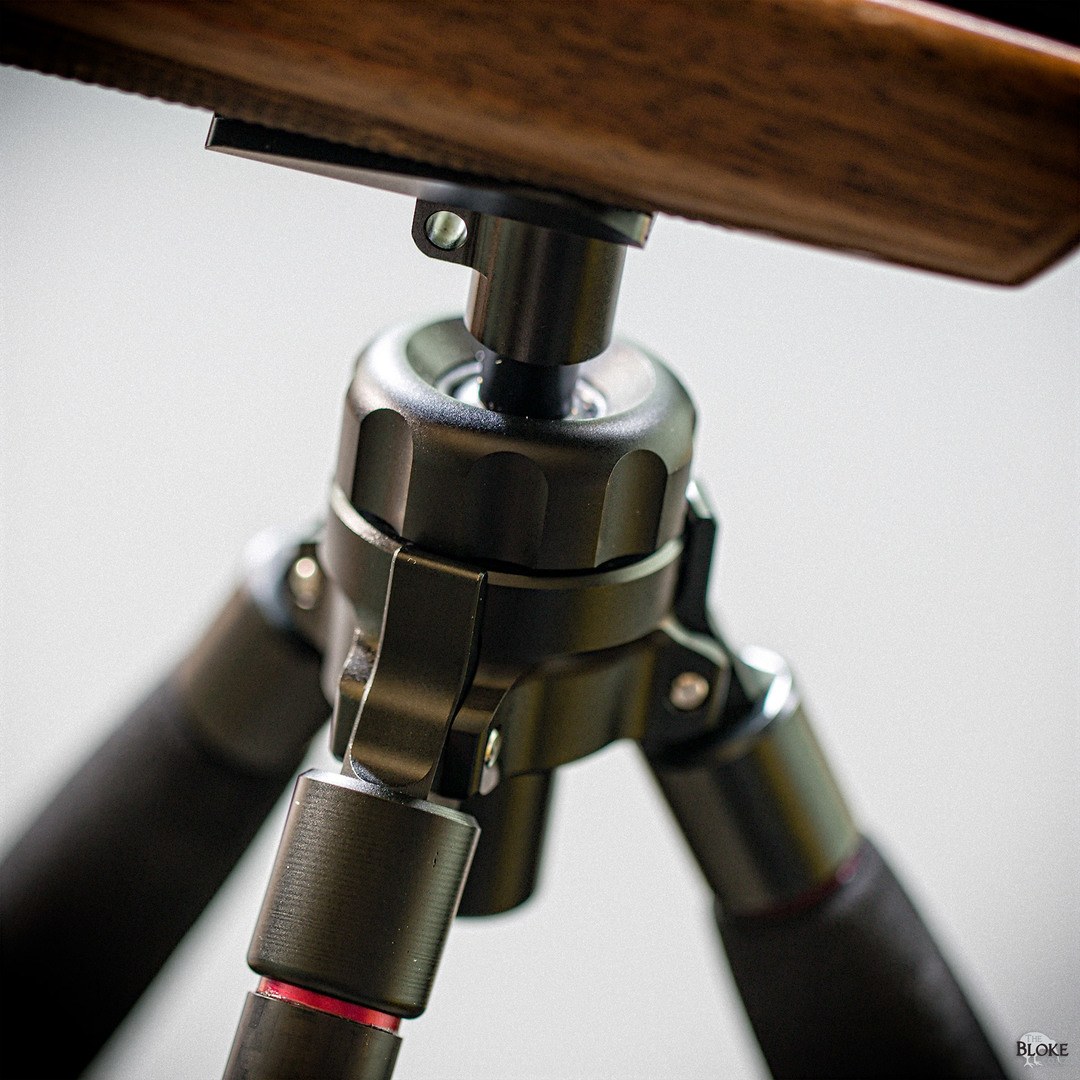
The tripod head is a simple to use – the legs simply have stops when they are open as far as they are going to go, and the ball head is tightened by a twist ring on top. I found I could put the rifle on top of tripod and have it support it – but you do have to realise there is a bit of a crazy fulcrum going on when you have it connected up front with all the weight hanging behind it. Heavier rifles likely would be a bit much for it. Though, it’s not so much weight capacity, as it is leverage – for example – mount the adapter in the middle – and it will happily carry a LOT of weight.

The Hook

Underneath the tripod, an optional hook adapter allows you to hang a bag for ballast, or, use the tripod for ‘gralloching’ – hanging an animal to dress it. I initially thought this meant I might be able to get a deer under there – but realistically, the 40kg recommended limit would mean even a Fallow Deer would be a bit heavy.

However, what it is perfect for, is handing some weight under there to give the tripod some additional stability. It’s something I had a bit of a play with and sure with some more experimentation, you could get even more out of it.

[fvplayer src=”https://vimeo.com/180072765″ splash=”https://i.vimeocdn.com/video/588181169_1280x720.jpg?r=pad” caption=”Spartan”]

Shooting with the System

1exI have been a little lax in the shooting recently but was heading out to the North Auckland Deerstalkers to RO for the day. It seemed only logical to also take out the gear to try out in the afternoon.

Ok, enough enough, you want to see targets, I know.

Bipod

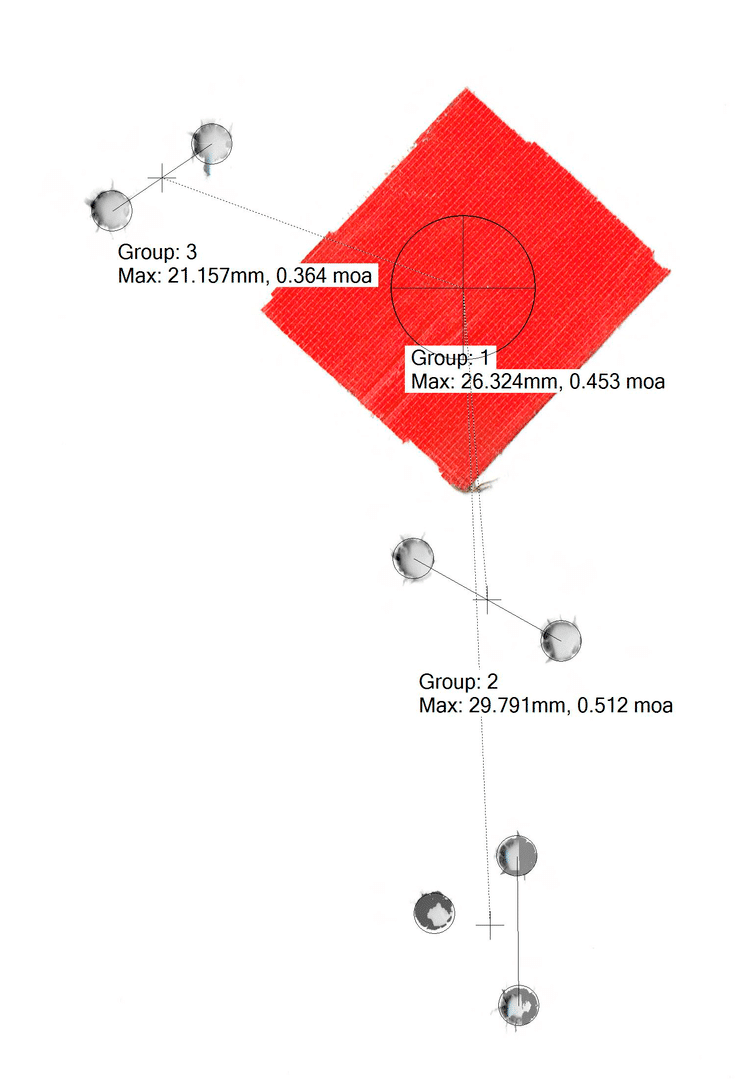
So, after I had ROed the morning, I setup and got the 7mm08 out. This was actually the first time I had shot off the bipod – and of course, realised quickly that I was shooting at 200m, not 100m, so had to adjust the zero up a bit. I had managed to forget the range card I have for the gun, so dialled up, shot two more, dialled up again.

I was surprised how much I could actually load up the bipod. I had actually equated lightweight with a bit dinky, so was happy to find out that it wasn’t going to flex on me. At all. Settling my upper body weight into the bipod – it seemed to happily take up the slack. Certainly, it lost nothing to the Harris.

2ex

Kneeling

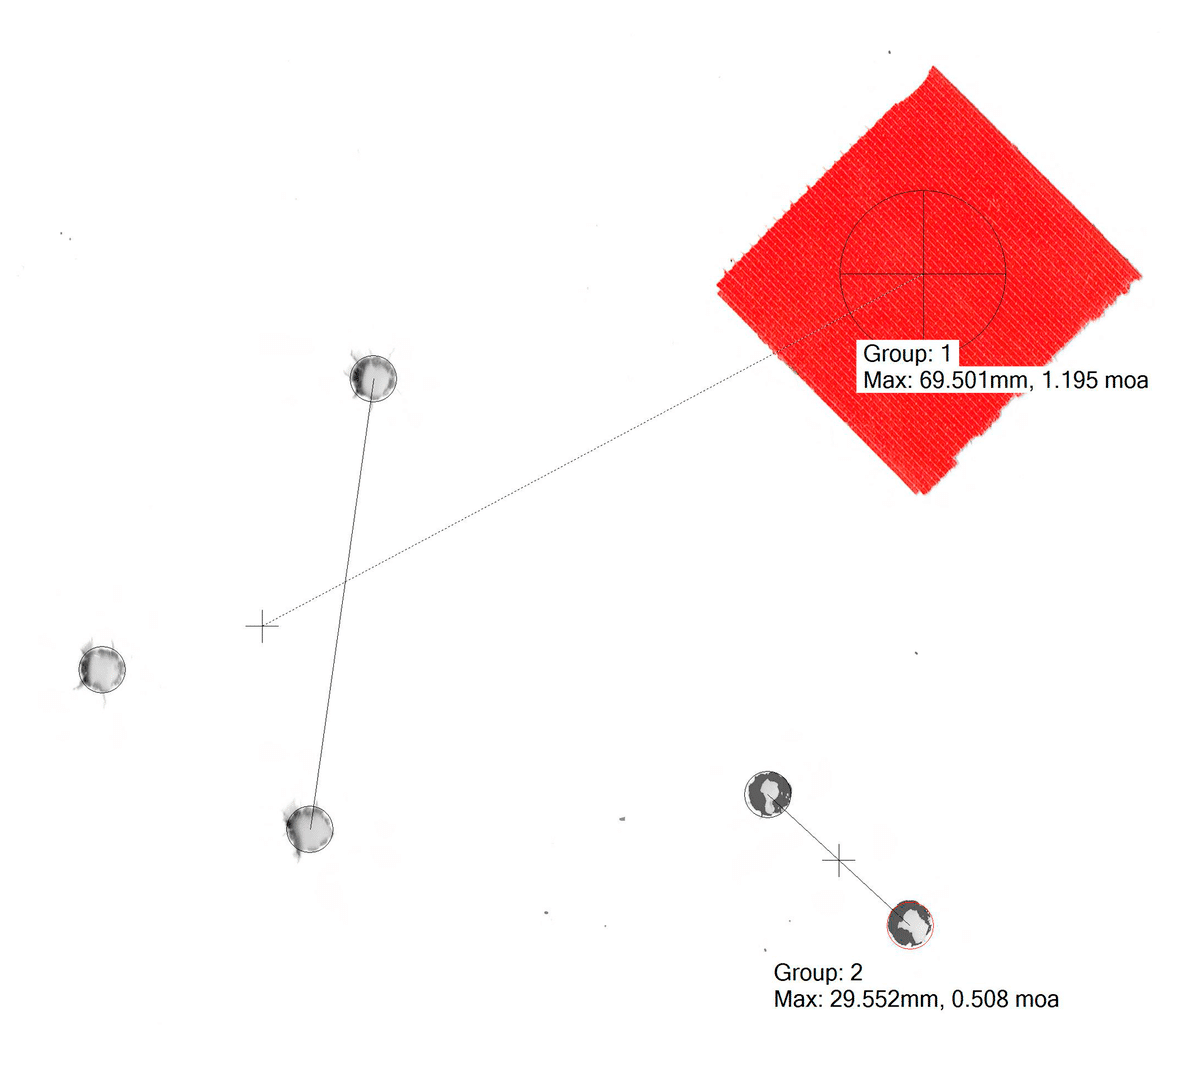
Target Two. Kneeling. If you had seen the results from the hunters competition prior to this, you would realise how amazing the difference truly is. I am an average to shit positional shooter. So shooting seven rounds at 200m kneeling, well, the deer would have gotten away.

However, this deer? Dropped. Also remember, I was changing the setup between shots – and would be interested in exploring the position more – as I think this is where it would be used quite a lot. Talking to another shooter today – I would be interested in trying with a pack up under the buttstock of the rifle as well.

I did find the setup as it was rocked back a bit – definitely more so when I had two legs towards the rear. I think this is more reflective of learning how to shoot of this setup.

3ex

Standing – Tri and Bi

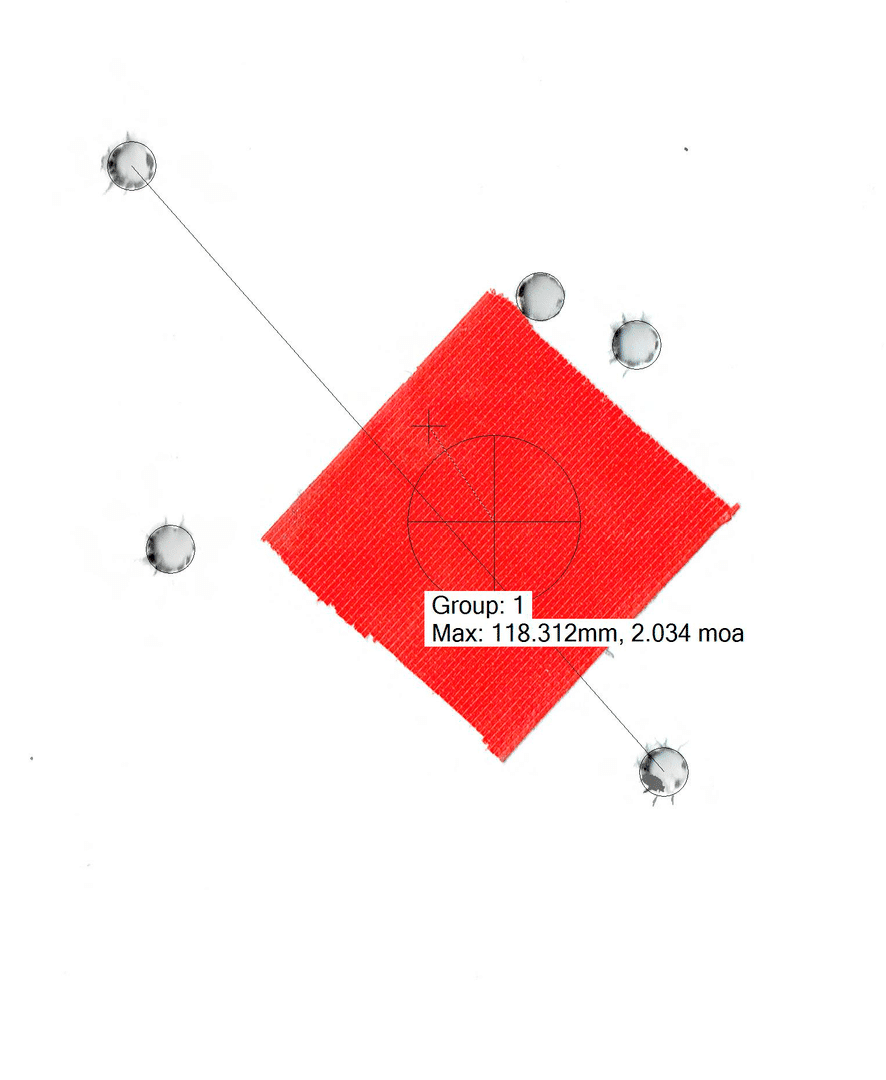
Should that be Bi and Tri? Anyhow. Standing up now. Group two is the tripod, and group one is with one leg removed – essentially making it into a pair of shooting sticks. Again – a hell of a lot better than I am ever going to shoot off-hand. However, worth noting – they are a way off from my POA. Though, first time shooting off this system – I am sure I would figure out what I was doing ‘wrong’.

While it’s going to be a bit slow setting up for this – I don’t really know if it would be any slower than taking the time to find a tree to lean on, and if there isn’t anything suitable around – you basically are caring your supports with you.

Standing – Tripod with Ballast

Ok. So that is five shots standing. I would even go so far as to call one of those an actual ‘flyer’. Centred right around my POA.

You might not consider this all that exciting – especially if you wanted to compare it to they guys shooting standing off the heavier, hog saddle type setups. And it’s true – you can get down under 1 MOA with those setups. However, this is ‘minute of deer’ – and, importantly, it’s all centred around where I was aiming. So it would have put the animal down.

I think, though, with some more time and playing around with this system – you would start getting down there. And it is important to remember – this tripod weighs 650 grams.

4ex

Pricing

For the Javelin Bipod, you are looking at a RRP of $469, the Kapita Tripod, $799.

By comparison, a spiked Harris with the podlock is going to be around $340.

Weight wise, according to their page, the Harris Ultralight is 277 grams. So, nearly twice the weight.

So, in Summary

Cost aside, yes, yes, yes. The gear is so light you don’t really have to think to hard about packing it, and the ingenious magnet system means quick on/off and swapping between equipment.

The bipod. That’s staying. I don’t normally carry a bipod with me hunting, but will now. No question.

The tripod? Well. That’s high on the list. It’s a bit of an investment, but after carrying it around with me all weekend – up and down a hill, it’s potentially going to replace the camera tripod I have been carrying around for the camera and the kestrel. It might even get shot off now and then! There is a Picatinny rail adaptor that I can bolt to the bottom of the 700 – and, I have seen online that there is also a heavier weight bipod in the pipeline! The Harris might finally be replaced!

Kapita Tripod


[fvplayer src=”https://www.youtube.com/watch?v=Z6pj9YjQ52I”]


[product_category category=”bipod-tripod” per_page=”5″ columns=”5″ orderby=”default” order=”ASC” operator=”IN”]
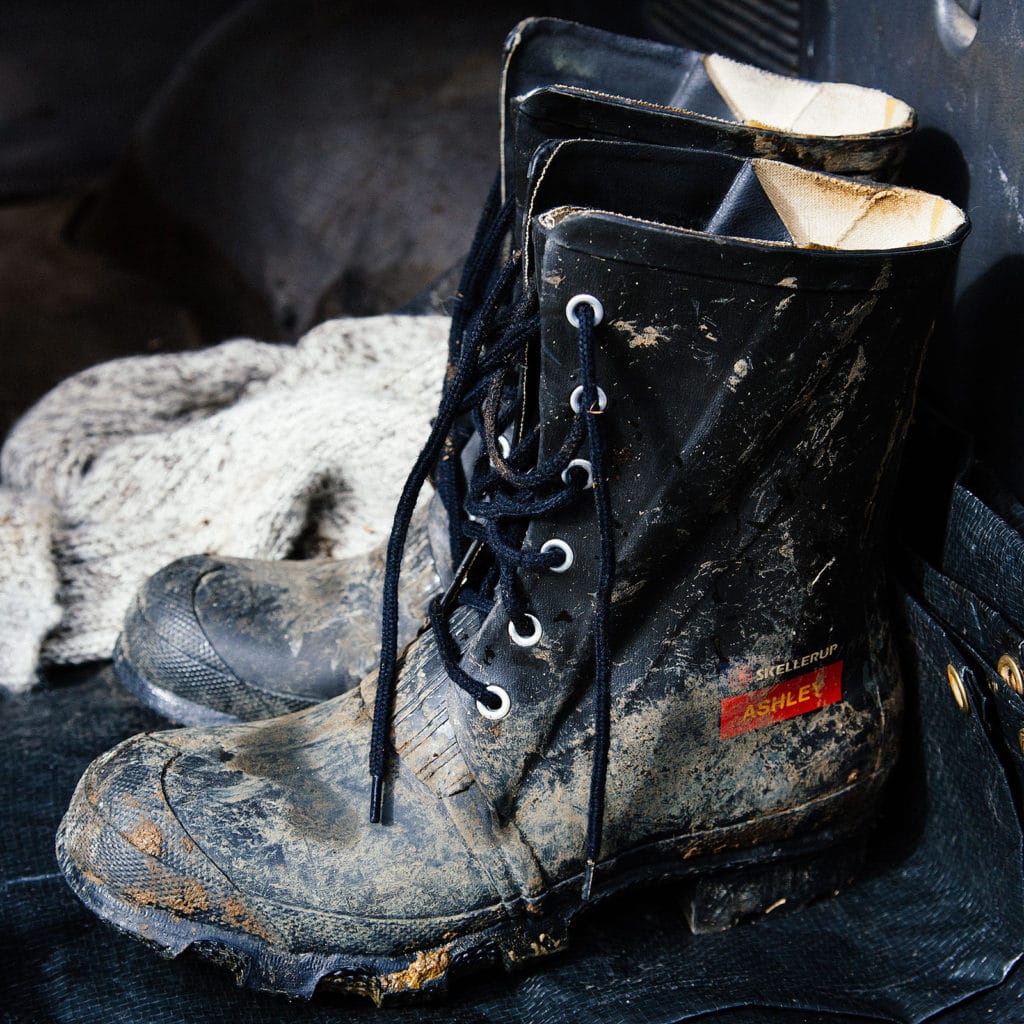
What Cartridge for Deer?

0

The age old question. It’s usually made with good intentions – the new hunter, armed with $1k in the bank and a passion for shooting some deer just wants to know an easy answer, what rifle to buy. What cartridge?

In my opinion, the answer is not so easy

To me, the best cartridge is the one that the hunter uses well. I have shot most of my kills (deer, goats, hares) with my .223. Does this mean it’s the best cartridge? Well, no!

13461119_10153464697767100_939007540_o

For the average Joe Hunter wishing to give advice, I believe that their use of multiple cartridges is potentially limited. If someone has used a variation of size bullets, I highly doubt that they have shot multiple platforms with the same cartridge. For example, their shooting experience may be with a Howa .243, a Tikka .308 and a Sako 7mm08 suppressed. Sure, that’s three cartridges. But it’s also three very different triggers, stocks, shapes and weights. I don’t consider that comparison particularly helpful when suggesting a cartridge as the shooter’s experience may have been impacted by the rifle platform. The heavy Howa with lighter projectile may have shot accurately and easily with minimal recoil, whereas the light Tikka with a short barrel and power of the classic .308 may have booted the shooter into developing a flinch, therefore affecting their accuracy and the lack of success may have been blamed on the cartridge. So, sort of in short, ask a mate but don’t take his opinion as gospel! The key to accurate advice is an impartial guide with plenty of experience. See: your local gun shop guru.

Here are my choices in my safe

Savage Trophy Hunter .223 suppressed by Shooting Systems Research, all else exactly as it was out of the box (standard 22inch barrel length included)

I am small and do not appreciate recoil. I am hard on gear (lazy when it comes to cleaning, I use my rifle as a walking stick/paddle/bush basher/cricket bat …just kidding). For the most part, the size of this rifle stock fits me well, and I shoot sub MOA consistently with this setup. Nine times out of ten (until recent mods of rifle No2) I would take this rifle as my choice for deer.1

13446226_10153464697677100_1231854066_o

“Black Beauty” custom Frankenstein build .260 on a Weatherby Vanguard receiver, (now) suppressed by Shooting Systems Research

The old version of Black Beauty – custom Stug carbon stock, but made from his regular mould. This was far too long a length of pull for me (the part of the stock where you put your cheek was too long for my arm and neck length) plus an incredibly meaty home-made limb saver, about an inch thick. This affected my trigger control and feel as I was using the very tip of my finger and overextending. 22inch barrel, home built suppressor on the end weighing about 300g. The overall length of the rifle was close to my shoulder height, and most of the weight was at the end of the barrel. I was shooting with reloaded 139gr AMAXes, which were accurate to a longer distance, but I found blew up on near side of closer range animals. I hardly ever chose this rifle in this state as I found it awkward to carry and shoot, although it was accurate at the range when I was given a good amount of time to set up.

13467550_10153464694067100_1520977274_oThe new version – most of that barrel had to go. New light suppressor, barrel down to as short as possible (the can screws back to nearly touching the stock); nearly three inches reduced in the length of pull via a sharp haircut of the buttstock; new thinner limb saver; trigger job. This rifle is HANDY! The TruFlite barrel has remained exceptionally accurate even at 16 inches. Apart from the higher cost of ammo, nothing stops me from grabbing this set up every time a hunt presents. I have switched my projectile and have had some outstanding results. I now shoot just as well (actually better) with this set up than my .223.

Enough About Me

Anyway. Enough about me. You – the new hunter with that cash burning in your pocket – do your research. Ask as many people as you can (make sure you include some professionals) and test out some rifles. Pretty much every centre fire will do the job in NZ provided you put the bullet in the right place. But at the end of the day, if you can’t put that bullet where you want to or if you don’t enjoy shooting the rifle, you’ve wasted your money.

13445847_10153464697867100_518824845_o

Make your own choice

Also now is probably a good time to warn you; nobody is going to make this decision for you. Get ready to develop a thick skin as a hunter, as you’ll have people from all sides coming at you no matter what you choose. “Your 7mm08 is a girl’s gun!” (not sure why that is an insult anyway…plus I’m a girl and don’t have one?) “Oh, you shoot with a poo-four-three!” “Kimbers aren’t as cool as Norincos!”

Okay so I’ve not ever heard the last one, but you get the idea. Make your choice and be proud of it. You never have to stay in one camp and just because someone else has had a lot of success with a setup doesn’t necessarily mean that you will too.

Ultimate solution – just buy more than one gun!

Rivers to Ranges

All gun work was done in conjunction with Jeremy at Rivers to Ranges in Hastings. With his direction I decided what mods to carry out, then he and his team got to work making this rifle the beast that it is now.

Hot barrels…


  1. Under the complete understanding of my limits with my 55gr projectiles. I use a ballistic calculator and range finder. My calculator lets me know the power and speed of the projectile on impact, and I limit this to a minimum of 500fpe for an ethical kill on a deer with accurate bullet placement. 

The Novice Deer Butcher: From Field to Plate

0

Spoils of my hunting

The spoils of Deer ButcheryProcessing the spoils of my hunting has quickly become a favourite hobby of mine. Having only hunted seriously for about three years, I consider myself a ‘newbie’ to pretty much all facets of hunting. However, I think I’ve picked up on a few tips that could make your life as a new deer butcher a bit easier. This past week I harvested three red stags. I’d like to share with you what I’ve learned over the past three years to assist me with the harvest of these triple chaps.

I believe it’s important to understand all the steps right from the beginning. Please note, this is just my  deer butchery process. I’ve picked up things from other hunters, books, and websites but moulded my style mainly from my experience. I am fairly small, not particularly strong in my upper body, and I have limited resources at home and a small budget. I will mention the equipment I have chosen to use to help me – this is just what I use.

I would also like to request before you read further that you respect my decisions of what meat to take and what to do with it. Every kill has different limitations and resources. I am not a wasteful person, so I consider every option and reflect on past hunts and butchering experiences before making the final D.

Stag 1

No big deal, just a huge 12 pointer from 443yards… long story short, this animal was very pizzled up (read: he had been jizzing on himself a whole lot) and smelled like a swamp. He was situated up a steep gut and over a muddy, silty river crossing. By the time I got to him, it was pitch black. I removed his back steaks and noted the very deep reddy brown colour of the meat and pungent smell. I decided to take the head and back steaks only. Once I made it back to my vehicle (this took two trips because the head itself was heavy enough for me!), I placed the meat into a sack I made from a tube of mutton cloth by tying a knot in both ends. The temperature was about 16oC and about an hour later the meat was in the fridge back at the hut.

Stags 2 & 3

Both these boys were shot in the front shoulders by .308 and .260 respectively within 300yards. These stags were out by themselves and had no girls. They were not so smelly, and I guess they were less than three years old. Stag 2 suffered immense damage to both front shoulders due to the hard hitting .308. Stag 3 appeared to have smashed the near side shoulder only. The animals came to rest in a fairy accessible area – flat with only a small drain to cross.

My partner took the head, back steaks and back legs from stag 2.

I took the head, back steaks, back legs and far side shoulder from stag 3.

We kept the skin on the legs and placed them in our chiller box made for the back of the ute. This box is made from chiller panel but has no method of being cooled – it is just very well insulated. Think of it as a giant chilly bin. After about two hours we reached a petrol station where we purchased five bags of ice which we cut open and distributed over the meat. All the back steaks were placed into a fish bin, and the mutton cloth still identified the big smelly stag’s steaks.

I think this is a good time to mention that it is important to cool your meat as soon as you can. In this case, we separated each leg individually and carried them one by one over a shoulder. Usually, I will keep the back legs together and make them into a backpack to travel longer distances. If you do this or are lucky enough to be able to take the animal whole, it is imperative to open up the hips and ball joints as soon as you can. The H-bone holds so much heat; it’s quite staggering. This heat will taint your meat if you can’t cool it down quick enough.

Deer Butchery 101

The Hanging

I am lucky to have access to a full-sized walk-in chiller. If you don’t, a fridge does just fine. This is what I used to do (make it a dedicated meat fridge out in the shed or garage, though!). It is important to have good air circulation around the meat so place legs in the fridge without touching each other (skinned) and lay back steaks on a wire type rack. If you’ve taken the whole animal, it’s not necessary to hang flaps/trim so just chuck them in a rubbish bag and straight into the freezer.

This time, I let all my meat hang for seven full days. Sometimes I will process it after as little as four days; it’s different every time. It just depends on the meat and my schedule.


The Processing – Deer Butchery

FullSizeRender (1)This is where I wanted to share what makes things a bit easier! It’s best to prepare all your gear before you start. Making things easier for yourself makes this job so much more fun. Add a couple of beers, music, and some mates and you’ve basically got a party. Now that it’s not so difficult, butchering has become one of my favourite parts of being a hunter.

I’ve got a dedicated butchery bench in my shed that I made out of a couple of pallets and some plywood. I also have two chest freezers that, with the addition of a chopping board, make okay benches. For whole animals/huge legs, I have a pully and various hooks too. This time though I decided to make the most of the warm weather and do everything outside on the back of my ute.


Here’s the stuff I prepared:

  • Chopping boards. I have a selection of giant nylon boards I got from the warehouse and old hunks of ply and other giant wooden boards
  • My fav is the butchery set from EKA and a good steel my partner already had
  • This could be the hose, but I use a 20L container with a tap
  • Scrub brush
  • Drink bottle (‘cos you might be out there a while!)
  • Gumboots
  • Apron
  • Fish bin
  • Old buckets with rubbish bag liners
  • Giant thick rubbish bags
  • Freezer bags/Glad wrap
  • Permanent Marker/Vivid

IIMG_0335t’s important to remember that although it’s a gruff manly outdoorsy thing, deer butchery is still handling food: hygiene and tidiness are very important. I wash my hands and knives frequently. As I still had the skin on these legs, deer hair/grass/dirt is in my processing area, so it’s important to keep cleaning the items that get dirty and keeping finished products separate.

My process is to:

  • Filet the back steaks – by that I mean remove the sinew
  • Bone out legs, steaking and packaging as I go
  • Add to trim bin as I go
  • Organise meat in freezer
  • Clean up

I use freezer bags for my steak/chuck meat and mark accordingly. I separate everything else as I go, and that’s where the buckets/bins/bags come in handy.

Trim Bag

For me, this time, this was a cardboard box holding open a giant black rubbish bag. It ended up being too heavy, so I split it into two bags once I was done. Trim is anything that is not easily steaked, cubed or has an annoying amount of sinew in it. The meat around the lower legs goes into my trim bag as well as the smaller muscle groups in the back legs. Pretty much all front shoulder meat goes into my trim bag. We are very fond of the patties and sausages that come from our mate Rob at Wild Game Salamis! Once I’m done, the bag gets marked and then chucked into the freezer until I’m ready to take it to the butcher. If it isn’t much and you’ve got another hunt coming up, you can wait until you have a substantial amount. Trim keeps for quite a while in a well-sealed bag in the deep freeze.

Dog Food

This is small stuff, whatever I feel generous giving to the pooches. DO NOT put sinew or coagulated blood, rotten meat or anything nasty into your dog food bin. What goes in must come out and trust me you don’t want to have to be involved in the “out”. Venison bones are great for dogs. If you have the freezer space, separate to whatever you want (I keep whole bones together as my dogs are pretty big) by cutting tendons or using an axe. Remember that whatever you chuck in the freezer will freeze together so either use sheets of plastic or separate strategically so you can smash with a hammer later to get individual bones out.

Rubbish bucket/Fish Bin

IMG_0395Bloody meat, anything a bit dicey, long filets of sinew, etc. If you don’t have much, clearly label this as rubbish and freeze it until rubbish day. If you have loads, make friends with someone who has an offal pit.

Boss Wear

Wearing an apron and gumboots will not only make you look like a boss, but it’s so much easier to clean up and keep your meat clean. I tend to have to use my whole body to move around big legs, carry boxes, etc and having a clean apron be the contacting surface with your game meat is much more hygienic than whatever you are wearing under it. I have a pretty big selection of aprons these days for different jobs. Honestly, they are wicked. I got my butcher’s apron online for about $25. Gumboots are easy to hose off, and it won’t matter if you’re standing in a puddle while processing. Essentials for deer butchery.


Clean Up

It’s tempting to leave the clean up until later, but trust me, do it right away. Scrub all equipment with dishwashing liquid and water. Leave chopping boards to air dry but look after your knives. Sharpen and oil accordingly. Ensure your rubbish is in a safe place where your dogs can’t get it (Tess puts me to the test on this one) if you can’t dispose of it straight away. If you used a fridge to hang your meat, turn it off, clean the inside and let air out with the door open.


There you have it!

That’s a basic run through of how I have settled on doing my deer butchery. I’m always finding out new tricks with each animal, and I think it’s important to keep an open mind to any new ideas that might help you. If you have any tips yourself or still have questions, do not hesitate to comment or check out my full bio.

Hot barrels and sharp knives!

Dougie

IMG_0398


Crispy Bacon – the quest continues

0

Bacon-Cooking-(1-of-6)

Like many blokes, I like eating bacon. Lots of it. Lots of different ways.

The challenge I have had, cooking the bacon in a pan, is that without fail1 you end up par boiling the stuff and get a kinda fried, boiled, not particularity crisp bacon.

So, I wanted to try out a couple of different ways of cooking bacon to see out how they would turn out.

Method One: In the Oven

It’s simple – place the bacon in a pan, put the pan into a cold oven, turn up to 204°C and leave for twenty minutes.

The two keys to this method are – using a cold oven to start with and, not putting the bacon on a rack – you want it to cook in it’s own fat. If you want, once cooked, put it on some paper towels to get rid of some of that fat – or better yet, strain and store it for seasoning your cast iron pan!

The bacon, is what I would basically describe as ‘American’ – really crispy, to the point of being burnt. That is simply remedied by reducing the time in the oven.

Method Two: In the Pan

With a twist – or more correctly – with a pile more water. In this case, you are essential boiling the bacon first – which to be honest, I was a little hesitant about initially.

Bacon-Cooking-(4-of-6)

The idea here, is to put the bacon in, cover with water (cover, not just a little bit) and turn the heat up high. As the water boils, it renders the fat as well as stopping the fat splattering all over the place. Once that water boils away, you turn down the heat and continue to now fry until till crisp.

The bacon was ok, but the issue was that I had to basically keep an eye on the pan for when the water boiled away. It also took about the same time as the oven, but basically required more attention.

Bacon-Cooking-(6-of-6)

Which method?

My vote in this case goes to the oven. It’s easy, little mess and results in bacon that got picked by myself and the misses. So, from now on, as part of the weekend morning breakfast routine – the bacon is going in the oven!


  1. especially for store bought, brine drenched, mostly water bacon 

Adequate, Ample, or Addiction?

0

20150404_142913

This is my Dad’s gun collection.  I refer to it as his arsenal.  He is adamant each and every firearm has a purpose and he needs to own all 13.  My sister and I tease him that we know where to go when the zombie apocalypse finally happens.

That being said where do you draw the line?  Some of these guns hold sentimental value for Dad and he just can’t bear to part with them.  For instance his Bruno .270 he bought brand-new 35 years ago or his Grandfather’s side-by-side hammerlock shotgun.  The .270 still gets taken out on a regular basis but the hammerlock simply sits in the safe.

I can see the rationale for owning each gun on an individual basis.  .303, .270, .243, .223, and .22 are all useful calibres and each has their place dependant on the game and situation.  However, it’s when you start straying into the territory of owning 3 separate .270s (his Bruno, one for me, and a single shot) that you begin straying into a grey area.  Same with the shotguns.  Pump action 12 gauge, single shot 12 gauge, single shot 10 gauge.  Who needs that level of diversity?

Maybe, it’s me.  I’m not nearly as passionate about hunting as Dad is.  Maybe, if I was as dedicated as him I wouldn’t see the issue with owning this many rifles but without that level of devotion I struggle to wrap my head around it.

Nevertheless, as the years go by Dad is beginning to slow down and the idea of lugging around 3kgs of wood stock and bulky scope is becoming less appealing.  I think I need to encourage him to downsize his collection and invest in some quality, lightweight gear so he can continue doing what he loves into the distant future.

Everyone needs a hobby and as long as he’s safe doing it then who am I to pass judgement.

The Collection

  • Side-by-side hammerlock shotgun
  • Pump action 12 gauge
  • Single shot 12 gauge
  • Single shot 10 gauge
  • .303
  • .303
  • Bruno .270 (his)
  • .270 (mine)
  • Single shot .270
  • .243 (sister’s)
  • Single shot .223
  • .22 magnum with silencer
  • Pump action .22 Winchester

Hearing Protection Choices

0

In my previous post – Shooting and hearing damage – I covered what you could be doing to your ears by not wearing suitable hearing protection. This article is about some of the options available to the shooter and the pros and cons of different systems.

No matter if you are shooting a pistol, bolt action, AR, shotgun, black powder or anything else that goes boom, you need hearing protection and you need to understand your options.

shooting

Hearing Protection – anything, is generally, though not always, better than nothing.

If you get to the range, realise you have left your hearing protection at home and decide to put wet, wadded up balls of toilet paper in your ears rather than shooting with nothing? Well – you are still an idiot and now you are an idiot with toilet paper in your ears.1

However, the point being – while something is good, the proper equipment is much, much better. It’s a real danger for selecting something that isn’t actually providing you with the required protection and gaining a false sense of security, only to realise years later that the hearing protection you have been using, well, isn’t protection much at all. Make sure you get the right stuff, and good stuff.

shots2015_10_024_Waiuku_PWS

New Zealand – Hearing Protection and Classes.

In New Zealand, hearing protection is required to be tested to and comply with the AS/NZS1270 Standard “Hearing Protectors” – this gives hearing protection a class, or grade – indicating the level of protection it provides – based on peak volume levels – we get –

Class Peak Level
1 90
2 95
3 100
4 105
5 110

If you remember from the last article (again, over here) – a gunshot can be considered around 140db. A .338 with a muzzle break? Call it 170db.

So, no question. Class Five is the only option here. Meaning, if your current hearing protection is not rated to class five. You are still damaging your hearing, even while wearing them.

You can read more about the standard and recommendations here – Worksafe Website

So. Class Five it is. But what about Earmuff’s vs. Earplugs?

Earmuffs – easy, large.

STAC-GN_Anwendung_DI own a pair of the Peltor SportTac’s – they were an early acquisition for me and have served me well – certainly, the active technology in the earmuffs makes communication at the range(s) easy.

One thing I highly, highly recommend with the Peltors, especially if you wear glasses while shooting – get the gel replacement earpads.

Without them, the arms of the glasses will break the seal on the earmuffs, making them less efficient and less comfortable. With the gel muffs, I can happily wear them for hours without my glasses slowly crushing the sides of my head in. Not a nice sensation at all!

However, for rifle shooting, I still struggle with wearing a pair of earmuffs – try as I may, I always seem to end up with the earmuff sitting on the stock. This is particularly problematic with my 700 build – where I have a chest riser and low rings. For the actual setup of eye relief, this is perfect for me, but it means that with every shot I take I get a hollow ringing sound through the earmuffs. I think this is a combination of the contact point and the electronics of the earmuffs. It’s just something that ends up drawing more of my focus to it than I would like – so I generally try to avoid earmuffs while shooting with the rifles, pistol – not an issue.

The other issue you can get with earmuffs, especially with us heading into summer, is heat. There is nothing like an insulated, airtight seal2 around your head to help create heat and sweat.  I find that earmuffs can get quite warm – enough that you want to pull them off between strings of fire in order to let the sides of your head breath a bit. This leads to my recent mistake of then forgetting to put them back on again. Especially when you are used to earplugs and just permanently having them in.

Earplugs – small, fiddly, better?

My personal preference is a decent set of earplugs. Why? Because I put them in my ears and generally forget about them. Sure, if I am away from the firing line and having a big conversation I tend to pull them out – but because I have moulded earplugs, that means I simply twist them a little, they stay in my ears, I know they are out and when I head back to the mound/stage I just push them back in.

Unlike the basic foam earplugs, a decent set will selectively filter out noise – not just muffle everything – so a good pair will allow you to leave the plugs in and have a conversation. Sure – maybe not quite as clear as a pair of active earmuffs (though active earplugs do exist) – but enough so you don’t feel the need to remove them in order to hear a conversation.

Also, the earplugs are smaller, don’t interfere with the cheek weld/rifle stock and are cooler and lighter on the head.

The one issue I have had a couple of times, due to their inconspicuousness, is needing to point out to the enquiring range officer that you have hearing protection in.

Your choice

As I stated in the beginning of the article, any hearing protection is better than none. Unless your are firing a suppressed rifle on private land3 – you need to get some good hearing protection and wear it. Always. Otherwise you will suddenly realise in twenty years, that you are having to ask people to constantly repeat themselves, or even worse, becoming detached from conversations altogether because it is just too hard. Protect them now, prevent the damage in the first place.


  1. I was known to do this in nightclubs back in the good old days. 

  2. a requirement of earmuffs, obviously 

  3. and even then, hearing protection may still be necessary