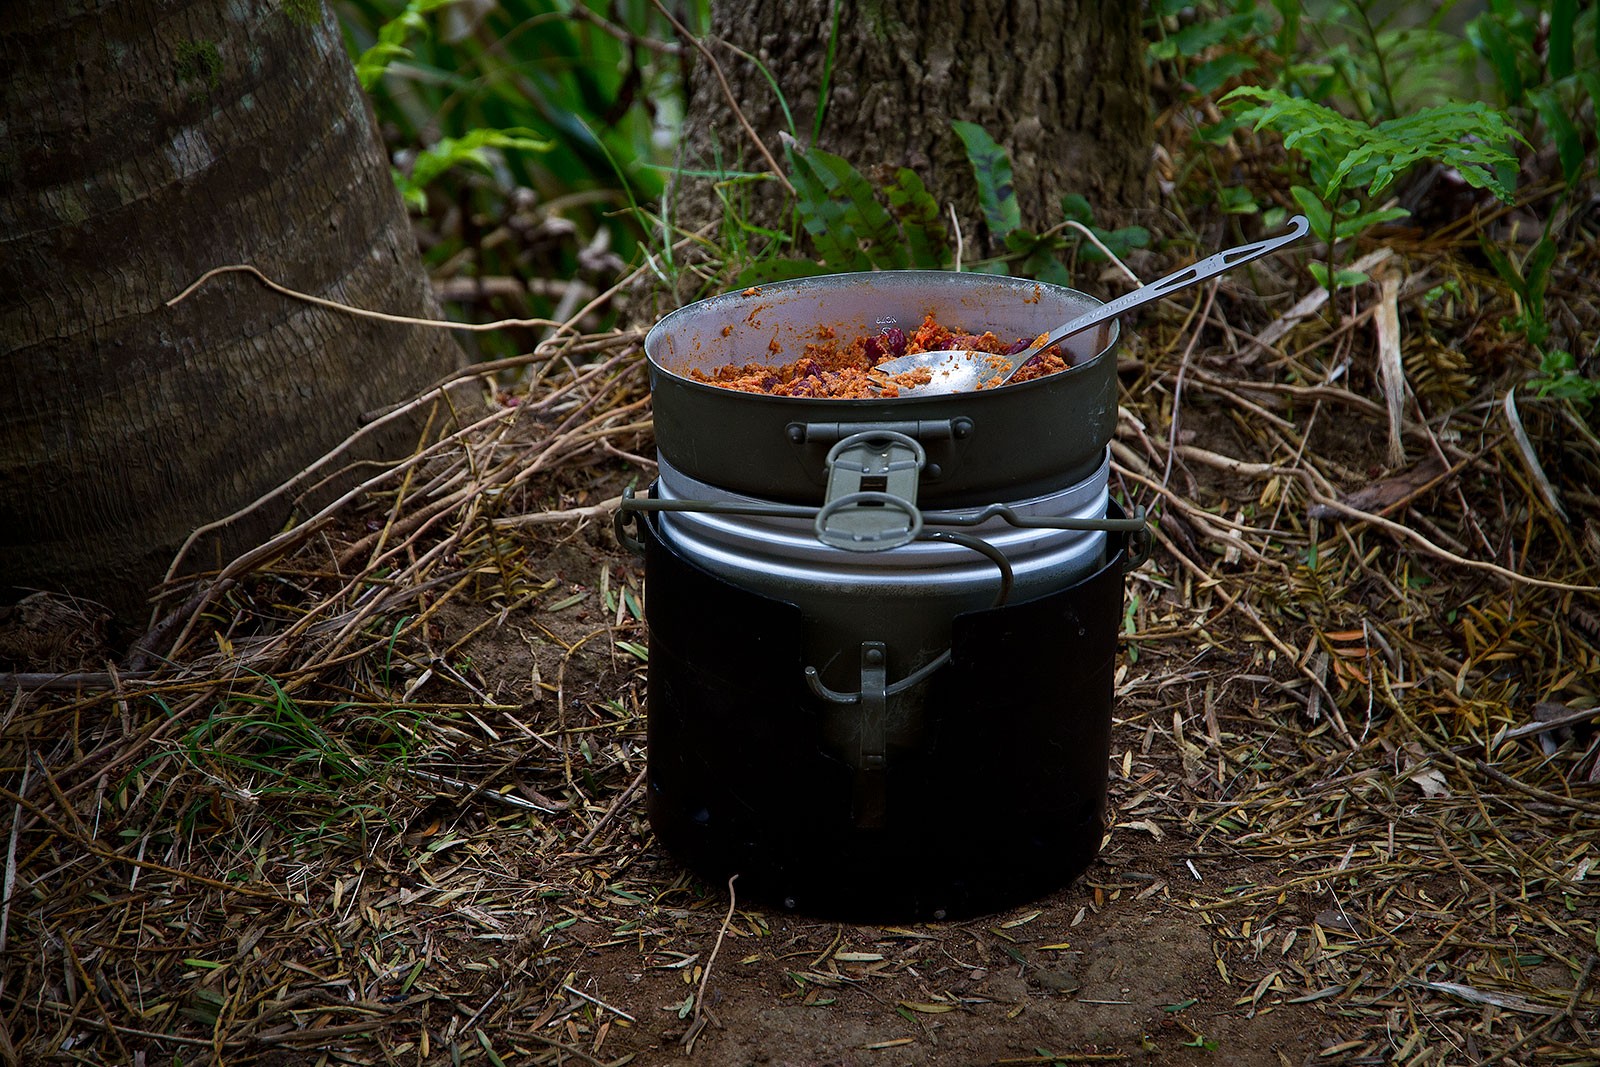
I wasn’t quite sure what to call this article – as there are really several different systems that fall into this category. For the purposes of the post though, we are talking about shaped shelters that often are still utilising poles, guy lines and tent pegs to keep them up.
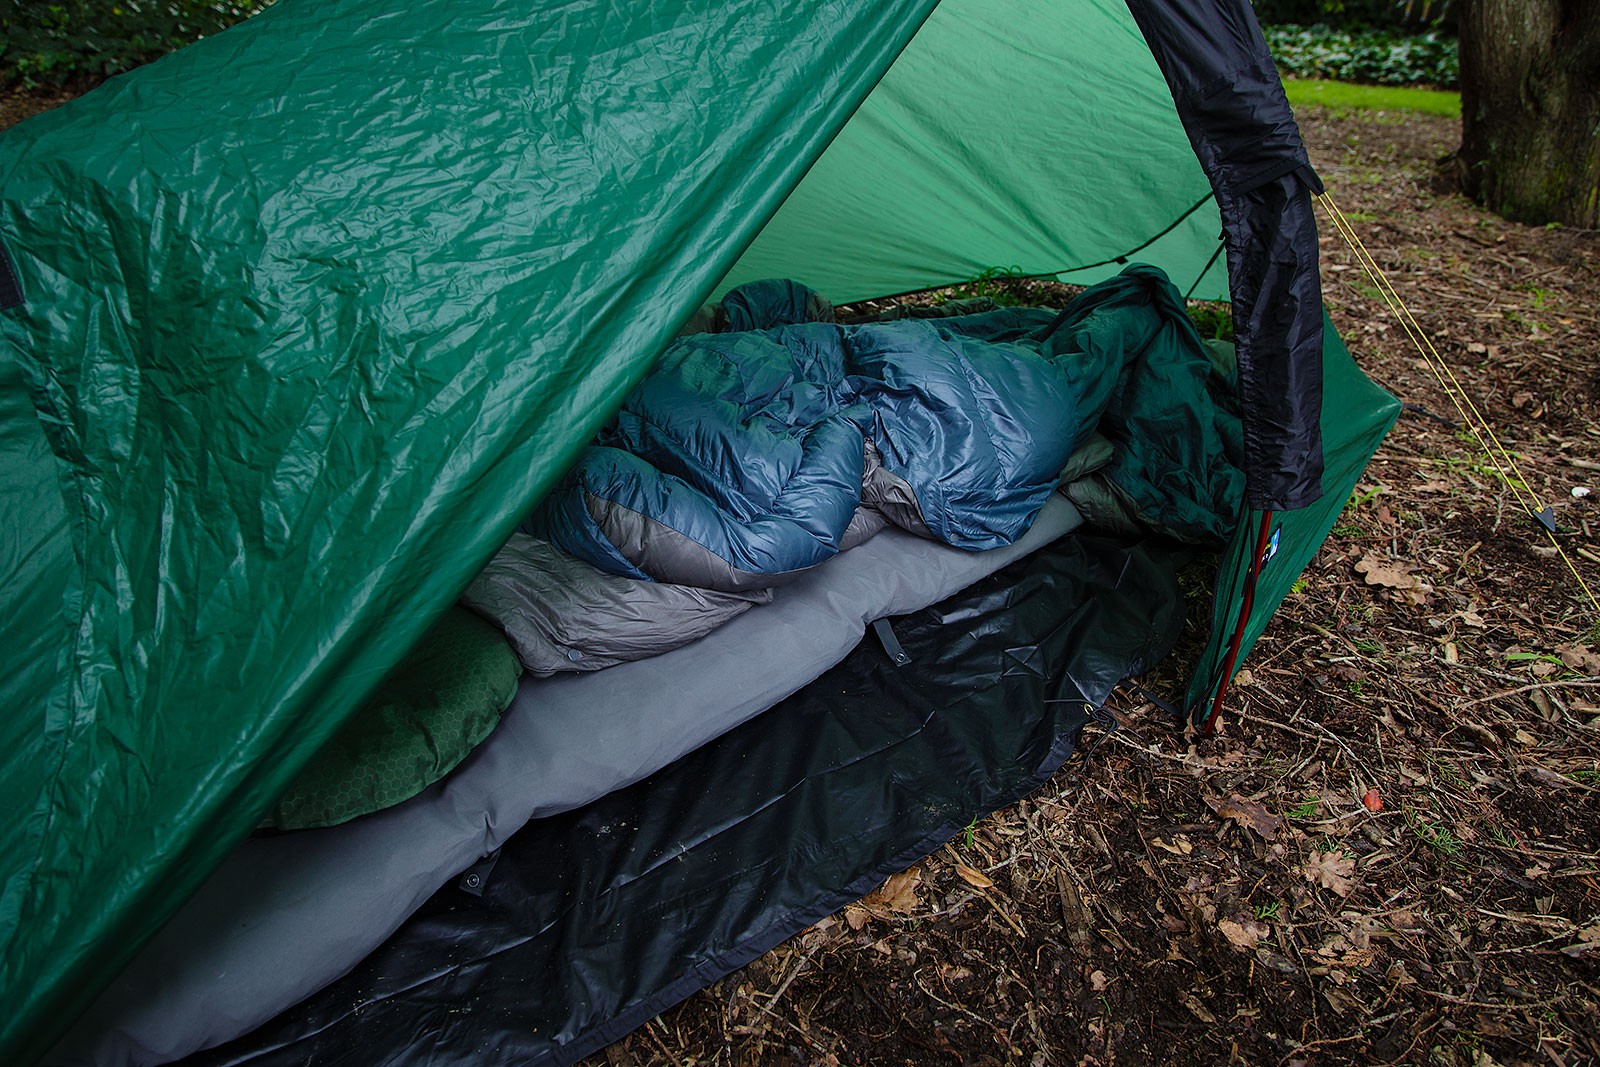
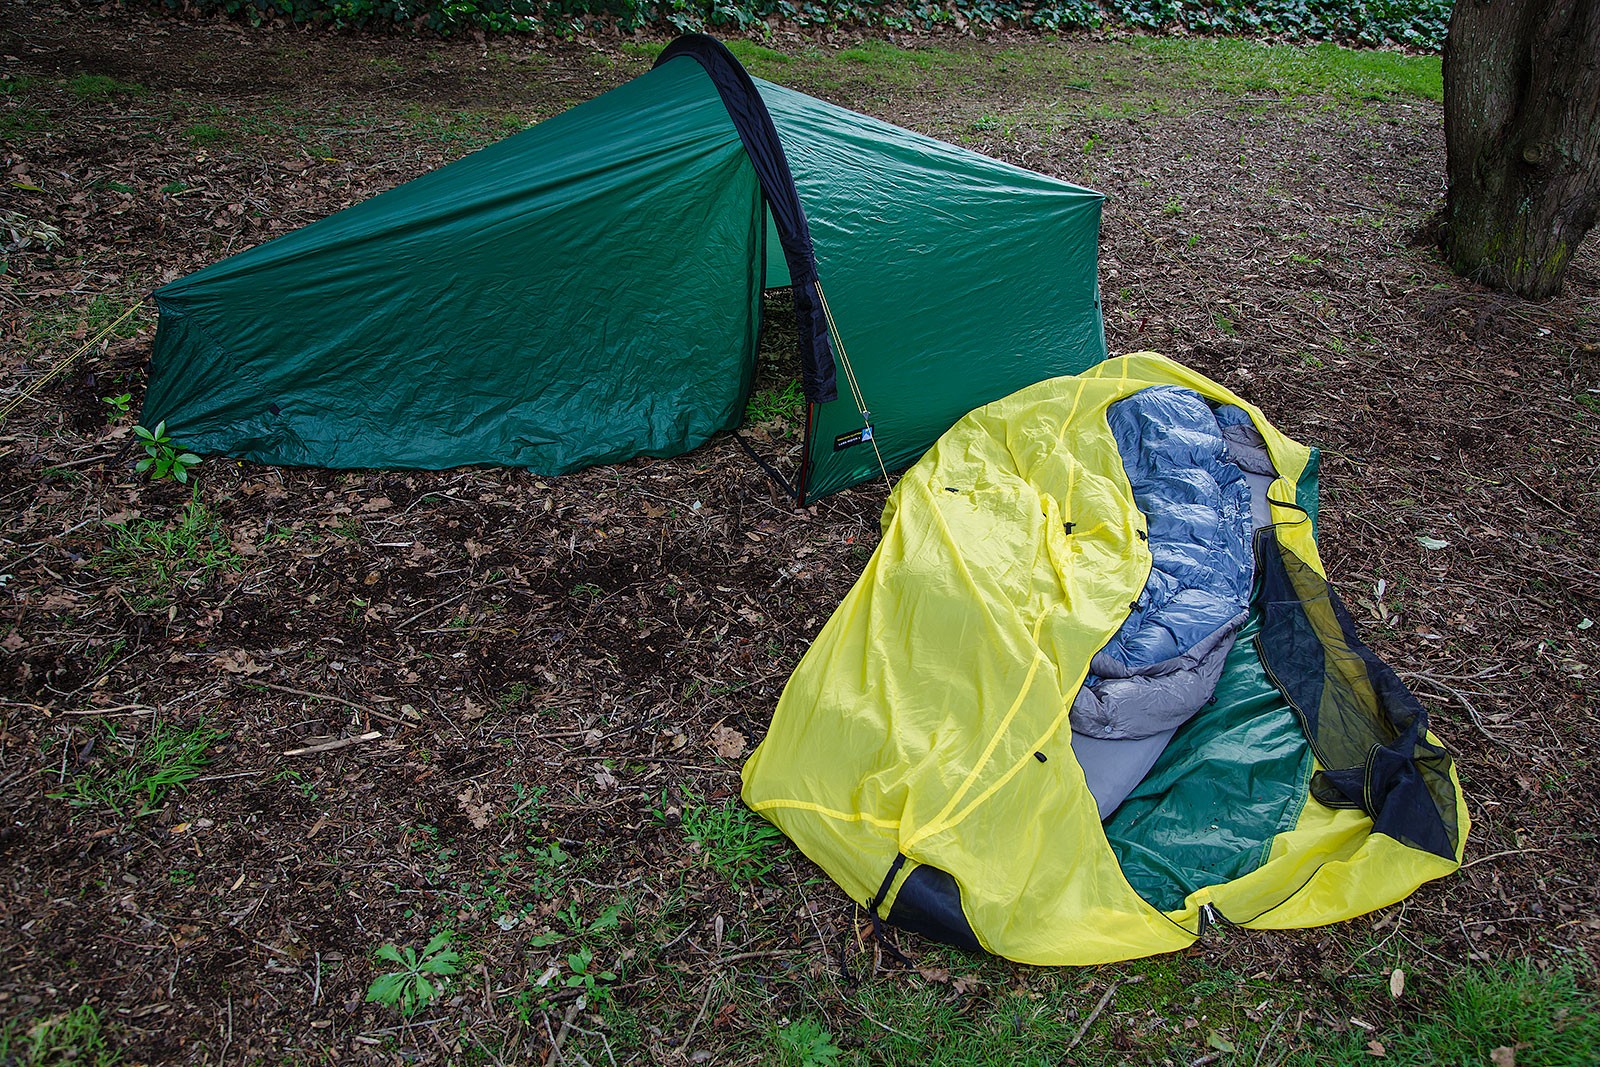
Many Double Walled Tents1 can have their inner mesh layer removed – leaving you with the fly, or a single-walled tent. Some of these will have the bathtub style floor permanently sewn in, and some will have them separate – like the Photon.
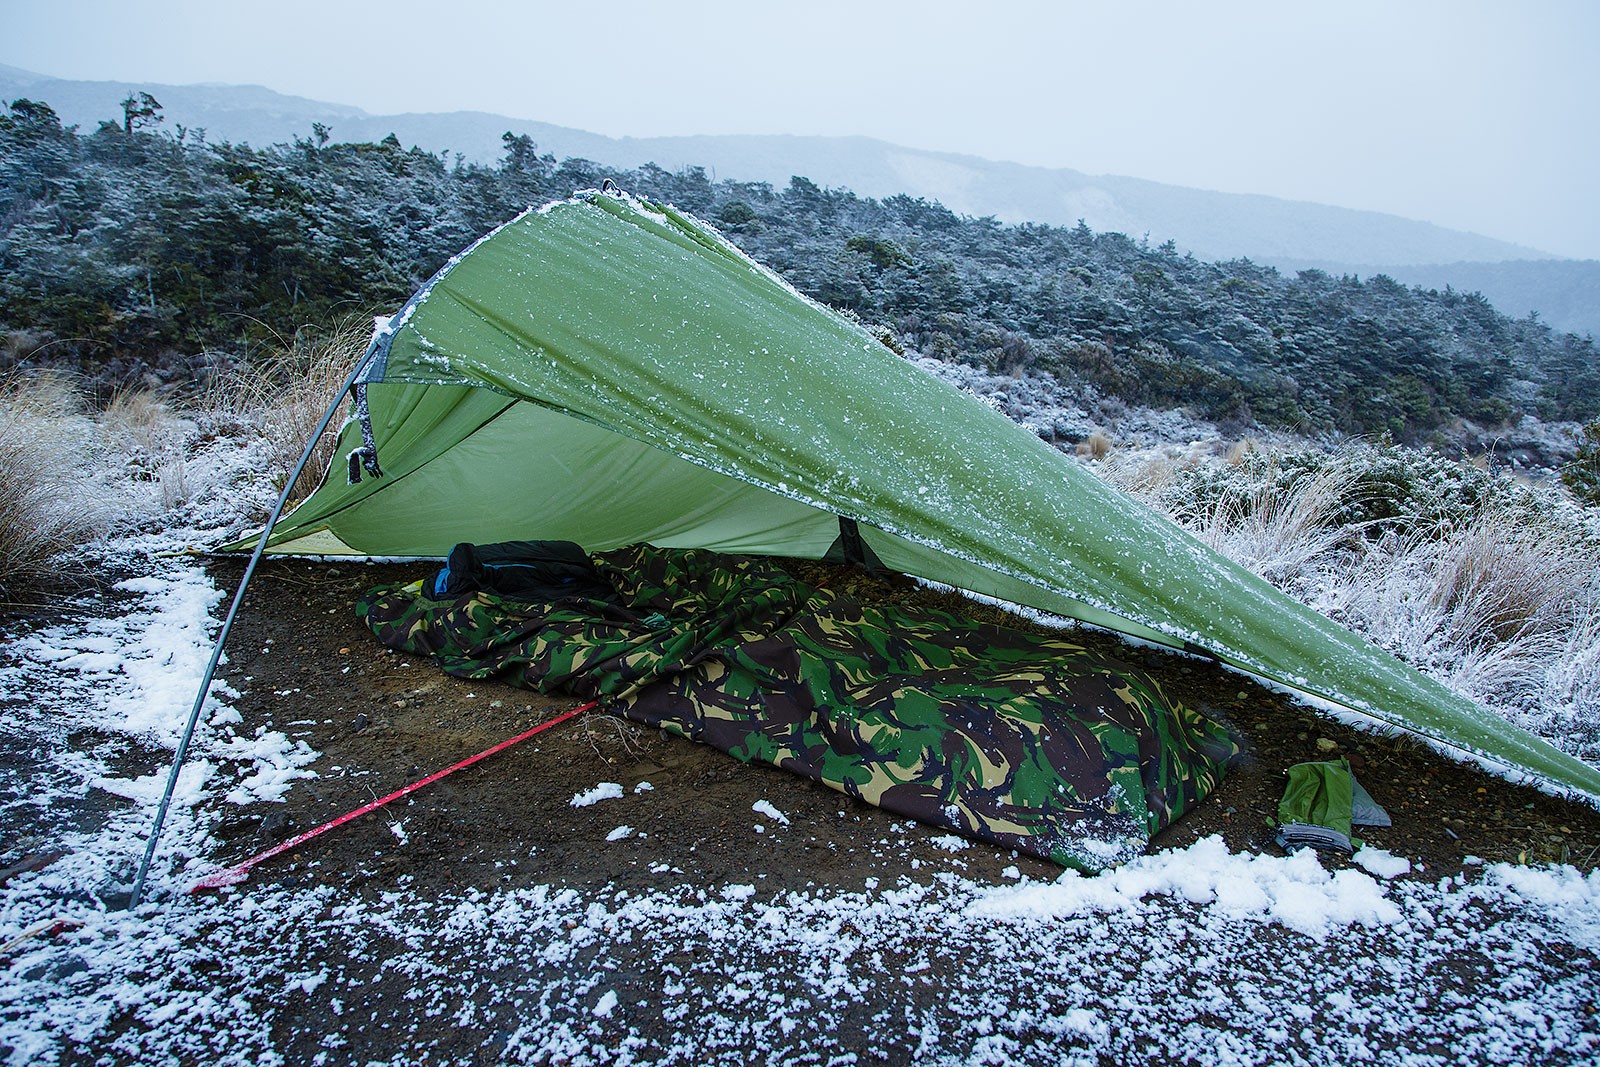
Specifically, in the case of the Terra Nova Laser Photon 1, you can get the Fastpack system instead – which is essentially a floor that will sit under your sleeping mat/roll and keep you dry underneath. The fly, by itself only weighs 355 grams, so you can start to see it’s potentially a very light shelter.
Floors or Bivy Bags?
The other option you have with a single-walled tent is going without a floor as such, and instead of putting your sleeping bag into a lightweight bivy bag. I am going to cover bivvies more another article – but essentially in this case you are using them like a sleeping bag cover – keeping them away from any moisture on the ground, as well as any splashback you might get from around the edges of the tent during heavy rain. Regardless, the goal is to keep the sleeping bag dry.
Weather, Condensation and Airflow
Be it in the form of just using the outer layer of a double system, or a specifically designed single-wall tent, where they do differ from a simple tarp is that they are generally going to be shaped to give you peaks and vestibules – as well as often having mesh panels to help the air keep moving through.
This shaping is going to help when the weather gets rough – having some form of aerodynamics is going to help keep the rain and the wind out, providing more shelter when the weather gets nasty. In addition, vents mean air can keep on moving through the inner space (in a controlled manner) so that condensation doesn’t have a chance to form, potentially meaning you wake up in the middle of the night with it raining on the inside of the shelter.
Advantages
Generally quick to set up
Venting allows for good control of condensation
The living area of the tent stays dry when pitched in the pouring rain
Aerodynamic shapes provide good wind resistance
Fast drying
Disadvantages
If the mesh doesn’t completely close up – you may have bugs
Won’t be as warm as a double skinned tent
You need to be aware of where you pitch – they have the potential to flood more as the floor isn’t always a full bathtub style
Best Used When…
You have a flat site to pitch the tent on
Not the middle of a storm, up to moderate winds
Great when you want to travel light
You are wanting to get out of a full tent, but maybe not ready to go to a traditional tarp
Because obviously, if you can’t shoot, there is only so much gear will help.
If your rifle isn’t capable of shooting, then it may not matter what you feed it. If you are shooting animals in the bush at 50 meters, then some of the things we are going to talk about certainly won’t apply to you,
If you don’t have a desire to do right by the animal, and the hunting community by ensuring that when you pull the trigger, you are making ethical shoots, then, well, sort out your game.
TLDNR – What does better ammo do for me?
It reduces your margin of error. I could (and will) go on about how a better BC will have better ballistic performance in regards to both elevation and wind hold, as for that matter, doe certain cartridges, but at the end of the day what it actually all means is this –
Better designed projectiles (bullets) provide the same killing power, but also reduce your potential to miss should you incorrectly estimate the range, or, under or overestimate the wind you are shooting in.
So yes. They are worth it if you are planning on taking any long shots.
But why?
Ok. So as a primer, pop over and read my article on what exactly BC is. We are going to be talking about projectiles, BC’s, velocities and the like for a bit.
Essentially, the BC is a measure of a projectiles performance and ability to ‘slip’ through the air. Higher BC, better flight characteristics. Better flight characteristics, means more velocity (more correctly, it losses velocity slower), less flight time, so less drop and less ‘pushing’ about by the wind. All of the things that are of interest when hunting longer range.
Speed Kills
You know the Road Safety Adverts, well, it holds true for bullets hitting animals as well. It’s fairly logical – if we are talking about an object of the same weight hitting something faster or slower, the faster hit will cause more damage.
Now, sure, the projectile design also plays a large part in this. But for the purposes of this article, we are going to consider the projectiles being discussed to be of close enough performance in regards to expansion to not matter – of course – you shouldn’t be using match bullets or ammo to hunt with – because, at some point, the design becomes more about BC than expansion – and a bullet that doesn’t expand, is likely to pencil straight through an animal – causing bleeding – potentially not enough to kill, or, enough to cause a slow death. Neith of which we want.
Maybe something that isn’t thought of as much – but more velocity means less flight time – and when we are getting up into the seconds, there is actually ample time for your target to move. Maybe not completely out of the way, but moving enough to cause a solid hit to become a wounding one.
A projectile that gets there faster simply reduces the potential for this to happen.
Drop it like its hot
Sorry, not sorry.
More speed, less time for gravity to pull the projectile back down into the earth, so less drop. Now, while gravity is a mathematical constant (as we deal with it), then drop you have to dial is going to also be constant. However, more to the point, if if you need to dial less, you have less margin of error. This also translates into having more wiggle room when it comes to getting your range wrong.
While I would suggest that a rangefinder becomes an important component when you start shooting out to a distance, for those guesstimating range – a bullet that requires less dial i.e. is flatter shooting – is going to be more forgiving if you get the range wrong.
Yes, we have a slightly different grain weight. I know that.
We also have different ‘box velocities’ of 2854fps from the PPU and 2770 from the ELD-X. Less velocity for the heavier projectile. No real supprises. BC’s are .459 for the PPC and .574 for the ELD-X. Let’s run some numbers.
I am going to use Coldbore, and it’s excellent Error Budget functionality. Read up about that over here. Couple of ‘assumptions’ – Ranging Error allowance of up to 10 meters either way – I mean, you should be using a rangefinder, but let’s just allow for a bit of variance here. Wind Call error of up to 2 miles per hour around an average of a 10mph wind call. It’s likely actually more unless you happen to be Todd Hodnett. Spoiler. You ain’t. I allowed an SD on both ammo of 14.27 – which, for factory ammo, is generous. Finally, I allowed a system accuracy of 1 moa.
PPU
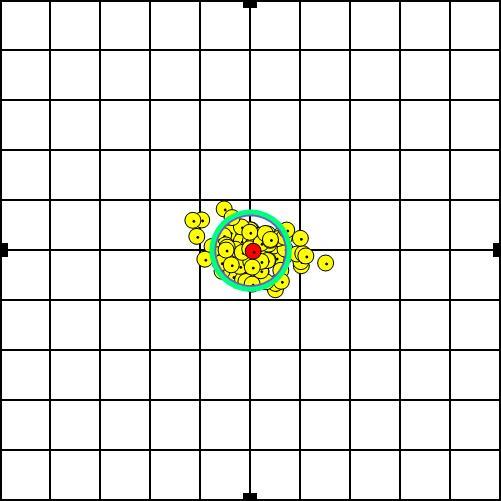
For the PPU, when all is said and done, at 500 meters – you have a probability of hit of 66% – all going perfect (assuming you don’t pull the shot) that’s the mathematical likelihood of hitting a 6-inch target at that range. I use 6 inches – because, if we are being honest with ourselves – outside of that and we face a real risk of injuring an animal – either missing completely, or hitting low in the legs, or a gutshot.
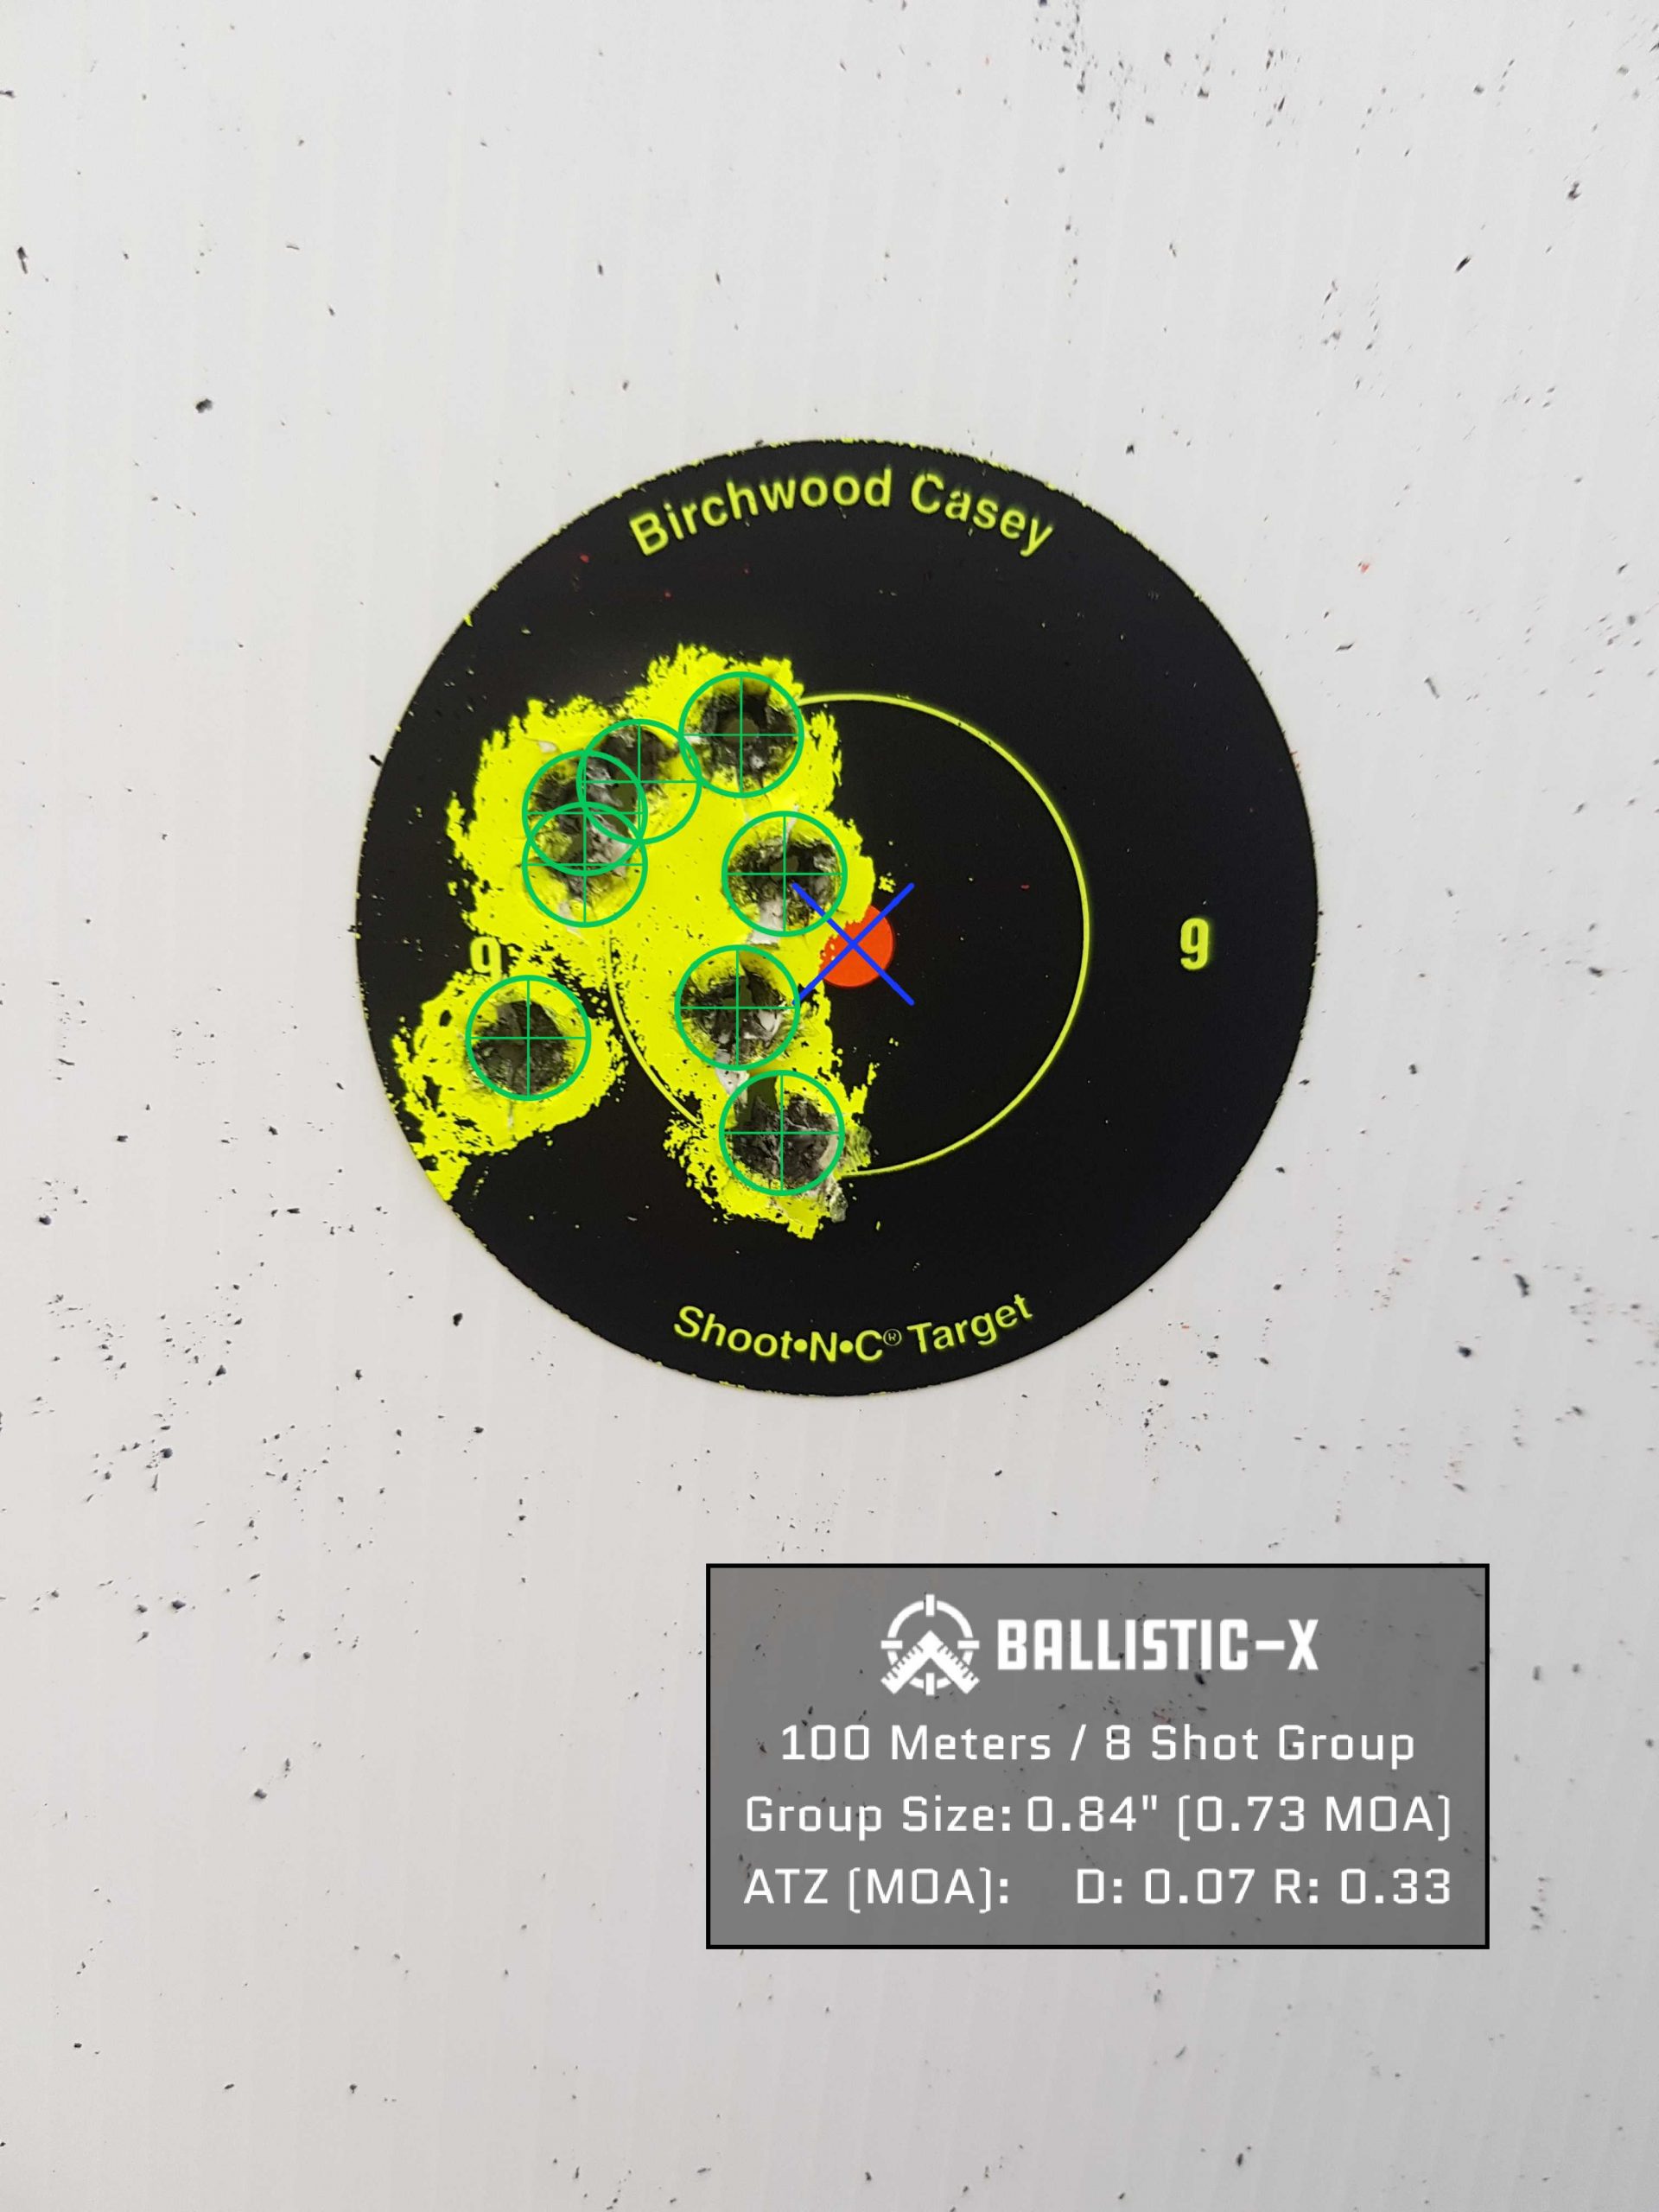
The purple ring is the ‘system’ accuracy – the green is the target diameter.
ELD-X
And how does the Hornady fair?
83% chance of a hit. Same 6-inch target, same variables, the only change being the BC of the projectile and less velocity.
If you compare the two pictures, you might notice that most of the variation is over the horizontal spread – the basically means – that the higher BC is going to give you more flexibility when it comes to your wind call. Potentially the most tricky part of hunting and shooting to distance.
I do have to point something else out though.
83% isn’t really an ethical shot. Sorry to break it to you. And it’s not until we reduce the distance to around 300 meters that we show a 100% likelihood of a hit. Again, that isn’t accounting for you pulling a shot, stuffing up a position or the multitude of other things that could go wrong.
Out of interest – I also ran the figures for the 300PRC Eld-X Load – 212gr – and – we are presented with a 100% hit rate at 400 meters and 93% hit rate at 500 meters.
So – in conclusion. Premium Hunting ammo does increase your likelihood of hitting. So does using the right cartridge for the job. 😉
The Police have now released their Buy-Back Price List. Many of you will have already seen this – but I am also away that I have a large enough reader base that even more of you will have not.
I would expect that the majority of firearms are going to be deemed ‘used’. So that is the price line I would be looking at.
If you have a firearm on there that isn’t listed, you need to get in touch with the police.
If you have an AR made out of multiple brands (like many are) – you will need to get in touch with the police.
If you feel the valuing is unfair, you will need to get in touch with the police.
There are already really more questions than answers, as was always expected.
However. Right now. Like previous advice, I would suggest you hold tight, follow the law, but just keep the firearms locked up safe and do nothing.
I would expect there will be legal challenges to this pricing and process, and I would imagine that the people quick to react will likely get a little mixed up in the wash.
A good example would be people who have been quick to have their firearms modified to be kept legal (pinning/blocking/permanently modifying lever action 22s or tube feed shotguns for example) – the police have indicated that there could be compensation for people having their firearms modified to comply – but I am not sure how this is going to work out for people who have already had the work done.
As always, you need to follow the law. But I would suggest the laws/figures/process are still being solidified and many potentially change a bit in the next few months.
Handing In Community Events
This part does genuinely make me nervous. A whole bunch of people, in a large public space, there to hand in firearms that they potentially do not want to be handing in, not sure if they need to be handing in, wanting to discuss, potentially argue… it doesn’t sound like a good recipe for a smooth operation.
I would expect there will be protests – from both sides of the situation, long delays and waits, all kind of helping fuel what will already be a tense and terse situation.
By the sounds of it, there will also be the option to discreetly hand the confiscated firearms in at dealers stores and locations – and I would pick this would be a much more civil and calm affair.
Our Public Face
There is already enough public conversation and option going on out in the NZ at the moment, and I am not really 100% sure what more I could contribute – I would just suggest to some though, that this shouldn’t be a political party issue. Sure. The incumbent party is the one pushing this through, but by understanding, much of the select committee, advisors and so on would have been exactly the same regardless of who was in. It really seems to have been a populist action, as much politics is today.
Through my experience dealing with people, both existing firearms owners, new shooters and right back to people applying for their licences, peoples reasons for getting into firearms and their backgrounds are as varied as people are on the whole.
This is a society issue, not a firearms one, though it has now just become political. Stay safe people, look after each other. Breathe. The sun will rise again tomorrow.
There are now many options for people requiring some shelter in the outdoors. In this series we will look to outline the main differences, advantages and disadvantages between the systems.
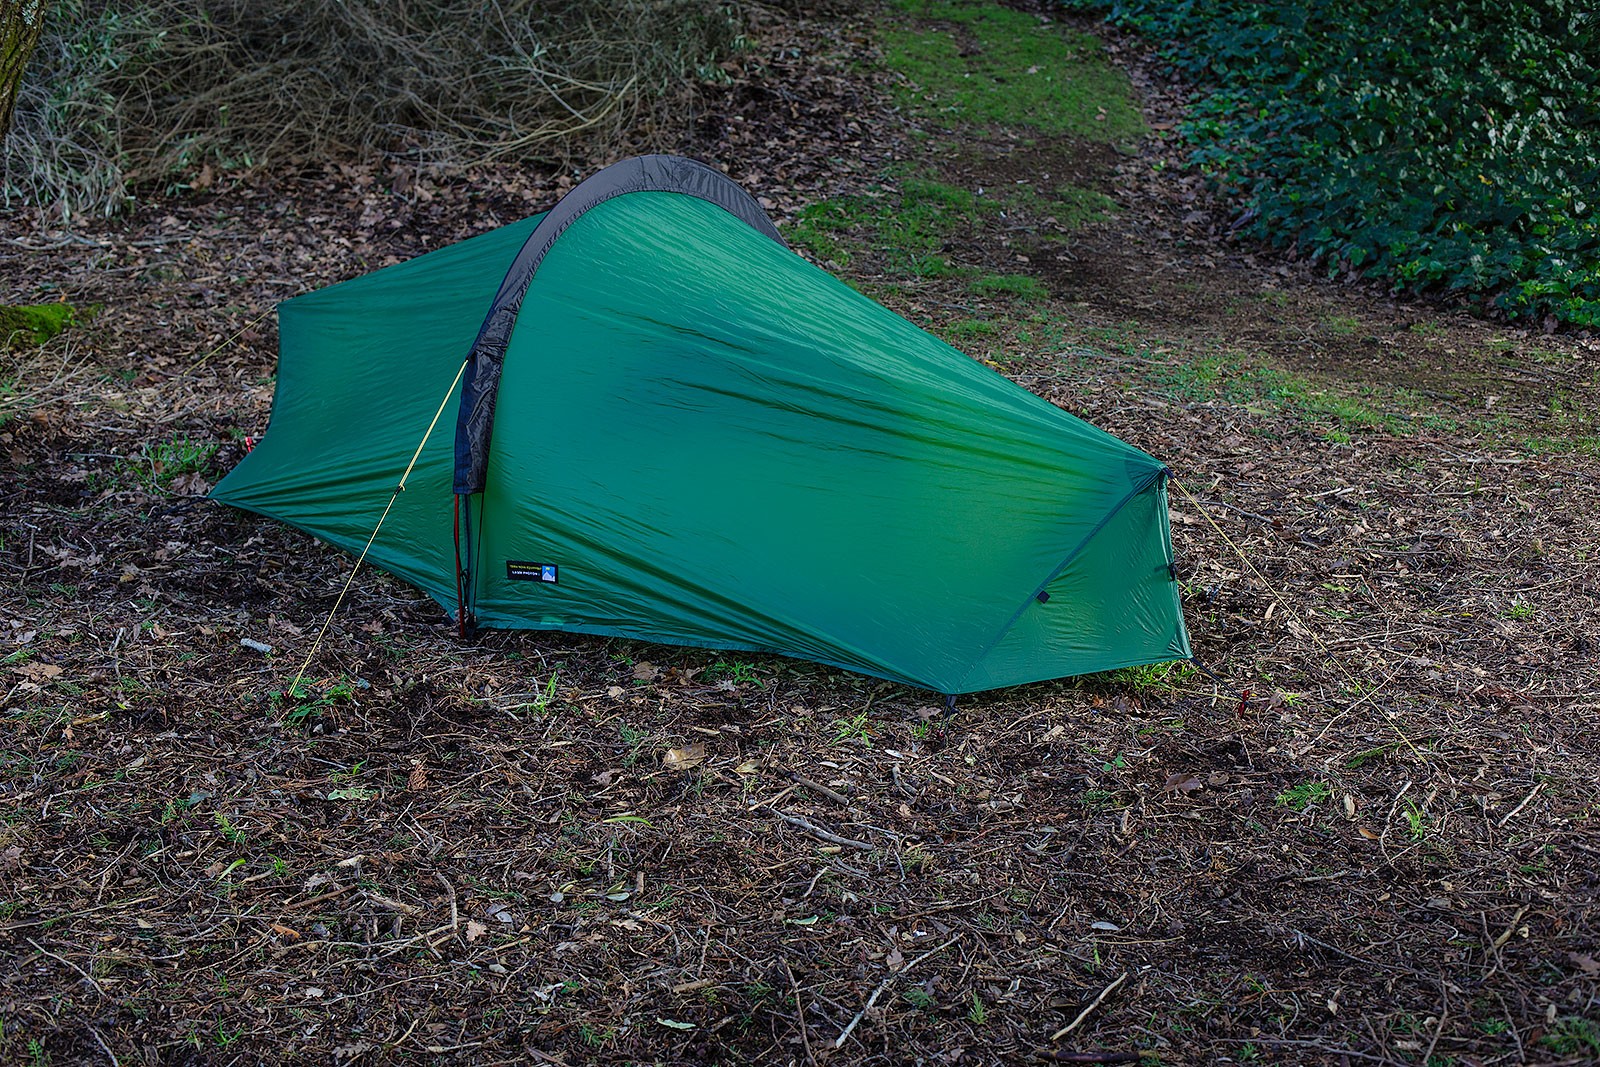
The first up in our series on the different shelters systems – A double walled tent is named as such because they have two ‘walls’ within the system. The outer fly, and the inner, generally mainly mesh inner. This is likely the most familiar shelter system for many people.
The double walled tent is designed to keep you dry (outer) and also free from mozi’s (inner). The inner mesh tent also allows any condensation to evaporate through the mesh, and form on the inside of the outer tent – keeping it away from you and your gear. In addition, most inner’s have a bathtub style floor – a waterproof base that comes up slightly on the sides – this means, even in heavy rain you are less likely to get flooded out – important when site selection isn’t the best.
While originally this double layer system meant double the weight, in recent years the weight of these systems have plummeted.
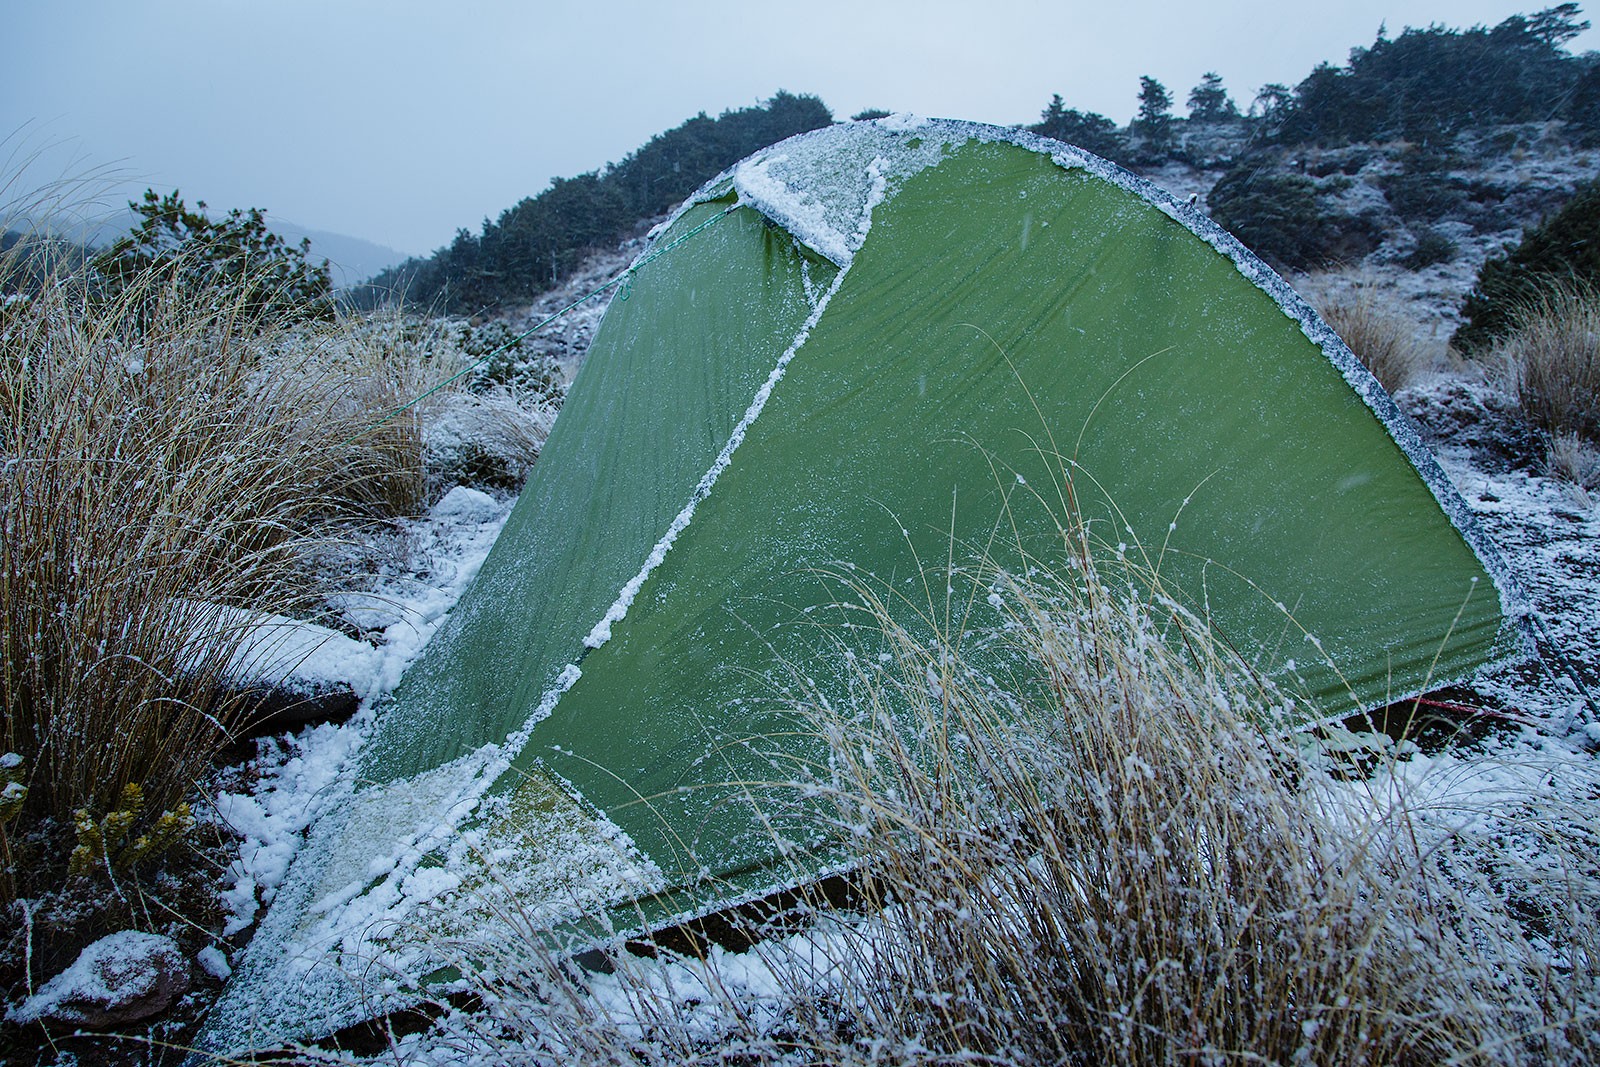
For example – in all these photos is the Terra Nova Laser Photon 1. I am in the process of putting together a full review, but as a one person tent (it’s snug) you are looking at an advertised total weight (including poles, pegs, packing sack) of 0.72Kg. That’s not a lot.
While most double walled tents require poles, some are also free standing – meaning you don’t need to peg them out just in order to get them up. This can mean quick setup and more versatile setup.
In many of these modern tents, you can totally remove the inner tent – often essentially turning them into a single walled, or tarp tent.
Advantages of a Double Walled Tent
Generally some of the easiest to set up for the inexperienced
Familiar design. It’s ‘a tent’
Bug proof – no mozzies
A generally a good 3 season minimum shelter system
Will be slightly warmed than many other systems
Disadvantages of a Double Walled Tent
Probably the biggest footprint of any system – and you need flat ground
Because you (generally) have to pitch the inner first, or at least both at the same time, there is more chance of ending up with a wet inner.
Likely heavier than some of the other systems
Closed in – you probably won’t be able to see the stars
Humans, as warm-blooded mammals (better known as Homeotherms), run best at a set internal temperature. This means our system tries to maintain a consistent temperature independent of what the external environmental temperature may be. In our case, we are Endotherms – which means we internally generate our own heat, in comparison to an Ectotherm, which is reliant on external factors to regulate their body temperature.
While an Endotherm will utilise external sources to regulate temperature (sitting in front of a fire, taking a cold plunge), the chief benefit of being an Endotherm is that we are able to withstand extremes of temperature ranges by internally self-regulating. For example, we can drop heat through sweating, creating convection of heat. However, this article will focus on the creation of heat. We have two primary methods of creating heat in our bodies, muscle contraction (which can present itself as shivering) and as a result of the process of metabolism.
Because we use metabolism (digestion) as a source of heat, we require a lot more food to maintain the system. In addition, the base rate of metabolism is going to be up to six times as fast in an Endotherm (warm) than in an Ectotherm (cold) of the same size.
The short of it – cold? Eat something!
The human body when feed, immediately starts processing that food through the process of digestion, metabolising that food into energy that we can use. A beneficial product of the process is also heat, which we can use to get warm when we are cold. If the system doesn’t have any food to digest then we are robbing ourselves of one of the easiest and most effective ways of firing up our internal heater.
If you are hungry you are also going to get cold.
Eat before sleep
Having a good meal before climbing into the sleeping bag for the night is a very good suggestion. Regardless of the temperature, if you have been tramping/stalking/exercising the body all day you need to replenish your energy stores – charge the battery and make sure you are ready to go the next day.
In the cold, this becomes even more important because what you eat before you go to sleep is going to have a direct influence on how warm or cold you are going to get during the night.
Sleeping bags and clothing don’t generate heat. They insulate. They keep the heat you are generating trapped and close to the body, helping regulate that important core temperature. It doesn’t matter what rating your sleeping bag is, if you aren’t generating heat you will not be warm.
What to eat
Well, if it’s something warm you are going to get double the benefits. Not only are you literally supplying heat to the body, but you are also fueling it and enabling the process of digestion to also create heat. If it’s cold the benefits of a good hot meal are both moral and physical. That’s why many suggest that a cup of tea or hot chocolate are ideas before tucking in – it’s one last load of heat before starting to trap your expenditure through your sleep system.
However, certain foods are better – and essentially the harder (requires more energy) they are to digest the better. This means extended heat creation; and while at some point you are going to have to start expending energy digesting them than you get back (thermogenesis), if you are really cold it could mean making it through the night without going into a state of hypothermia.
Protein requires the most calories to digest, that, in addition, Fats and complex carbohydrates are what you are looking for. It’s suggested that certain spices can help stimulate the generation of heat. A hot curry on brown rice, with a pile of ginger, coconut oil and cinnamon is an awesome combination to generate internal warmth and continue to do so throughout the night.
That’s nice. But I have lost my pack.
At a pinch – a One Square Meal is also a really good backup option. Lots of carbs, not the quickest to digest, great for generating heat. That is why it is important to keep some kind of food in your emergency kit.
While it is also a good morale booster the reality is you are unlikely to die of starvation if you miss a meal, or two. However, if you find yourself caught unprepared and having to stay a night out in the bush some form of food that you can use to fuel the digestion system and therefore the generation of heat is going to be of massive benefit. Get yourself insulated from the ground (conduction), climb into an emergency bag (convection and reflection) and eat that bar (generation). It’s going to maximise your ability to generate and trap that heat.I won’t promise you are going to be toasty warm, but you will be a lot better than going to bed on an empty stomach.
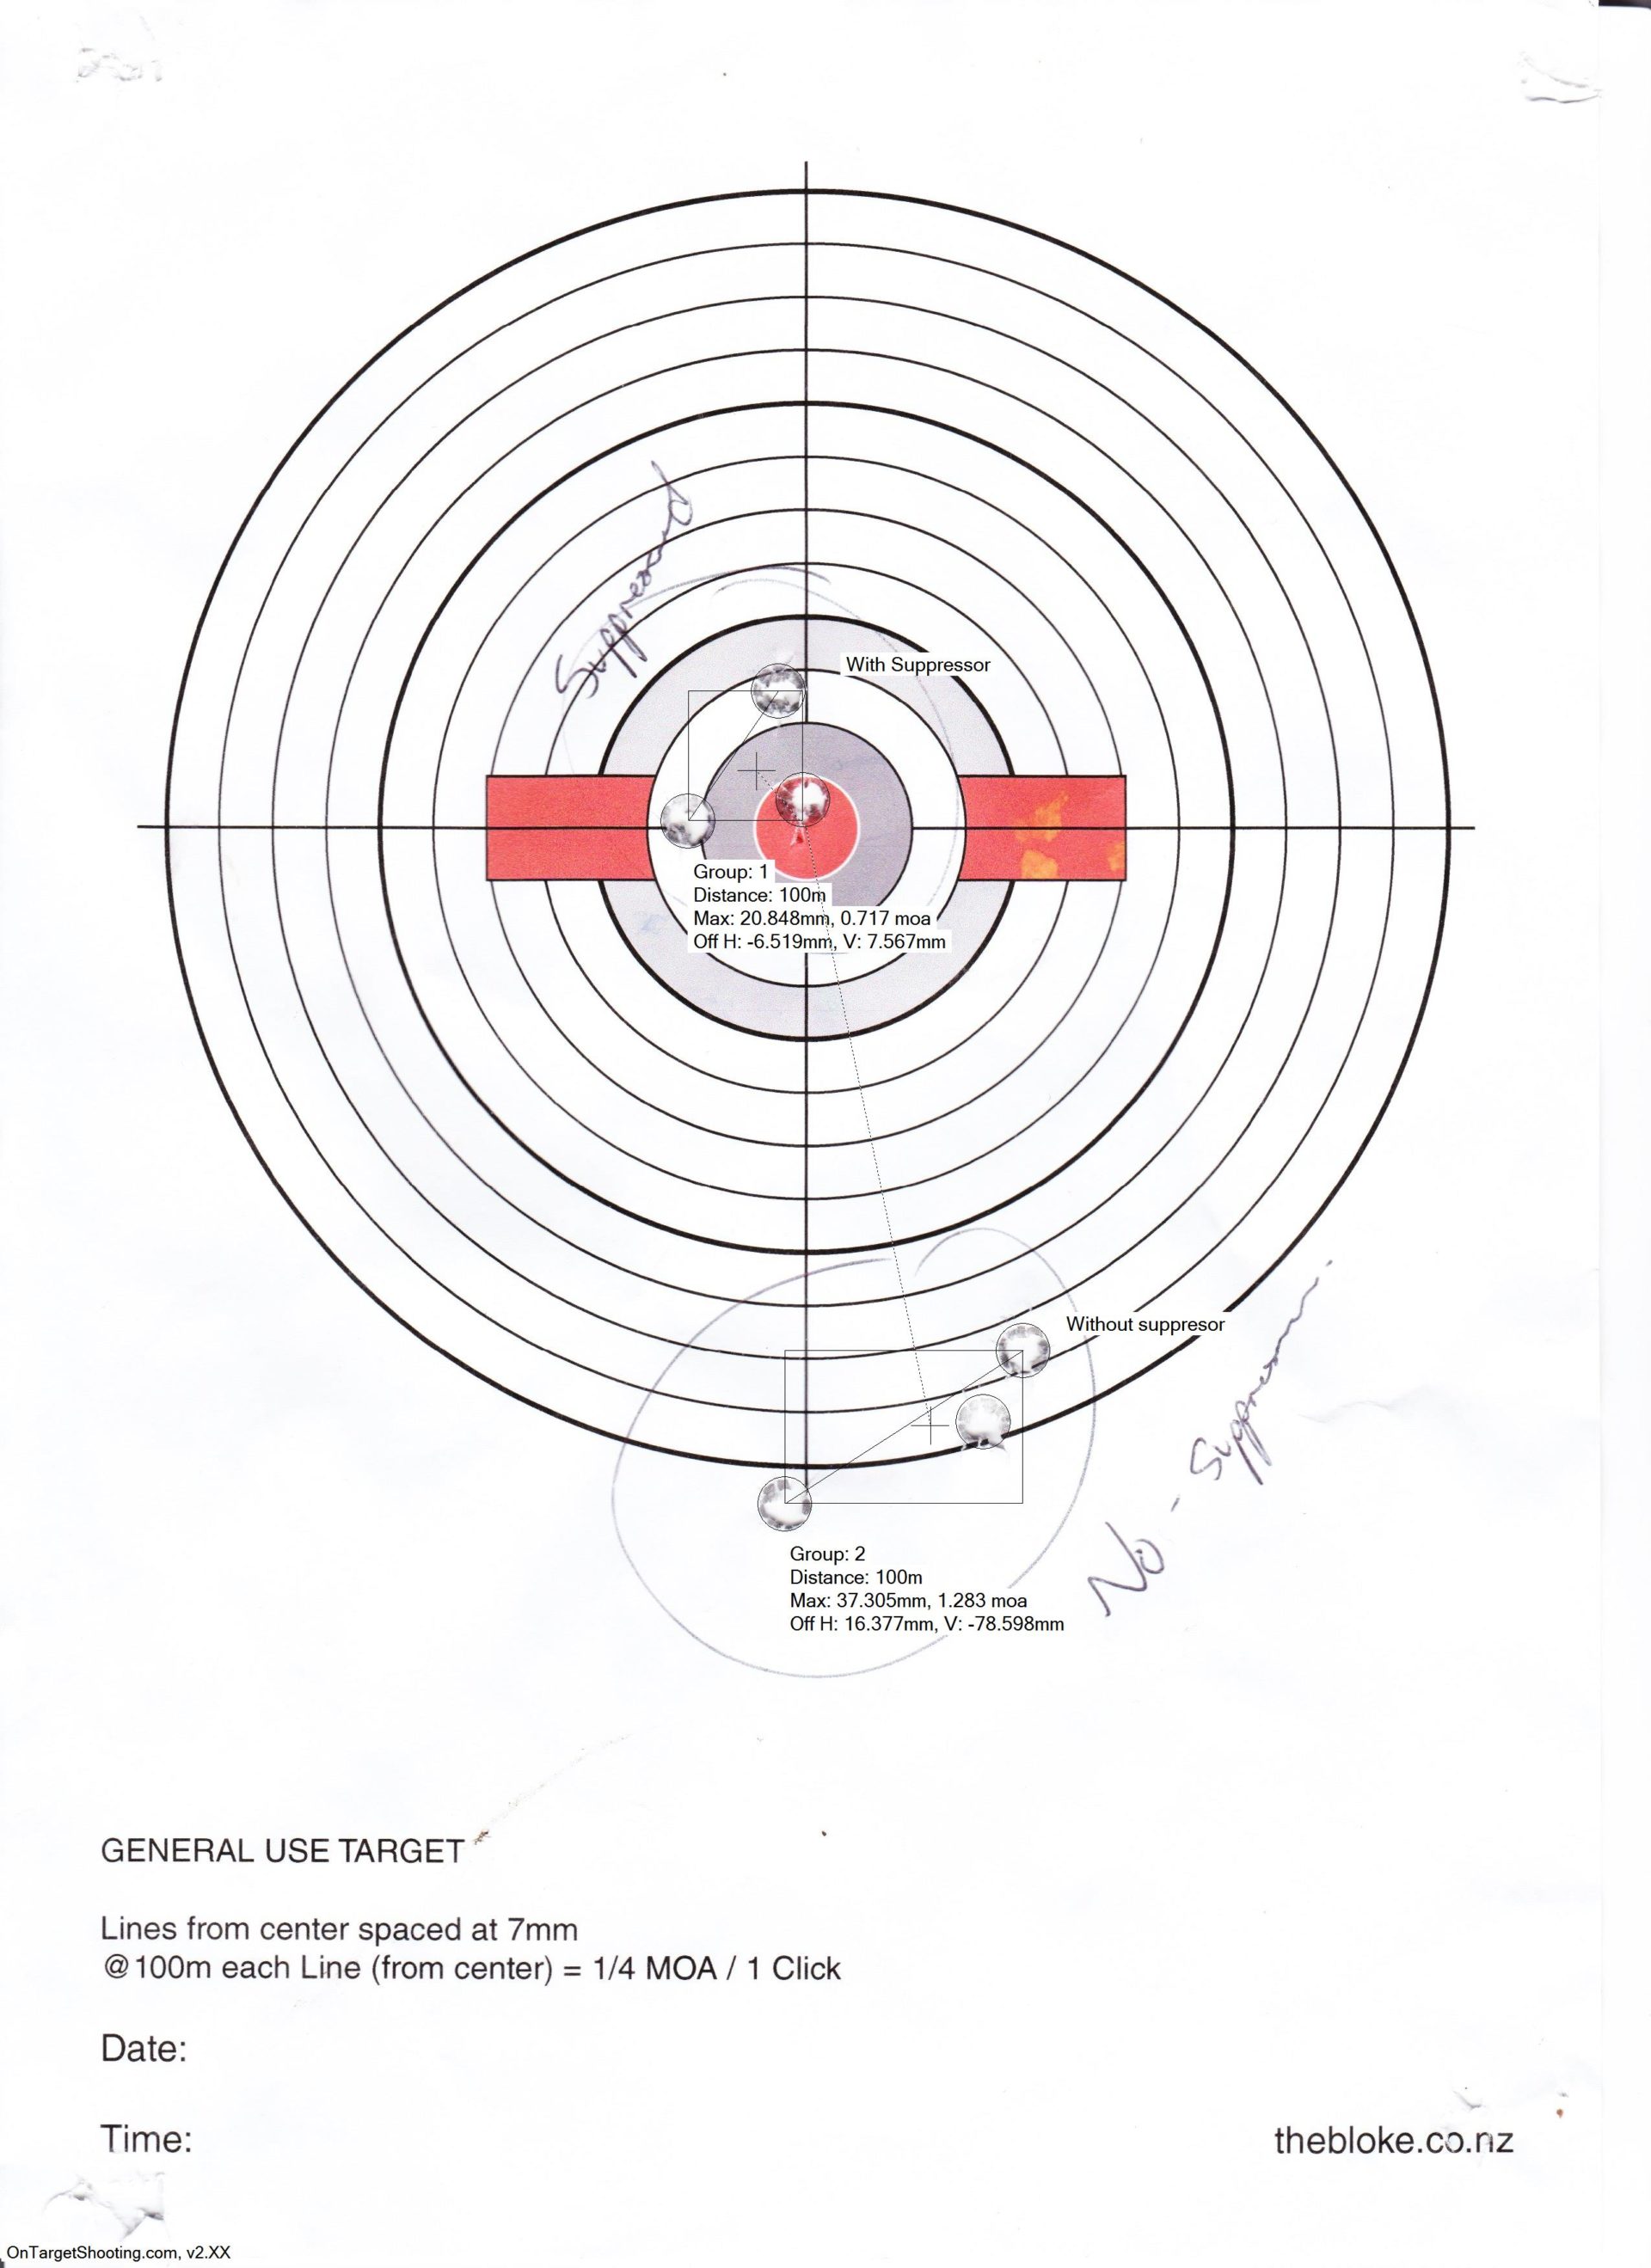
Recently when heading out to Woodhill, a requirement was no suppressors. I can kinda understand the reason for this – but to me, it just removed an important safety device that I really like to use. Stalking with earplugs/earmuffs doesn’t work, and unsurprisingly, I ended up with ringing in my ears after firing with an un-suppressed firearm. However; more importantly, it also brought home the simple fact that I didn’t actually know what my POI shift without my suppressor was.
Shooting the rifle with the suppressor as I did up at Balnagown a little while back, is well, easy. No ringing. Also, the suppressor really reduces the kick of the rifle (not that 7mm08 has much kick anyhow).
I understood that expected suppressor point of impact shift was down with the suppressor on. The weight of the suppressor works with gravity to pull the muzzle of the barrel down a little and the suppressor will also provide some harmonic dampening. How much though I had no idea. So it was off to the range to actually test it out. The results surprised me.
So. It seems that on my X-Bolt, the Hardy Suppressor actually causes it to shoot high. From the target above (at 100m) – with the suppressor on, it shoots pretty much where I want to (because that’s where it is Zero’d). Take it off and it shoots around 77mm lower. That’s 2.75 moa, roughly (my maths may be out slightly) or 11 clicks on my Z3.
It seems the combination of my rifle with it’s now shortened barrel, potentially including some gas interferences (though it seems totally consistent), shoots the opposite of expected suppressor point of impact shift.
Now, should I have to shoot the rifle again without the suppressor (which I really hope I don’t) I know I can dial 11 clicks up (because it shoots low without the can on) and my POI will be back where it should be.
Remember – yours will be different
Your rifle, suppressors, rest, everything combines as a system. A unique one – even if you are using the same rifle and same can, your ammo is different, and you may experience a different result. You need to test your own gun.
Even though in theory you may know what should happen – this just goes to show there are exceptions. It also means that the dear I got was really quite a lucky shot. But I will take it!
What is your suppressor point of impact shift? Do you know? Maybe it’s worth finding out!
Pretending to be a navy seal with the Garmin Tactix
Yes. I was taken in by the marketing. I mean – it’s got Tactical practically in the name! The Garmin Tactix caught my eye while looking for a watch for the outdoors. Primarily, I wanted to get a digital watch to replace my Tag Heuer watch that has served me well for many years, but I did want a couple of digital features – like a stopwatch and an alarm. Stopwatch to record my walking time more accurately, an alarm to wake me up before sun-up while hunting.
Look online, I initially had my eyes on a Suunto Elementum Terra – A well built digital watch that added some functionality like altitude and air pressure measurement. However, in the back of my head, I was also aware of the GPS enabled watches like the Garmin Fenix and Suunto Ambit.
Because I do tend to read a lot of Tactical and Military style blogs, the Garmin Tactix also popped up. After much comparing of the Tactix and the Fenix, I decided to go with the Tactix. Reading online – the one potentially useful difference was the ability to have the Barometer run separate from the Altimeter – therefore having an ability to track weather trends. In reality – yet to see/utilise/fully appreciate that difference – so if you are after the short version – just get the Fenix 2, save some money, get the newer hardware.
This isn’t a product review
Just putting that out there. There are already several in depth feature reviews online – the most comprehensive being DC Rainmakers review of the Tactix. There probably isn’t much point in me just repeating what he has already said. This article is more about how I have been using it in my travels – how it works into my navigation system.
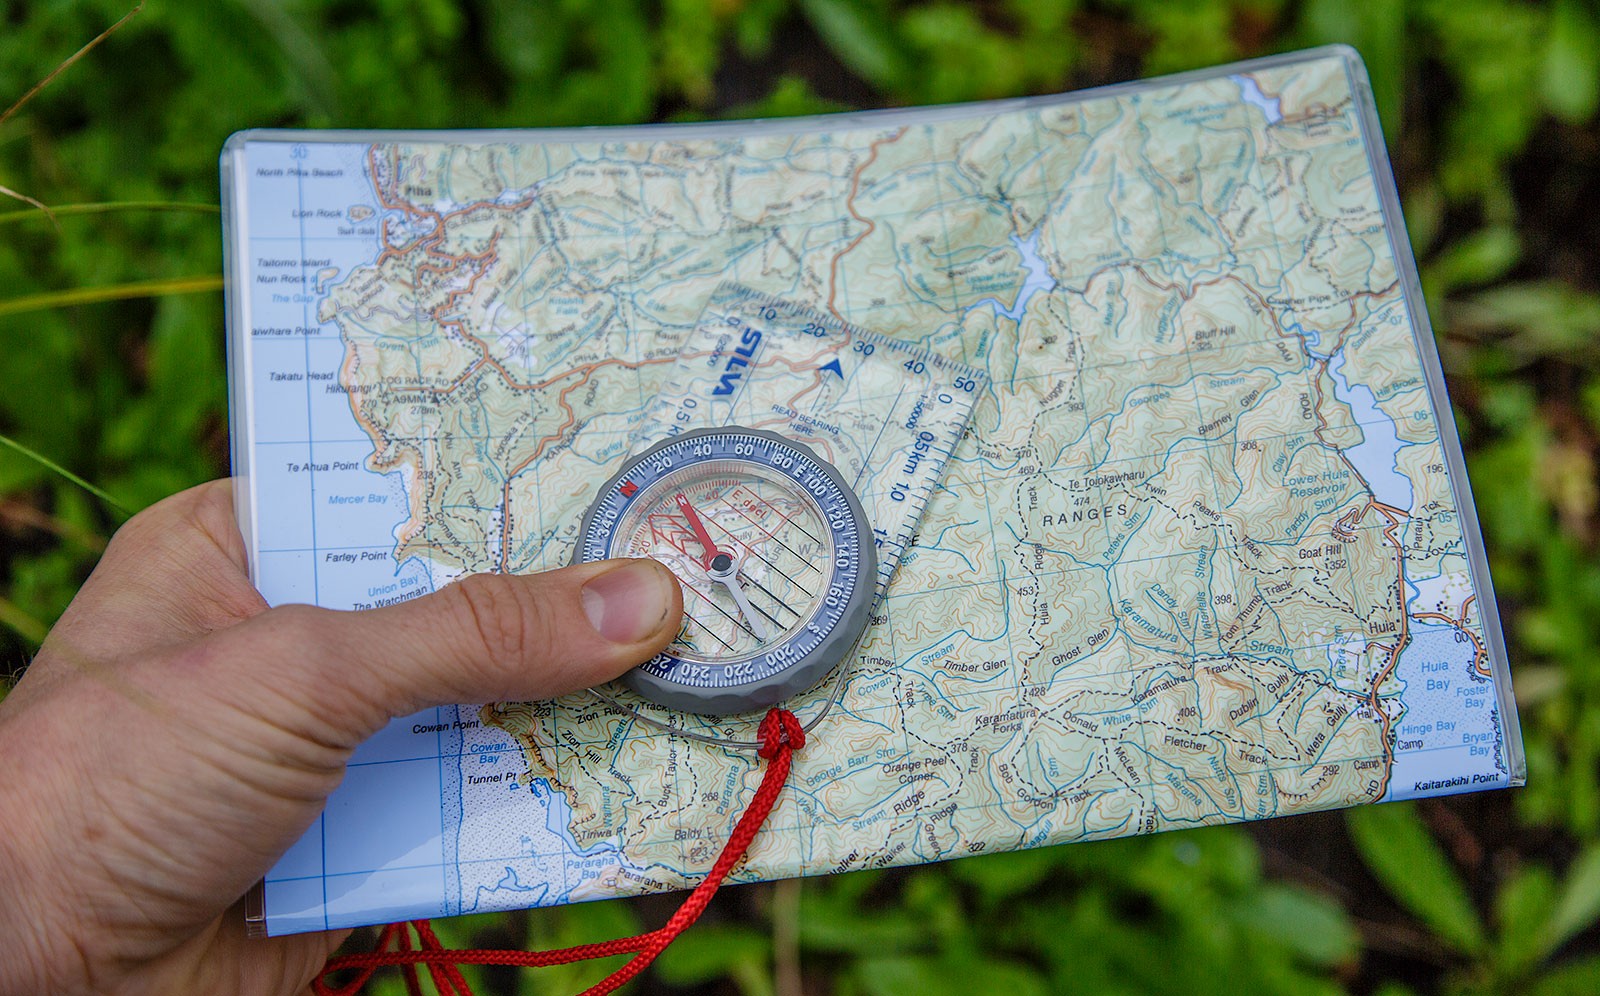
Map, Compass and then GPS
I can’t stress enough how important it is for people to first understand how to use a map and compass. This has to be the fundamental practised skill when navigating. Maps don’t ‘break’, then don’t run out of battery and the settings on them don’t mysteriously go out of whack and send you off in the wrong direction.
Like any other skill, navigation requires practise – and I have found one of the best methods of practising is heading out into the local bush to test yourself.
In my case, I will wander off into the Waitakeres for a day. The great thing about some of the more used parks is that there are going to be heaps of established tracks around. You can use these as hand rails to ensure you never get too lost if heading off track. I am going to presume at this stage that you can follow a map and a track well enough.
Anyhow – this is what my practise generally looks like –
Step 1 – Figure out where you are
Work on identifiable landmarks first, ideally from hardest to easiest.
Obviously, I could have just said, well, I am in the carpark at the head of the trail. This is where I am on the map. However, that doesn’t really push you at all. Look at any hills or mountains you can use. See a Trig Point? Easy. This is also a really good time to practise some resectioning with your compass and map. Take 2 identifiable points, and work backwards to where you are.
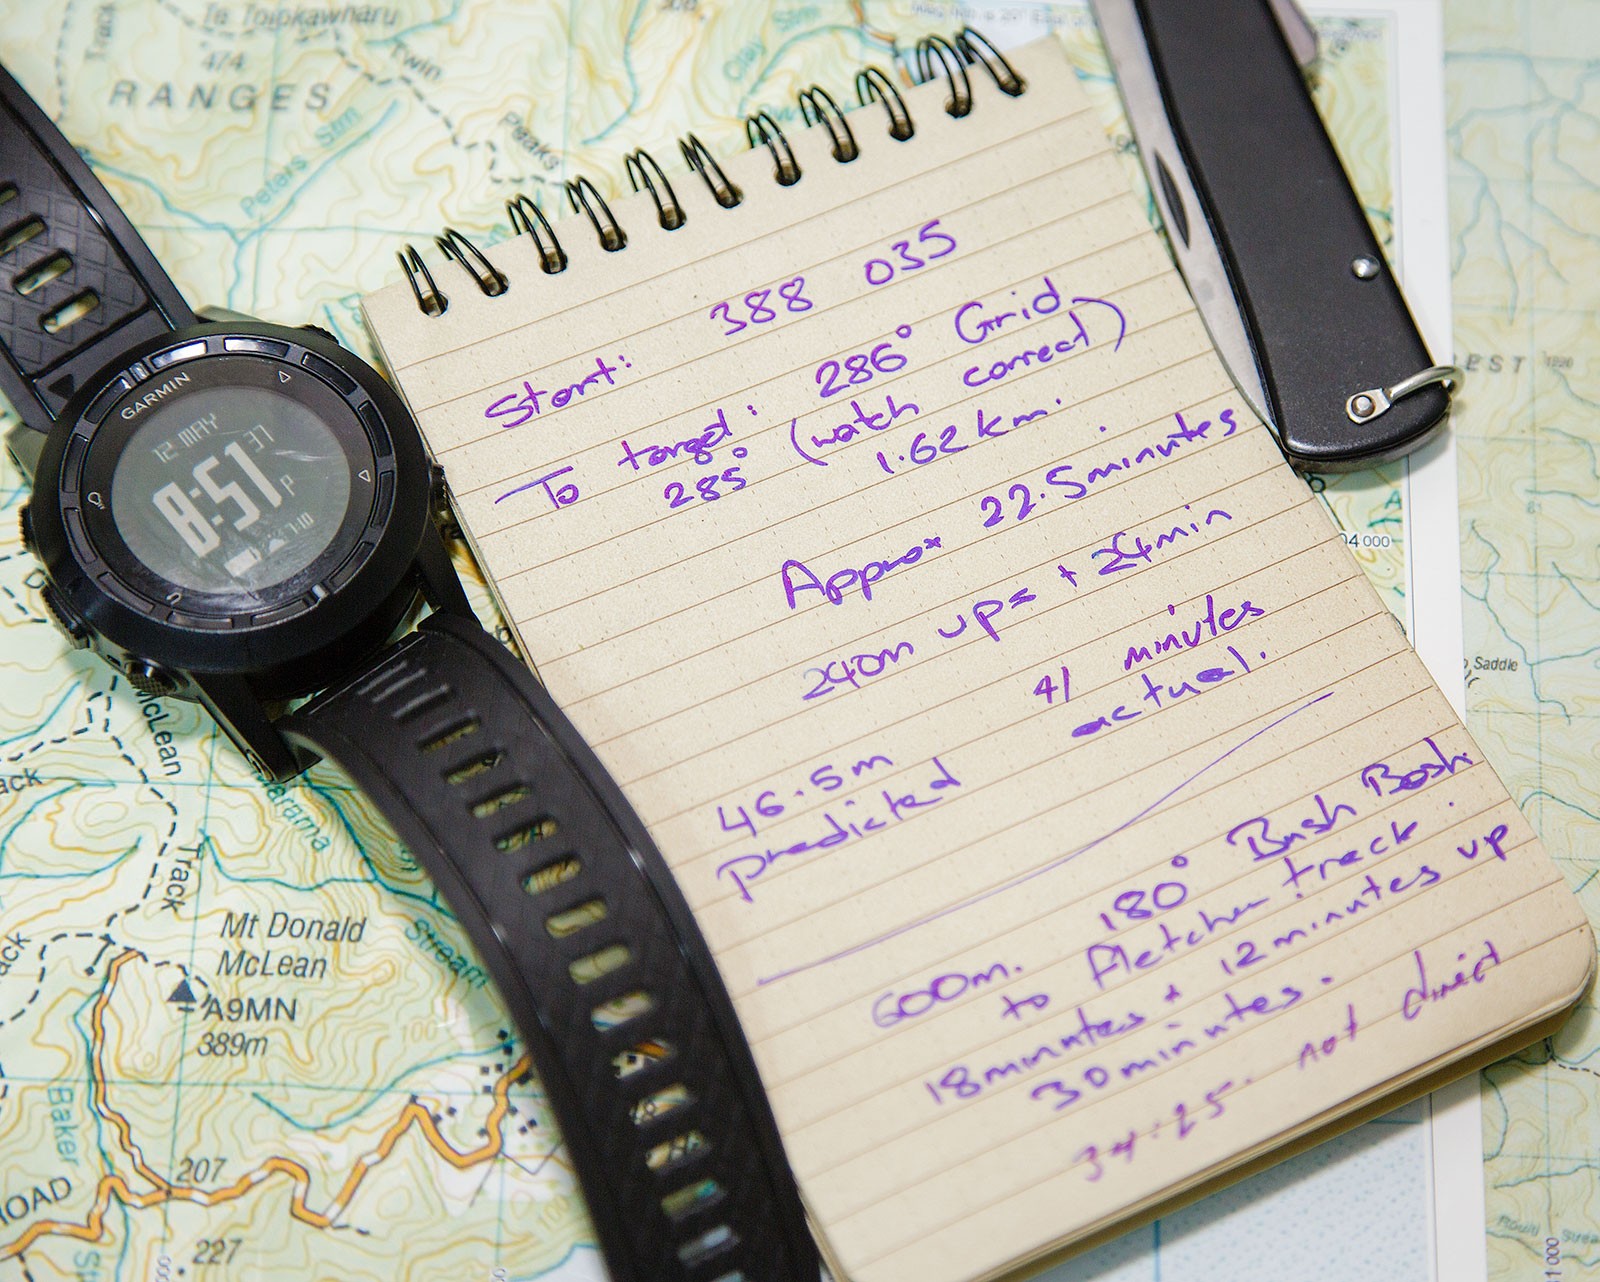
Once I have a good grasp on where I think I am, I write it down. This keeps you honest and lets you track how accurate you are. Get yourself a grid reference. Then you can check it.
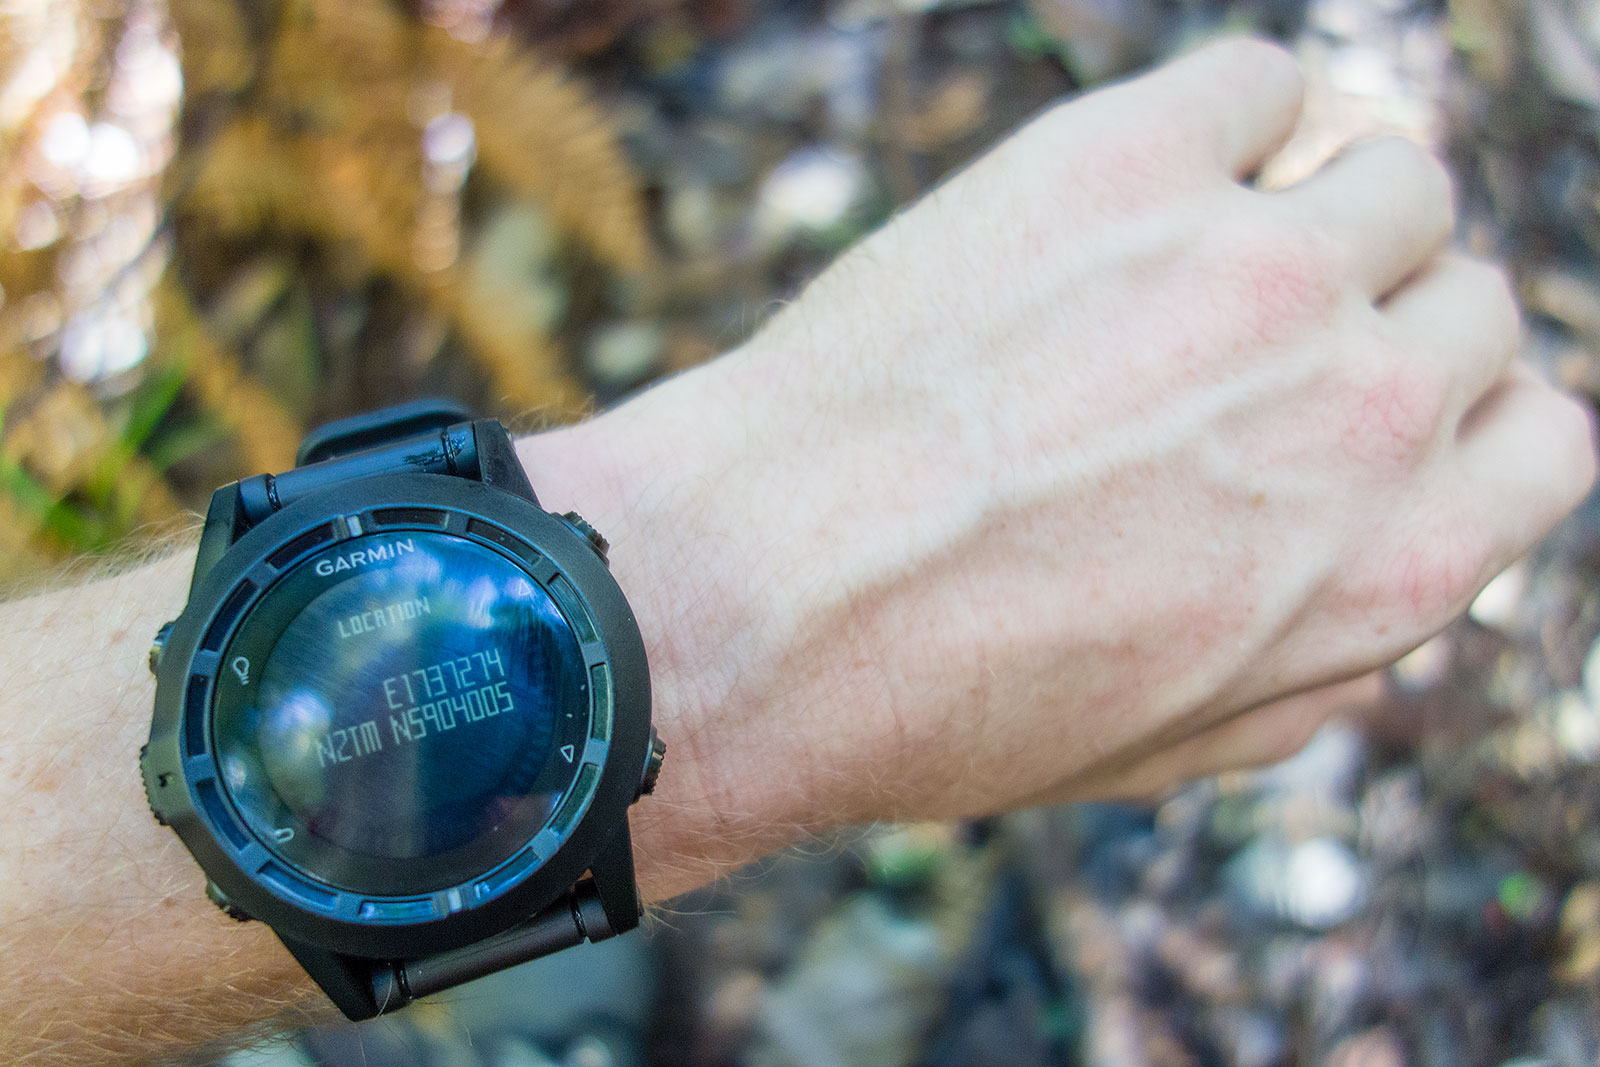
This is my primary screen for all my GPS navigation. Really, I just want it to confirm that I am where I think I am. This is also one of those good moments to make sure that your device, be it a watch, handheld GPS, whatever – is actually set up correctly. I am primarily using Topo50 maps. So that means my system needs to show NZTM, and be set to Datum WGS 84. If you don’t understand this, you are going to have issues using a GPS in conjunction with a map. If you don’t know at all what this means, you are also likely far too dependant on a GPS to be relying on it out in the bush. Just saying.
Once I have confirmed I am within 100m of where I think I am (we are realistic here folks) I can move on to step two.
Step 2 – Figure out where you want to be
Again, put the GPS away. Get out that map and compass. Figure out somewhere to go too. If you are just getting going, start easy – choose a track junction, or something else that is going to be easy enough to identify. Plan a route. If you are not heading directly there, this may take the form of several legs. Regardless, what you want is an idea of bearing and total distance.
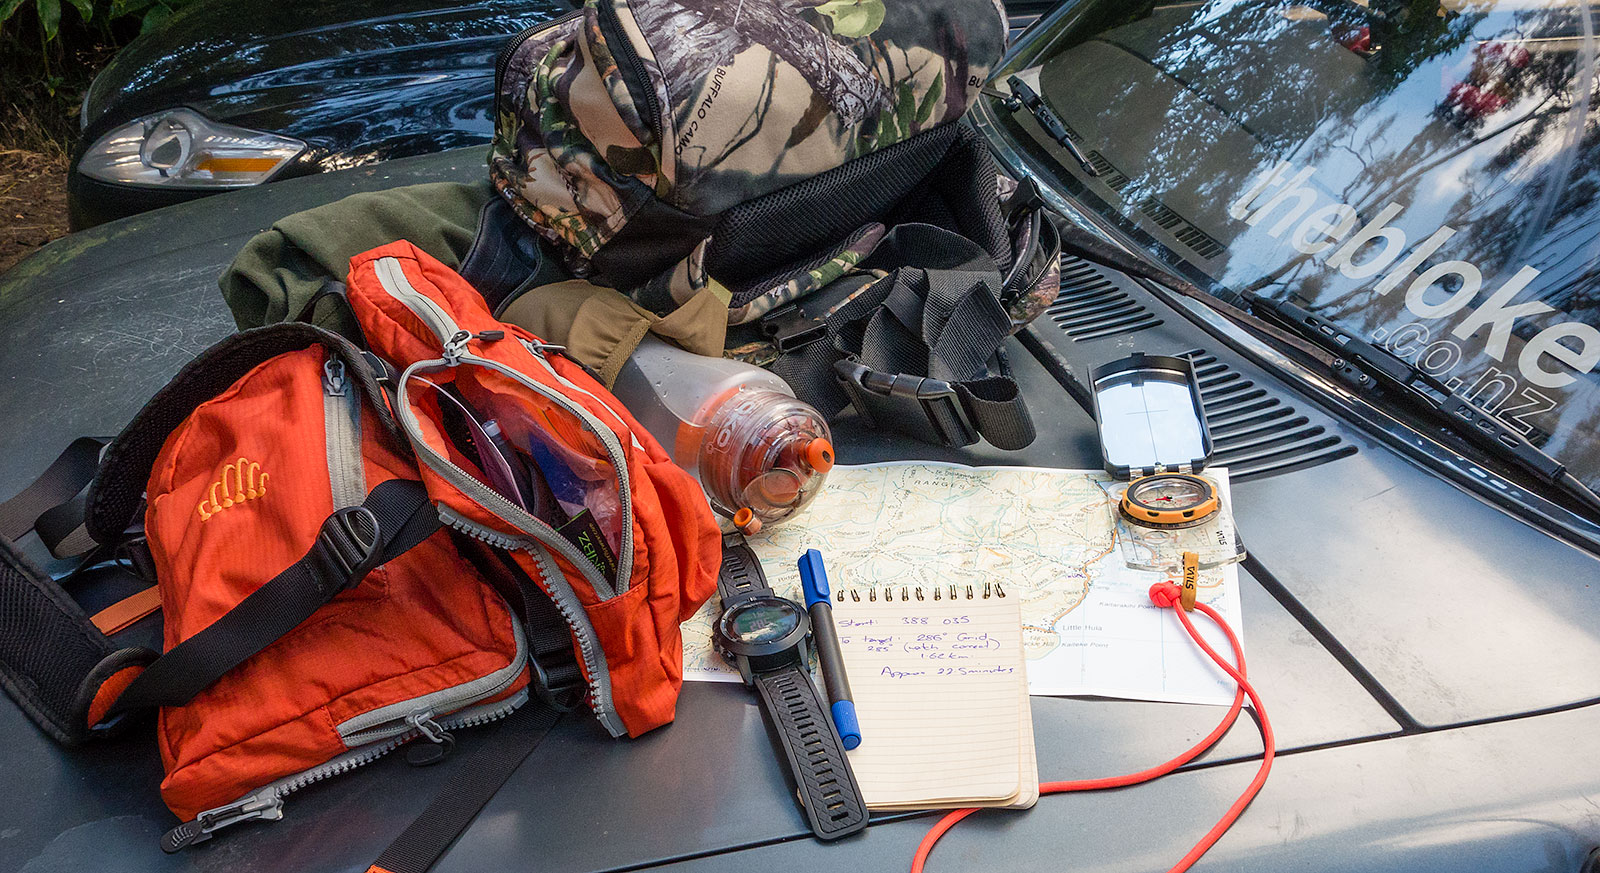
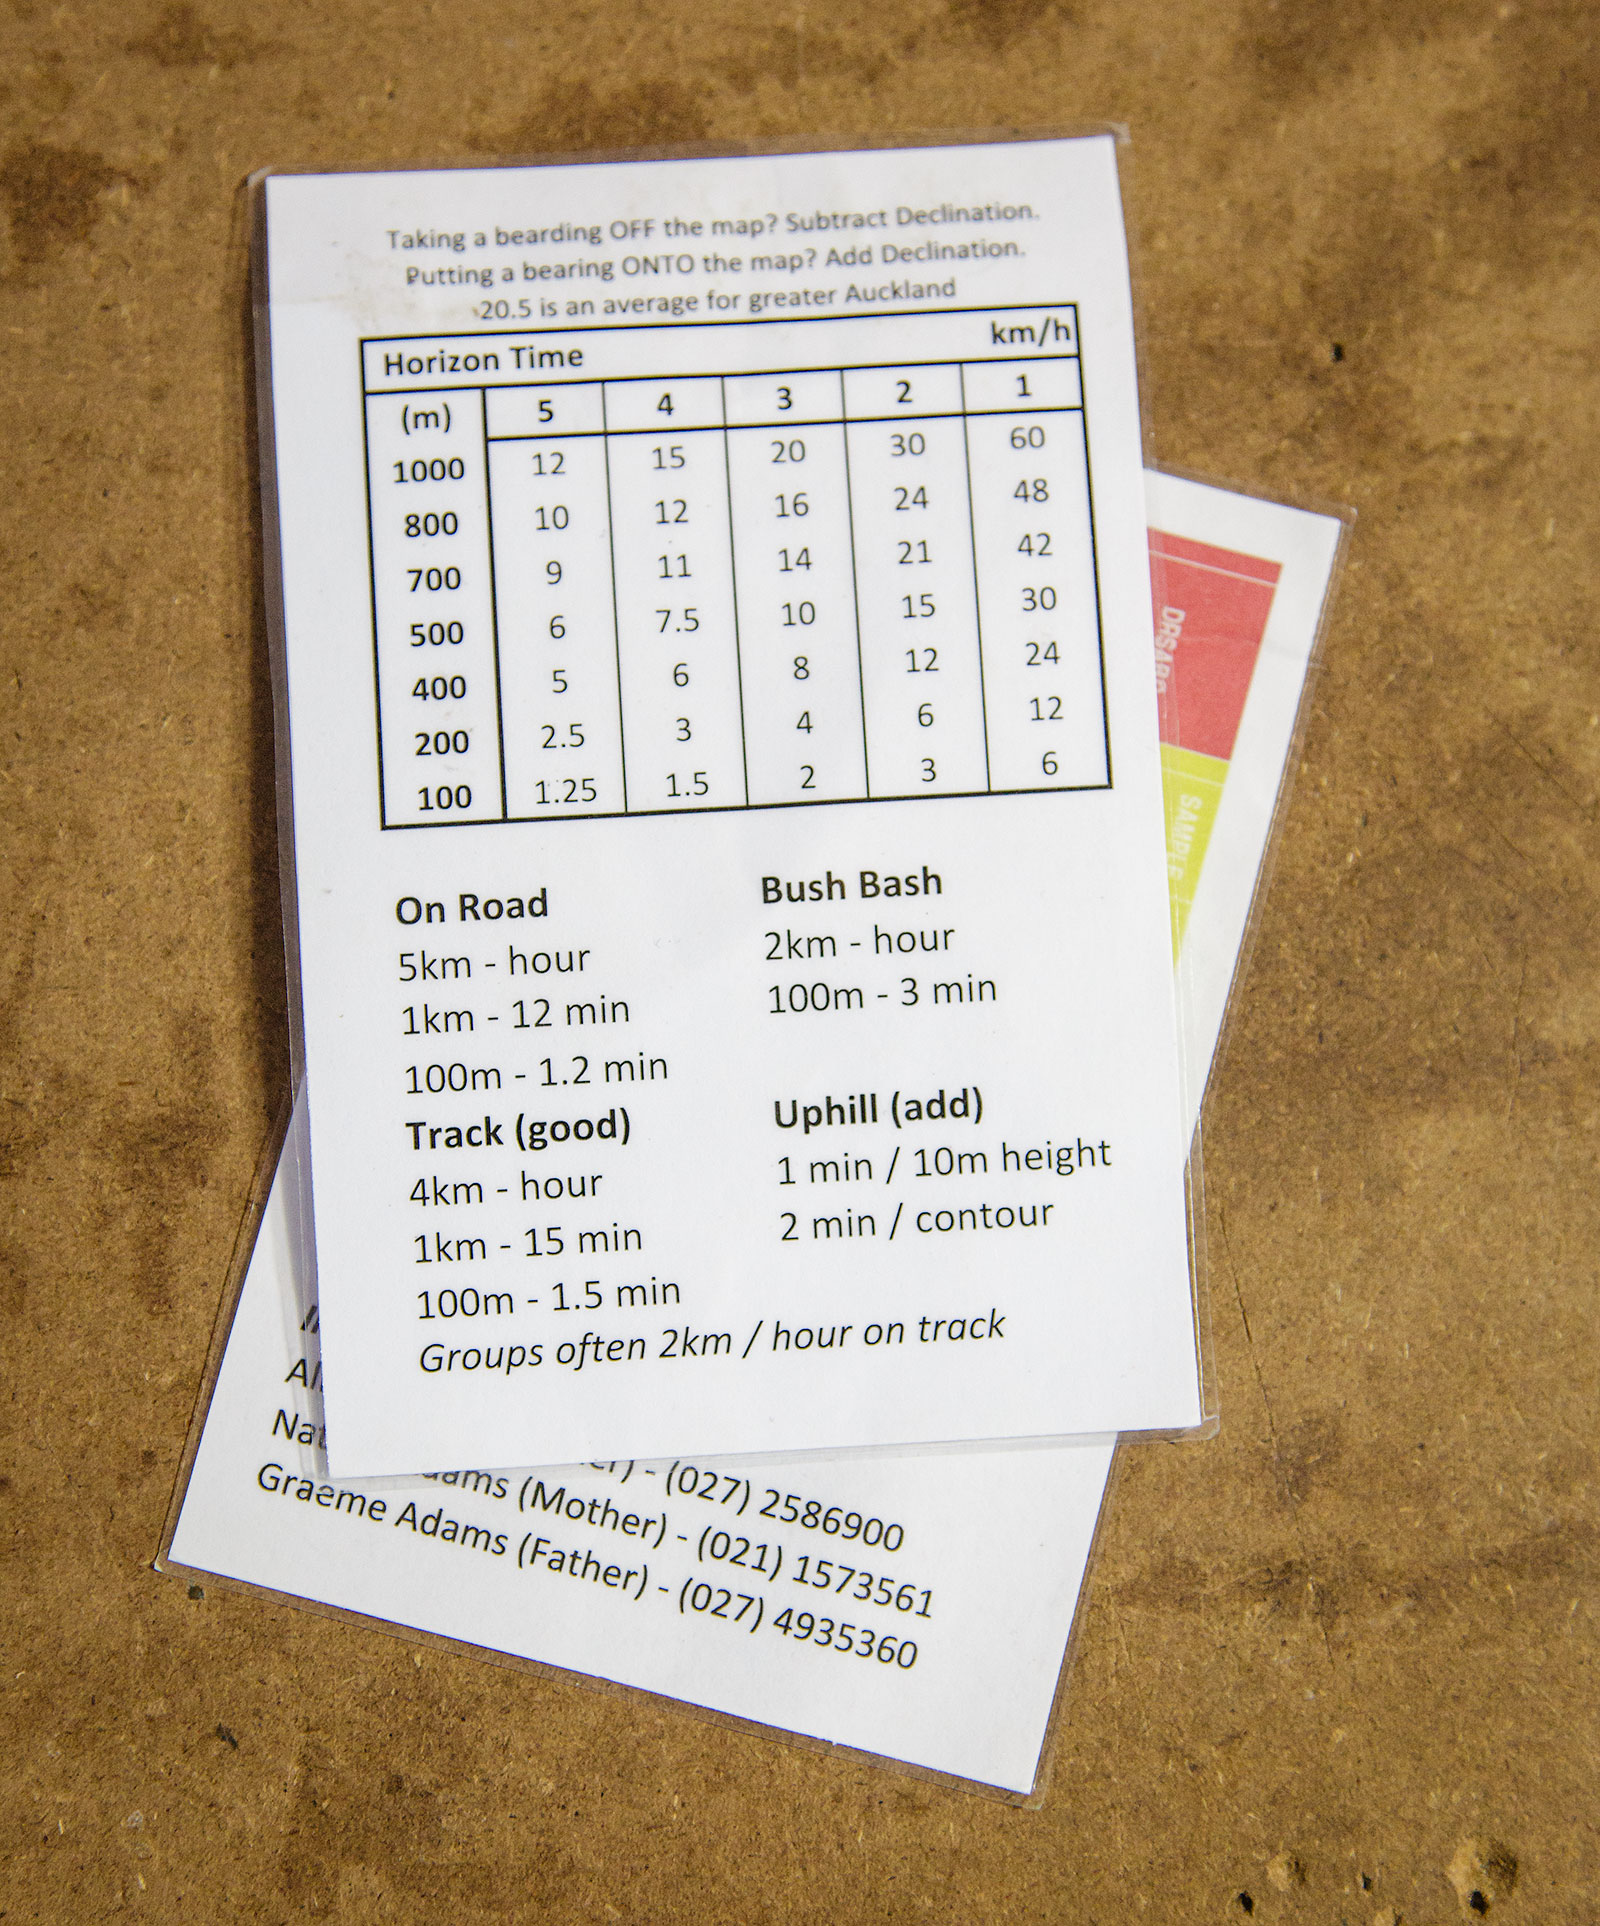
This is where a little bit of history comes in handy. I know have a card which I regularly update, which has a couple of useful bits of information on it.
It is a record of averages – based on how fast I move in certain situations.
Whenever I head out, I review it and see if something needs changing.
For example, to keep it super simple, say I know I want to travel 1km, on track and I will also be climbing 60, or 3 contour lines on a map. Looking at my chart I can estimate it is going to take me 15 minutes, plus 6 minutes for a total of 21 minutes to get there. Remember, this is only an estimate – but really, that is all it needs to be. If I am still travelling after 2 hours, I am going to know something is wrong.
Once you have all this information (written down) – you can set your compass, start the stopwatch (yay Tactix!) and go.
Once you get to your point and have identified it, either through the terrain features you are using for a catching feature – like a track junction, for example, confirm your location via a grid reference, then see how close you were timewise as well. Then rinse and repeat.
Using the GPS a bit more
Once you are comfortable essentially navigating with map and compass, simply using the Garmin Tactix to double check your calculations, you may want to also practise using the GPS to aid your navigation a bit more.
Now, I never just put in a waypoint and follow the GPS to it – looking more at the screen than the area around me. That’s a really good way to either miss any animals you might be trying to stalk, miss the nature around you and miss that gully you have just managed to walk yourself down into.
Instead, I will just use the Garmin Tactix to do some of the manual calculations for me.
With the Garmin Tactix, you are able to enter in your target Grid reference and then set it up to display the information you require to get there. In my case, I have set it to display distance, bearing (in grid – compensating for magnetic declination so it translates directly to a map), GPS accuracy (as a precaution) and the outside ring basically points to where I need to go. Normally, I have my compass around my neck – so I just match the bearing and go.
This means I can ultimately wander/stalk in the correct direction, occasionally referring to either my compass or watch to ensure that I am not drifting too far off to one side. In my case, I know I have a natural tendency to turn counter-clockwise. We all have a preference – test yourself!
However, it means I don’t totally turn off my location awareness – I am still aware of the direction I am heading, and more importantly, I am still spending most of my ‘headspace’ looking outward – being in the bush, not just navigating on automatic.
I have found, the best way to not get lost, is to not lose track of where you are in the first place. Simple. If you always know where you are, how can you get lost?
Even with all these gadgets, it is important that you still remain aware of your location and surroundings. Don’t totally trust the GPS to get you there. Because it just might fail you and you could realise you have been walking for an hour or two and don’t actually know where you are. It happens.
The Watch itself – my thoughts
Size
While this isn’t a traditional review – I do have a couple of thoughts on the unit. For a start, it is big. Real big. However, what is interesting is that now I am used to it, I find my other watches small and it is certainly smaller than my E-Trex 30.
Satellite Fix
It takes quite a long time to get a satellite fix. As in, minutes sometimes. It has always got one, even under tree canopies, but it is a lot slower than the E-Trex 30 – with I think in no small part is due to the GLONASS the 30 has. However, for what I am using it for – it doesn’t really matter. I am simply turning the GPS on, getting a grid and then generally turning it off again. This also maximises battery life.
Battery life
Much better than I initially thought. While some of these watches will say they only have an 8-hour battery life with GPS, you have to remember, at least the way I am using it, is that I am only using the GPS for a couple of minutes at a time, not leaving it running to track my course. Yes, if you want it to record your track on the Garmin Tactix, you are going to need to recharge it – and right here is one of the little tricks with this watch. It requires it’s own charger, and the charger will only plug into a USB socket.
This means, unlike the E-Trex, you can’t just swap out the battery on the Garmin Tactix and be on your way. Part of my original plan was to cut down on weight by replacing the E-Trex with the Tactix. In reality, if I am out overnight or even two, this is the case. The Watch will easily get me through 72 hours with intermittent GPS use. Longer than that though, and you start looking at charging solutions. In my case a Solar Monkey – however, that is another article.
Does it replace the handheld GPS?
Yes, and no.
If you just want something that can give you grid cords, then yes. It does. For most of the time, this is all I want. However, for example, when I want to record my track – say during SAR exercises, then no – the battery just isn’t up to it. So in that case – I will likely end up carrying both. Redundancy is always a good thing when it comes to electronics anyhow… It’s just more weight!
It is no mystery that a Blued Barrel is more prone to surface rust than Stainless Steel. That’s not to say Stainless doesn’t rust at all, that’s not true, but the speed between the two varies greatly.
On saying that, I was surprised to find during my recent couple of days in the Kaimanawa Ranges, that it only took a matter of hours after the barrel on my X-Bolt got wet that it started developing rust spots on the Blued Barrel! Needless to say, I wasn’t overly impressed with the situation and considering we were out for another day, keen to do something about.
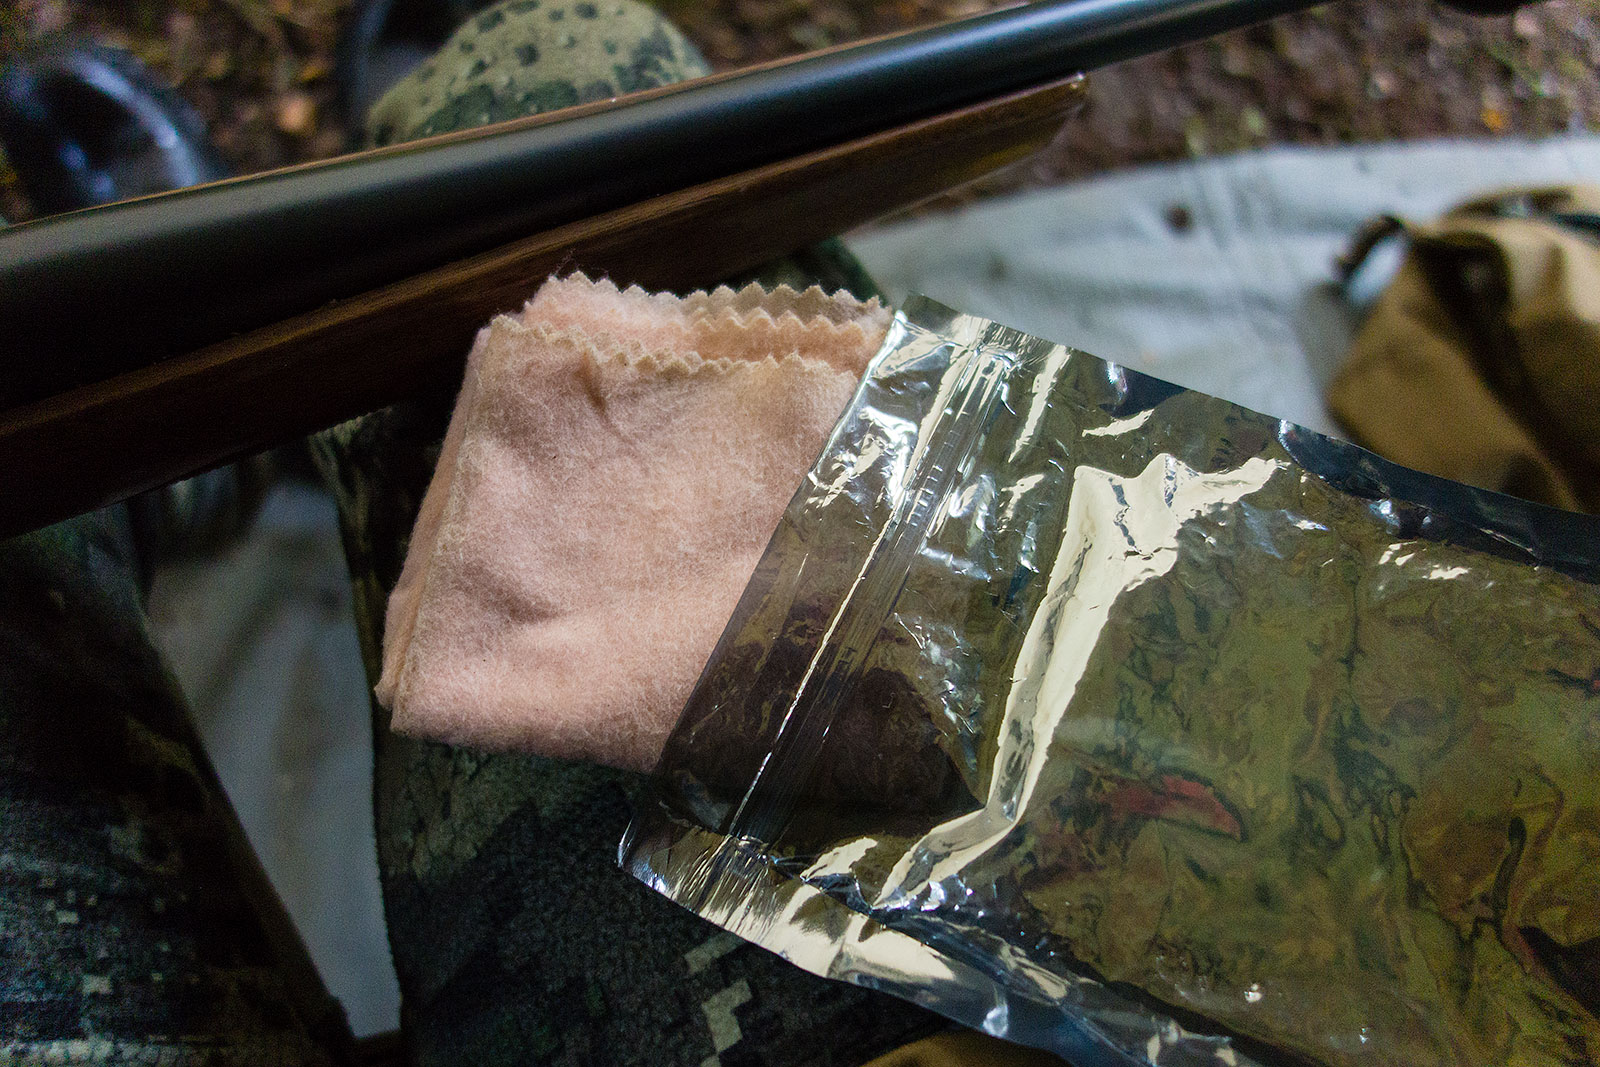
Well – it was my Pro-Shot Metal Care Cloth to the rescue!
I picked this up a bit of a whim one day at Serious Shooters, and have carried it my rifle maintenance bag, along with a bore snake and some spare tape for the barrel. I had generally used it just to wipe the rifle down after a day at the range. So this was the first time giving it a proper test!
Clean Cloth
The cloth is impregnated with a silicone that is said to both remove rust/marks and protect it. I followed the (simple) instructions – wiped the gun down and left it for a couple of minutes. It was about this point I started pondering the building of a Stainless Steel Bush Pig – any excuse to ponder the next gun build I guess.
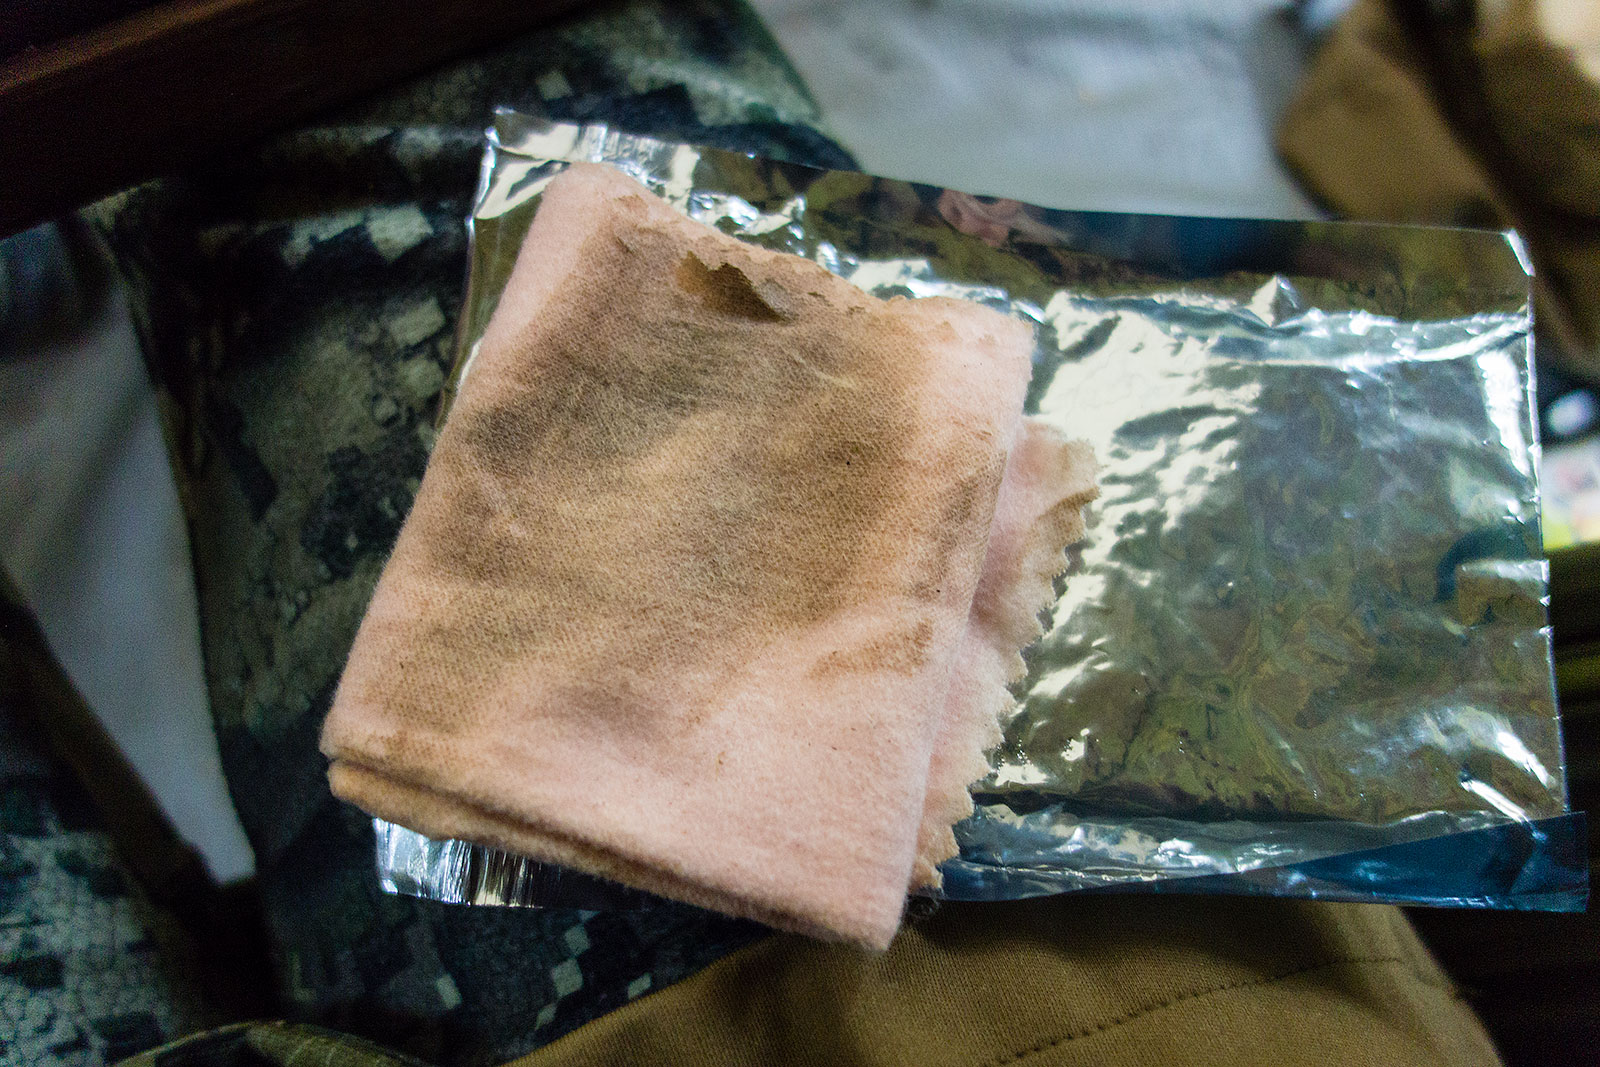
Dirty Cloth
After a good couple of minutes, I started to wipe down the barrel, I image a second clean cloth would be a good option for this, but then it’s more to carry – so I used the same cloth. Lo and behold, most the marking ended up on the barrel!
Wouldn’t call it perfect, but certainly a whole lot better than it was. In addition, it now had a thin silicone on it, so the rust spots didn’t come back, despite another day in the wet.
While these days, the blued rifle may not be the logical best choice for a wet environment, this also shows that a little surface marking isn’t something to worry about – and with a little care, can easily be dealt with. Certainly, if you have one of these handy little cloths on you.
On my return home, I stripped the rifle action down and gave the underside a good clean out – shaking loose a little bit of dirt and greenery that got trapped between the floated barrel and the stock during the bush bashing.
It also gave me a chance to check out the stock and start looking to waterproof the wood. Another article.
The privilege of owning and using firearms carries with it a number of responsibilities i.e. to store, maintain, transport and use firearms safely at all times. As firearms licence holders we have some very serious responsibilities every time we pick up a firearm and can, by law, be held personally responsible for our actions or inactions (e.g. failing to adequately secure a firearm). There was a hunting tragedy last year, with the fatal shooting of a young hunter at close range by his hunting companion, who failed to positively identify what he was shooting at. These days the consequences of this sort of negligence can lead to a fine, loss of licence and possibly a prison term.
With the roar here again and large numbers of hunters in the bush it is timely to review the safety guidelines that allow us to enjoy our hunting and return home to our families safely. When we sat our firearms licence tests (some of us may struggle to remember back that far) we learnt the Seven Basic Safety Rules and these must be applied every time you handle a firearm. Try to make them habits that you do instinctively and insist that others do the same. If you cannot recall these or are unsure of their meaning, get a copy of the Arms Code from your nearest Police Station and go through it again.
Treat every firearm as loaded.
Always point firearms in a safe direction.
Load a firearm only when ready to fire.
Identify your target beyond all doubt.
Check your firing zone.
Store firearms and ammunition safely.
Avoid alcohol or drugs when handling firearms.
As hunters here are some extra guidelines to keep you safe while hunting.
When hunting with companions, only the person in front has a loaded firearm and they must restrict their arc of fire depending on the position of their companions. Do not try to hunt parallel to a companion, you will soon lose sight of each other in the bush and end up in a confusing and dangerous situation.
If members of a party are hunting individually, always hunt in separate, agreed, designated areas and never enter someone else’s area. Always look out for hunters from other parties though that may be hunting the same area.
Always assume movement, sound, colour or shape is another hunter until you prove otherwise. This will focus your mind on ensuring that it is not a person, rather than immediately assuming it is an animal.
Look very carefully with your eyes and through your scope or binoculars to positively identify what you are looking at. Your brain can play tricks on you in the heat of the moment and you may convince yourself that you are seeing what you want or expect to see.
Try to sight at least the head, neck and shoulder of the target animal at the same time, to confirm target identification and place the shot in a vital area.
Wear high visibility clothing so that other hunters can see you. This should contrast with the environment and the animals you are hunting. Blaze orange is one of the best and is readily available. A cap and a vest that can be worn over any other clothing should be considered a minimum coverage area. If you are carrying an animal or a set of antlers tie some high visibility clothing or plastic over part of them.
Emotions can override rational thought in the heat of the moment (e.g. buck or stag fever) so learn to recognize this and counter it.
Attend a training course if you are inexperienced. An NZDA HUNTS hunter training course is a great way to learn everything you need to know to hunt safely and improve your chances of success.
Remember, it is always the responsibility of the shooter to clearly identify their target, regardless of whatever strategies other hunters may or may not use to be seen. No meat is better than no mate!
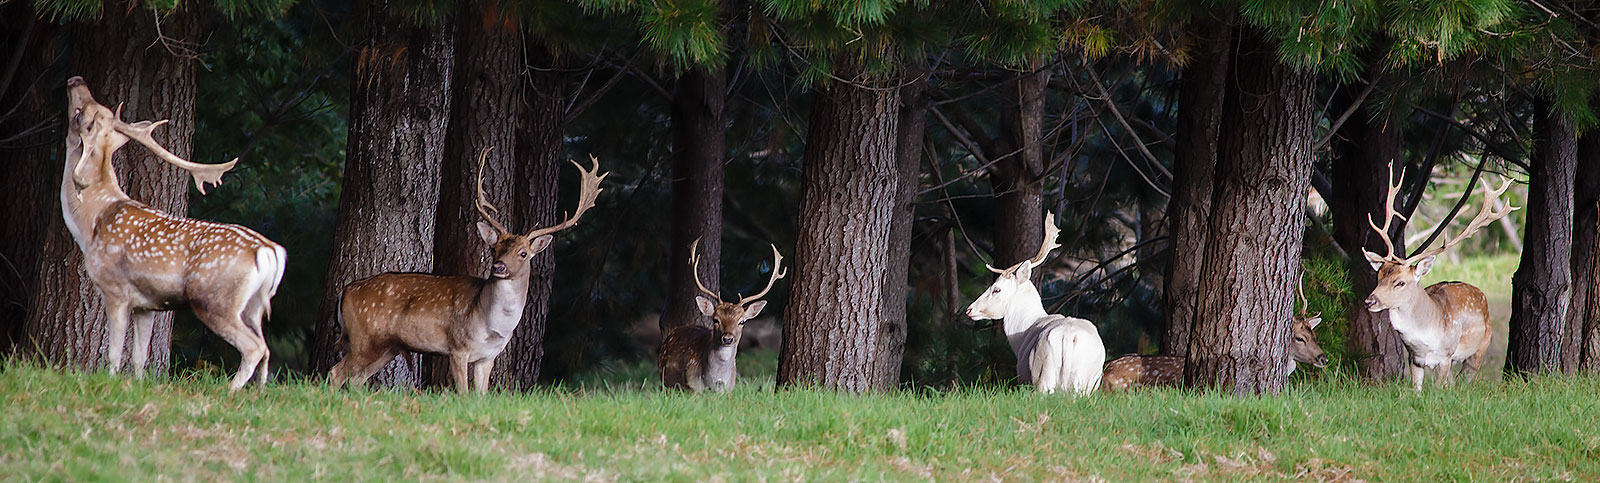
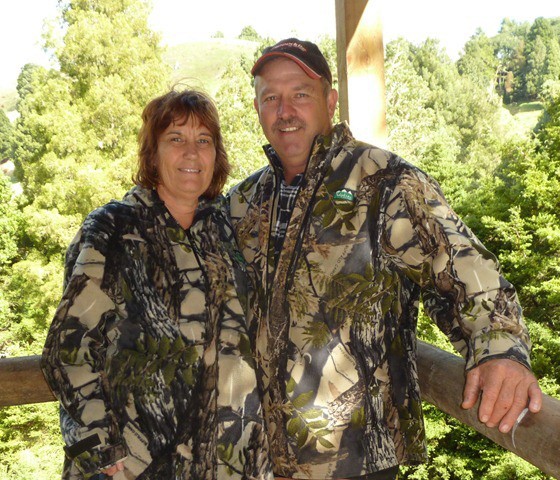
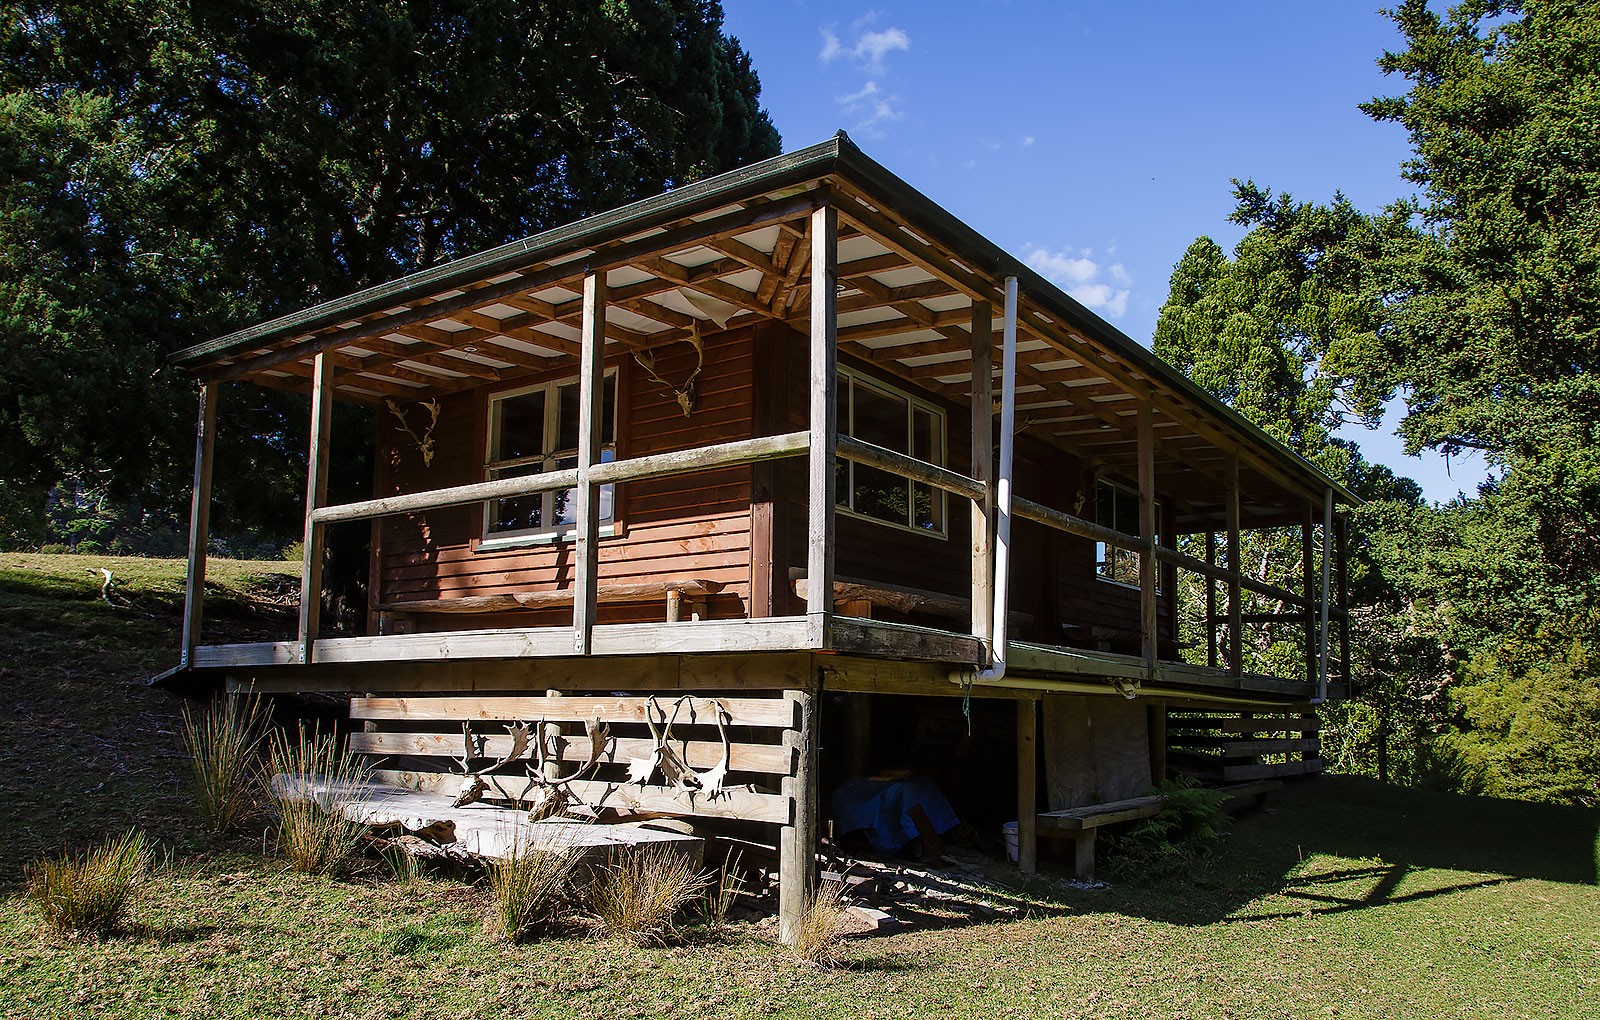
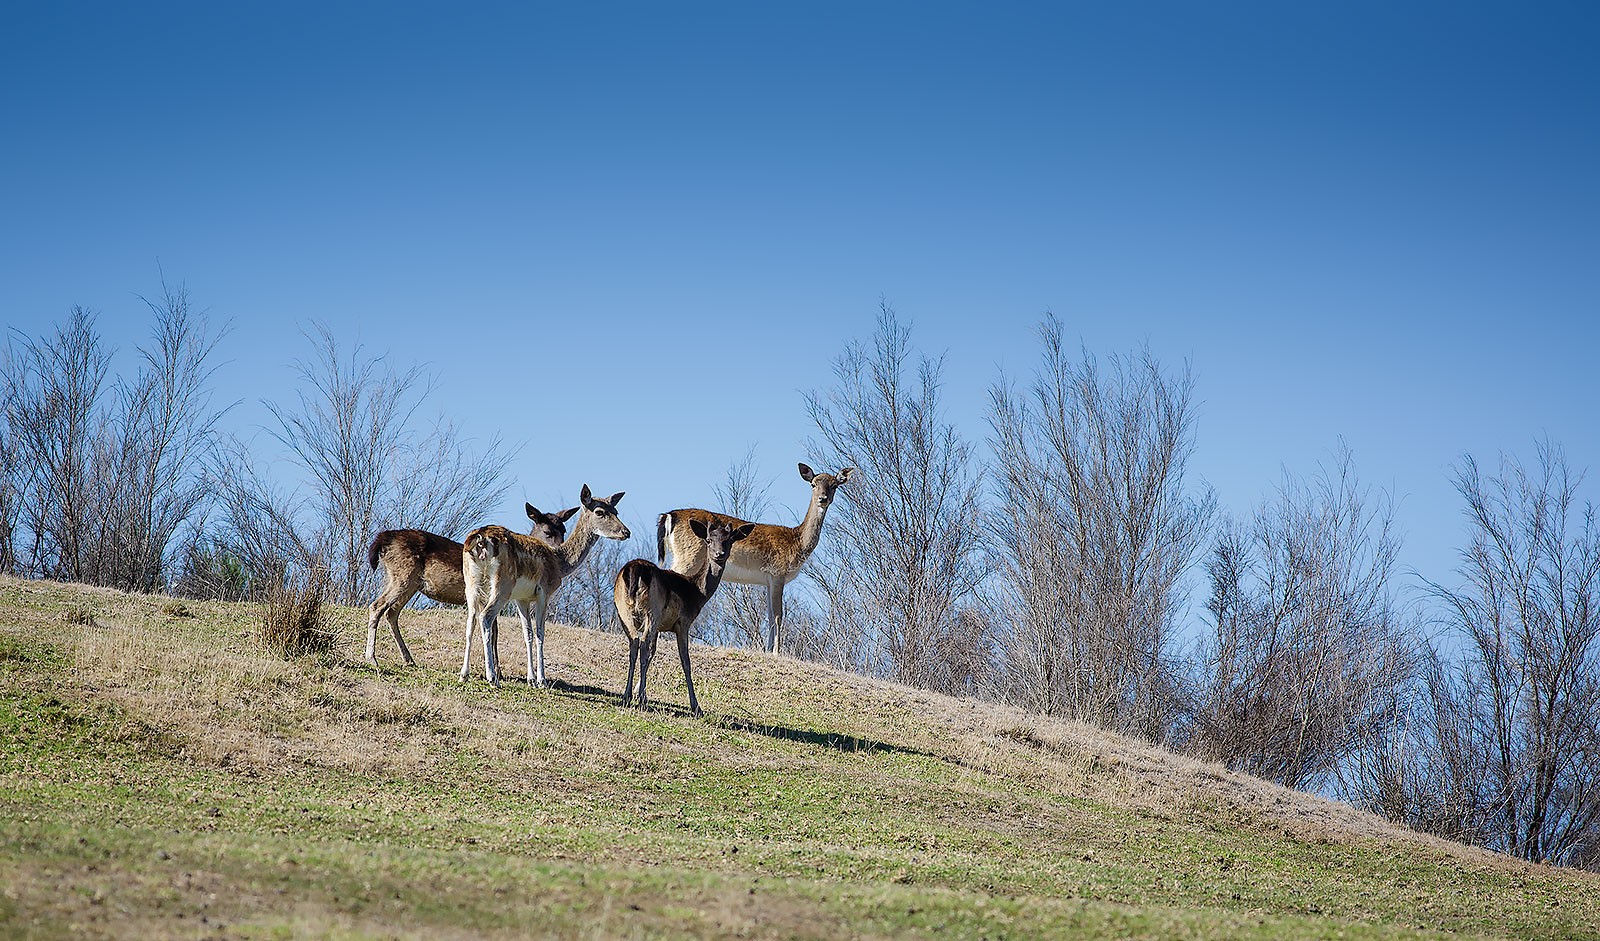
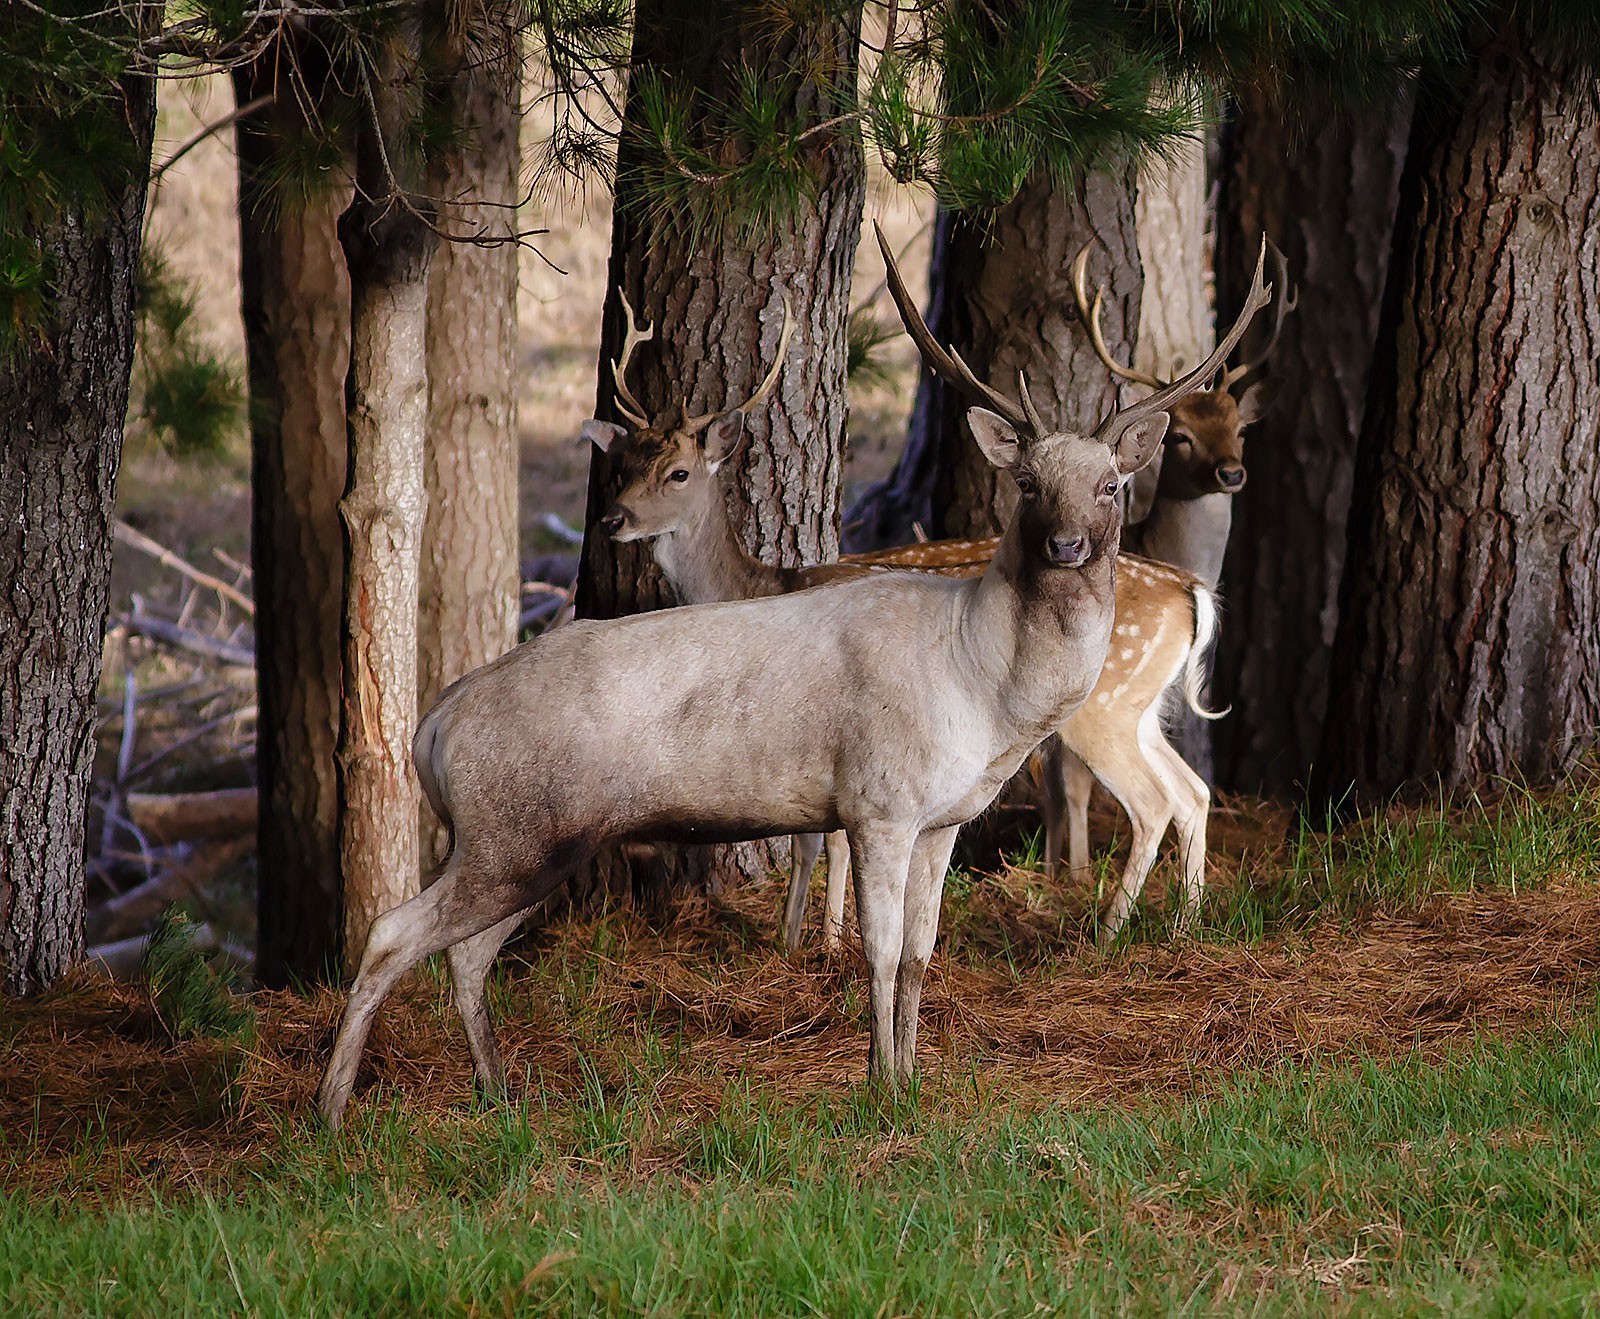
Richard and Stephanie Ross have been running Balnagown for over 20 years, fuelled by Richard’s desire to create a safe and fun hunting experience. Balnagown features a range of environments – native bush and pine forests, streams gullies and hills. There is plenty of room to stalk around in.
I originally met Richard when we headed there as part of the North Auckland Deerstalkers HUNTS Course. You can check out the footage from that day here. What initially impressed me was his passion for what he was doing. It was obvious that he was enjoying showing us around, telling us about what he did up there and of course sharing his knowledge.
The Balnagown Hunting experience is a result of years of Richards work. Taking over a rugged and run-down property ( I believe his mother in law wouldn’t allow Stephanie to move in until he had done a bit of work to the house), he started transforming it into his vision of a place for people to go and experience the thrill of a Deer Hunt in a safe and rewarding way.
Safety
Safety is a big feature of Balnagown. If you are hunting on his 300 acres, you can be comfortable in the knowledge that you are the only people anywhere near the block you are in. The rules are laid down up front. Only a single person hunting at any one time, small, close groups, firearm safety and awareness maintained at all times. Richard lost a good friend in a hunting incident years ago (public land, shot, shooters never came forward) – so rightly so, he is going to ensure that something similar never happens again. His regard for the safety of people on his property shines through. You know that he has your best interests at heart.
The Roar
The Roar was recently described to me as ‘A large group of testosterone-fueled Bucks, being chased around by a large group of testosterone-fuelled men with guns’.
It’s not the regular hunters that make me nervous. They generally know the area, know the rules and often decide to just totally avoid going out in public land at this time of year.
What makes me nervous is the guys who dust of their rifle once a year and only have one week(end) to score that trophy deer for the year. It’s a dangerous combination of eagerness and buck fever.
For this reason, I think the idea of heading up to Richards Private Block is even more appealing. By going there, you significantly (to zero) reduce the risk of accidentally roaring in another hunter and you can pretty much guarantee that you will walk away with the deer you want.
It’s not easy
Privately managed blocks sometimes get a bad rap by seasoned hunters who view it as too easy. Sure, if you decided to shoot the first animal you saw out there, it would be. Richard essentially has two areas to the land. The front area, which you pass through on the way out, is paddock. That’s where the deer spend their time growing up until they are ready to head out into the hunting area and once they are out there, well, you are going to have to work for it. To be fair, you aren’t going to get tangled up in Supplejack out there, or Bush Lawyer, or really have to suffer any more than you want to (though be careful of Richard, I think he likes to make sure you work for your reward).
Wandering through the hunting block(s) – it gets dense enough that you can have a deer within meters of you – and not know it. Many a time I was trying to get a good photo, only to be surprised (and sometimes surprise) another animal I hadn’t spotted just off to my side. Have no doubt – your stalking skills will get tested – and a couple will get away from you.
The Hunting Lodge
Often, a day/weekend hunting will start with Richard making you a cup of coffee, clearly explaining what is going to happen that day, the safety rules, tell you some great stories and then head off with you to the Hunting Lodge.
Think of the lodge as base-camp for your trip. For example, people will stay overnight at the lodge, enabling them to get up and get out at the crack of dawn, hunt for a bit, then head back to the lodge for a cuppa and a BBQ before heading back out at dusk.
The lodge has everything you need to be comfortable and also provides a well-sorted area for cleaning up and processing your deer. If it’s your first time out, Richard will take you through the process of skinning, gutting and separating out the meat – and then whisk it off to the chiller so it’s ready to go when you head out. This makes Balnagown equally suitable for beginners or experts. All nationalities are welcome. Richard can guide and show you whatever is needed to ensure your hunt is successful. He has had people head out who have never shot a gun before and people who are regular hunters that enjoy the environment he provides. If you need, he can supply the firearm, or you can bring your own.
Rifle, Bow or Camera
I took my camera and a 400mm lens out. I quickly realised that it was really, really difficult to get a good photo of an animal that didn’t want to hang around and pose for me. It forced me to try and get close as quietly as possible, then observe and wait for the right moment for that shot. Several times this meant me watching an animal, it getting a whiff of me or hearing me take a step and then bolting before I could get a good photo. It’s a great challenge.
Richard also has dedicated Bow Hunting areas. Pine Forests that are ideally suited to the long stalk and plenty of native bush to get tangled up in as well.
I think this is one of the great strengths of the service Richard is running. You just need to get in touch with him, telling him what you are after and he will make it happen for you. Meat animal? Easy. Trophy Hunter? Sure. The first-time shooter, Father and Son Groups, Company Client Hosting, he can make it happen. I am planning on heading up again soon with my partner to spend a night in the lodge and listen to the roaring (ok, so I might also take the rifle up with me).
Plug plug plug
This article might sound like it’s really just one big advert for Balnagown and in some ways it is. I have really enjoyed the time I have spent up there. Richard is so welcoming and knowledgeable and I could happily just drive around with him all day listening to his stories and knowledge about deer. You can learn so much from the man. Add to that the beautiful land he has up there, the broad range of animals and you have a great day/weekend out.
For the hardened veterans who have decided it’s not real hunting unless it’s in public land, well, fair enough. It’s not going to be for you.
For those who may have limited time in their lives for hunting and don’t want to head away for a weekend without even seeing an animal, I strongly suggest you get in touch with Richard and go and see what he has to offer.
Considering you have sole access to the 300 acres, the lodge and Richard right there to guide and help out, it becomes a cheap weekend experience and you are guaranteed to walk away successful.