
As I have previously said – I am fairly new to all this – so trying different methods and places, learning as I go. This trip, which was a doubleheader in the end – managed to land some ‘bait’ than then converted to food the next day. To be fair – as it turned out…
Preparing for your first Brazilian Jiu Jitsu lesson: A comprehensive guide

Forty-four years old, sitting in my car, unsure if I could sum up the courage to actually go in and try something new.
For a bit of history, I did Karatae as a kid (Yellow/Orange Belts), Kendo for years (Brown), and Tai Chi (unranked?) for many more – this wasn’t my first ‘foray’ into Martial Arts. I taught people to shoot rifles for years and held many Firearms Licencing courses. So – what was making me so nervous?
I guess. It was simply something new and a fear of looking silly.
Indeed, stepping into a new environment, especially one as intense as a BJJ dojo, can feel intimidating. The fear of the unknown and the worry of appearing inexperienced or clueless can sometimes hold us back. It’s a universal feeling we’ve all grappled with (pun absolutely intended) – but fear not, this guide will arm you with all you need to confidently approach your first BJJ lesson.
The journey of a thousand miles begins with a single step.
– Lao Tzu

What is Brazilian Jiu Jitsu?
I am writing a bit of a long answer to this one – as I find myself needing to do some research for my kids on the subject, but, as a short history: Brazilian Jiu Jitsu, often abbreviated as BJJ, traces its roots back to the Japanese martial art of Judo in the late 19th century. The Gracie family later modified it in Brazil to become the physical chess game we know today. Notably, BJJ focuses less on strikes and more on ground fighting and grappling, with the objective being to control and subdue your opponent through superior technique, leverage, and body positioning. It’s a challenging and rewarding sport requiring physical and mental prowess.
How do I find a reputable Brazilian Jiu Jitsu school?
This is a bit tricky because – you don’t know what you don’t know. Location obviously plays a big part, but other than that – knowing someone who already goes there is a big plus and the general feel you get on their website. But more than anything, you have to feel comfortable there. And you will only know that when you step into the dojo. So go ahead and take that leap of faith because every great journey begins with a single step, doesn’t it?
The best way to predict the future is to create it.
– Peter Drucker
Do I need any prior experience to attend a Brazilian Jiu Jitsu lesson?
No. Not really. Indeed, prior martial arts or sports experience will undoubtedly help, but the key is an open mind. Many seasoned practitioners started off with little to no experience and learned along the way.
Do I need to be physically fit to participate in Brazilian Jiu Jitsu?
I certainly wasn’t! My BBJ journey has been frustrating as I realised I wasn’t as fit as I would like to be and found myself (still do) gassing out while rolling with a more athletic opponent. Don’t worry – practice consistency, and through the beautiful ability of the human body to adapt – it will get easier, and you will get fitter!
It’s true that Brazilian Jiu Jitsu (or BJJ) can be a rather intensive form of exercise, requiring a fair bit of strength and agility. But here’s the crux of the matter – you don’t need to possess these attributes at the onset. As you progress in your training, your fitness level will naturally improve. Plus, instructors understand that everyone starts somewhere and are there to guide you from your current fitness level rather than expect you to be a grappling superhero from day one. So, if you’ve been watching from the sidelines thinking you’re not ‘fit enough’ to join in, it’s time to toss that excuse out of the ring!
BJJ is a martial art that champions technique over raw physical prowess. You’ll rely more on your wit and strategy than on hulking muscles. Yes, the thought might strike you as peculiar. Can one really out-manoeuvre an opponent in a physical combat sport without bulging muscles and a chiselled six-pack? The answer is a resounding ‘yes’. In fact, some of the most successful BJJ practitioners aren’t specimens of Herculean strength but are individuals who’ve mastered technique and timing.
Does all of this mean fitness doesn’t matter in BJJ? Not quite. Improved fitness can offer advantages like better stamina or faster recovery times. But remember, it’s a progression, not a prerequisite. So, keep those worries about your fitness level at bay, lace up your shoes (or rather, wrap up your gi!) and step out on the mat. As the old saying goes – the journey of a thousand miles begins with a single step….or in this case, a single roll!
What should I wear to my first Brazilian Jiu Jitsu lesson?
If in doubt, ask. The school will undoubtedly be happy to answer questions – but – in short – comfortable gym gear. However – that means shorts or trackies – without any massive pockets or other things to catch fingers and toes (been there, done that – even on a GI, it still can be a pain!) with a t-shirt. Skip the singlet and – pro-tip – ear jandels to the gym to let your feet air beforehand because you won’t wear shoes while training. Make sure your attire is convenient, non-hazardous, and feet-friendly. Your initial sessions will be more about learning the ropes than style, so comfort trumps fashion in the BJJ dojo/gym/school.
What to wear on your feet
You might be wondering: ‘What should I wear on my feet to a BJJ gym?’ Good question! Unlike other sports, BJJ is typically practised on mats and requires bare feet. Don’t panic if you’re not accustomed to this – the mat is generally soft, and you’ll get used to the sensation with time.
The Role of Flip-flops or ‘Jandals’
Now here comes the quirky part. Jandals! Yes, you read it right. The protocol in most BJJ schools is to wear flip-flops or jandals when you’re not on the mat. Wearing them when you visit the bathroom or move about off the mats in the gym is required. In doing so, you’re safeguarding your bare feet from germs and dirt, making it a healthier space for your BJJ comrades.
Feet Cleanliness
It goes without saying, but I will say it anyway – if you’ve been out in the wild in your jandals and you’ve stepped in some muck (it happens), do wipe down your feet before stepping on the mat.
- Most gyms will have antibacterial wipes or sprays for this purpose.
- Just give your feet a good wipe-down, and you’re ready!
Adhering to these practices isn’t just about keeping the gym clean or honouring the traditions of BJJ – it’s also about ensuring that you and whoever you’re grappling with can train safely and effectively.

What are some standard etiquette practices in Brazilian Jiu Jitsu?
Hygiene and Cleanliness Etiquette
Delving into the realm of Brazilian Jiu Jitsu, it’s pivotal to uphold a stellar standard of hygiene and cleanliness. I know hygiene hardly seems the most exhilarating topic, but trust me, it’s essential considering the level of physical contact in this martial art. You’ll soon discover that keeping clean isn’t just for your benefit but for everyone sharing the mat with you.
Keep It Clean
First things first, your Gi needs to be spotless for every lesson when you get it – that’s your uniform if we’re still acquainting ourselves with the lingo. A grubby Gi is a shocking offence in the BJJ community. Not only is it unhygienic, but also disrespectful to your training partners who, let’s face it, don’t want to get up close and personal with last week’s sweat stains.
I wash mine every time I train – it just goes into the washing machine for a quick cycle with some Antibacterial Laundry Sanitiser. Quick, fresh, minty. Well – Eucalyptus, actually.
Wash Up
Washing before training is a must. You’ll be physically close with your training peers, snugglier than traditional social norms tend to consider acceptable. As such, arriving fresh and smelling neutral is essential. While ideally, you might shower pre-roll – at the minimum – don’t work straight off a hot, dirty worksite straight into the gym. A spritz of deodorant is great, but steer clear of strong perfumes or colognes – when you’re gasping for breath mid-roll, the last thing you need is a lungful of someone’s pungent aftershave. Remember – cleanliness is not only next to godliness in BJJ; it’s respect for your fellow training partners.
Consider also bringing a little bottle of hand sanitiser – a quick spray before you step onto the mat – and you will deal with anything you might have picked up on the way to the gym.
Trim Them Nails
If you thought your first Brazilian Jiu Jitsu lesson was about grappling mats, think again! BJJ is an up-close and personal martial art; thus, personal grooming is more important. One simple yet crucial component of this is the state of your nails. Fingernails, as well as toenails, need to be frequently checked and maintained. But why, you ask? Well, I’m glad you asked!
The reason may sound obvious, but we should spell it out anyway – nobody wants to be scratched during training! Long, sharp nails are a hazard for you and your partners. And remember, we’re practising martial arts, not auditioning for a horror movie.
There’s more bad news for those worried about breaking a nail (and we know you’re out there). Long nails are more prone to painful breaks and tears during the rough and tumble of BJJ training. In the spirit of empathy, let’s avoid inflicting or suffering from such unnecessary agonies, shall we?
So, before arriving at your first class, ensure your nails are neatly trimmed. It’s a small but essential step in preparing for the BJJ mat. After all, big journeys come from small beginnings and trust me when I say your BJJ journey will be big. So, break out those clippers, take a deep breath, and engage in one of the simplest but most impactful preparation rituals for your BJJ journey. Trust me, your future training partners will thank you!
Mind that Breath
Before we proceed, could we take a moment to talk about our breath? Smelly breath should be classified as a martial art on its own, ‘halitosis-jitsu’, if you will. It’s powerful – powerful enough that your sparring partner could tap out before you even demonstrate that complex armbar you’ve been perfecting. Jokes aside, it is imperative to take care of your oral hygiene.
Frequently sipping on energy drinks or malfunctioning protein shake sippers right before a grappling session can give you a set of gnashers that even a great white shark would consider offensive. And if you’re wondering, yes, the smell does get amplified under the duress of intense submission grappling. Do you really want your new gym buddies to remember you as ‘the one with the breath’?
Here’s a tip, make brushing and flossing a part of your pre-GI routine! It’s a good practice to bring along some chewing gum for last-minute refreshment (the sugar-free kind, of course, we wouldn’t want to aid any cavity-causing bacteria, would we?).
In addition, stay hydrated throughout the class. Rollers often suffer from dry mouth due to intense exertion and heavy breathing, leading to malodorous breath. So, help your mouth maintain its natural clean cycle by staying hydrated.
These might seem trivial details, but they promote a healthy, respectful, and friendly training environment. After all, the art of Brazilian Jiu Jitsu also teaches us the importance of discipline, respect and cleanliness, doesn’t it? So arm yourselves with a winning smile and minty breath, and get ready to immerse yourself in the beautiful world of Brazilian Jiu Jitsu.

Bring a Gym Towel
Here’s something that might not automatically spring to mind when you’re packing your bag for your first Brazilian Jiu Jitsu lesson – a gym towel. It’s like Bruce Lee once said, “Be water, my friend” – and trust me, you will be. In this form of martial arts, a good old sweat sesh is pretty much a given, and a towel can be a little lifesaver in such moments.
Why, you might ask? Well, Brazilian Jiu Jitsu is a close-contact sport. Emphasis on the close contact. When sparring, you’ll find yourself closer to your training partner than you may be used to, and depositing a river of sweat on them isn’t exactly considered the height of good manners. Your gym towel is your trusty sidekick in maintaining cleanliness and diplomacy in the dojo.
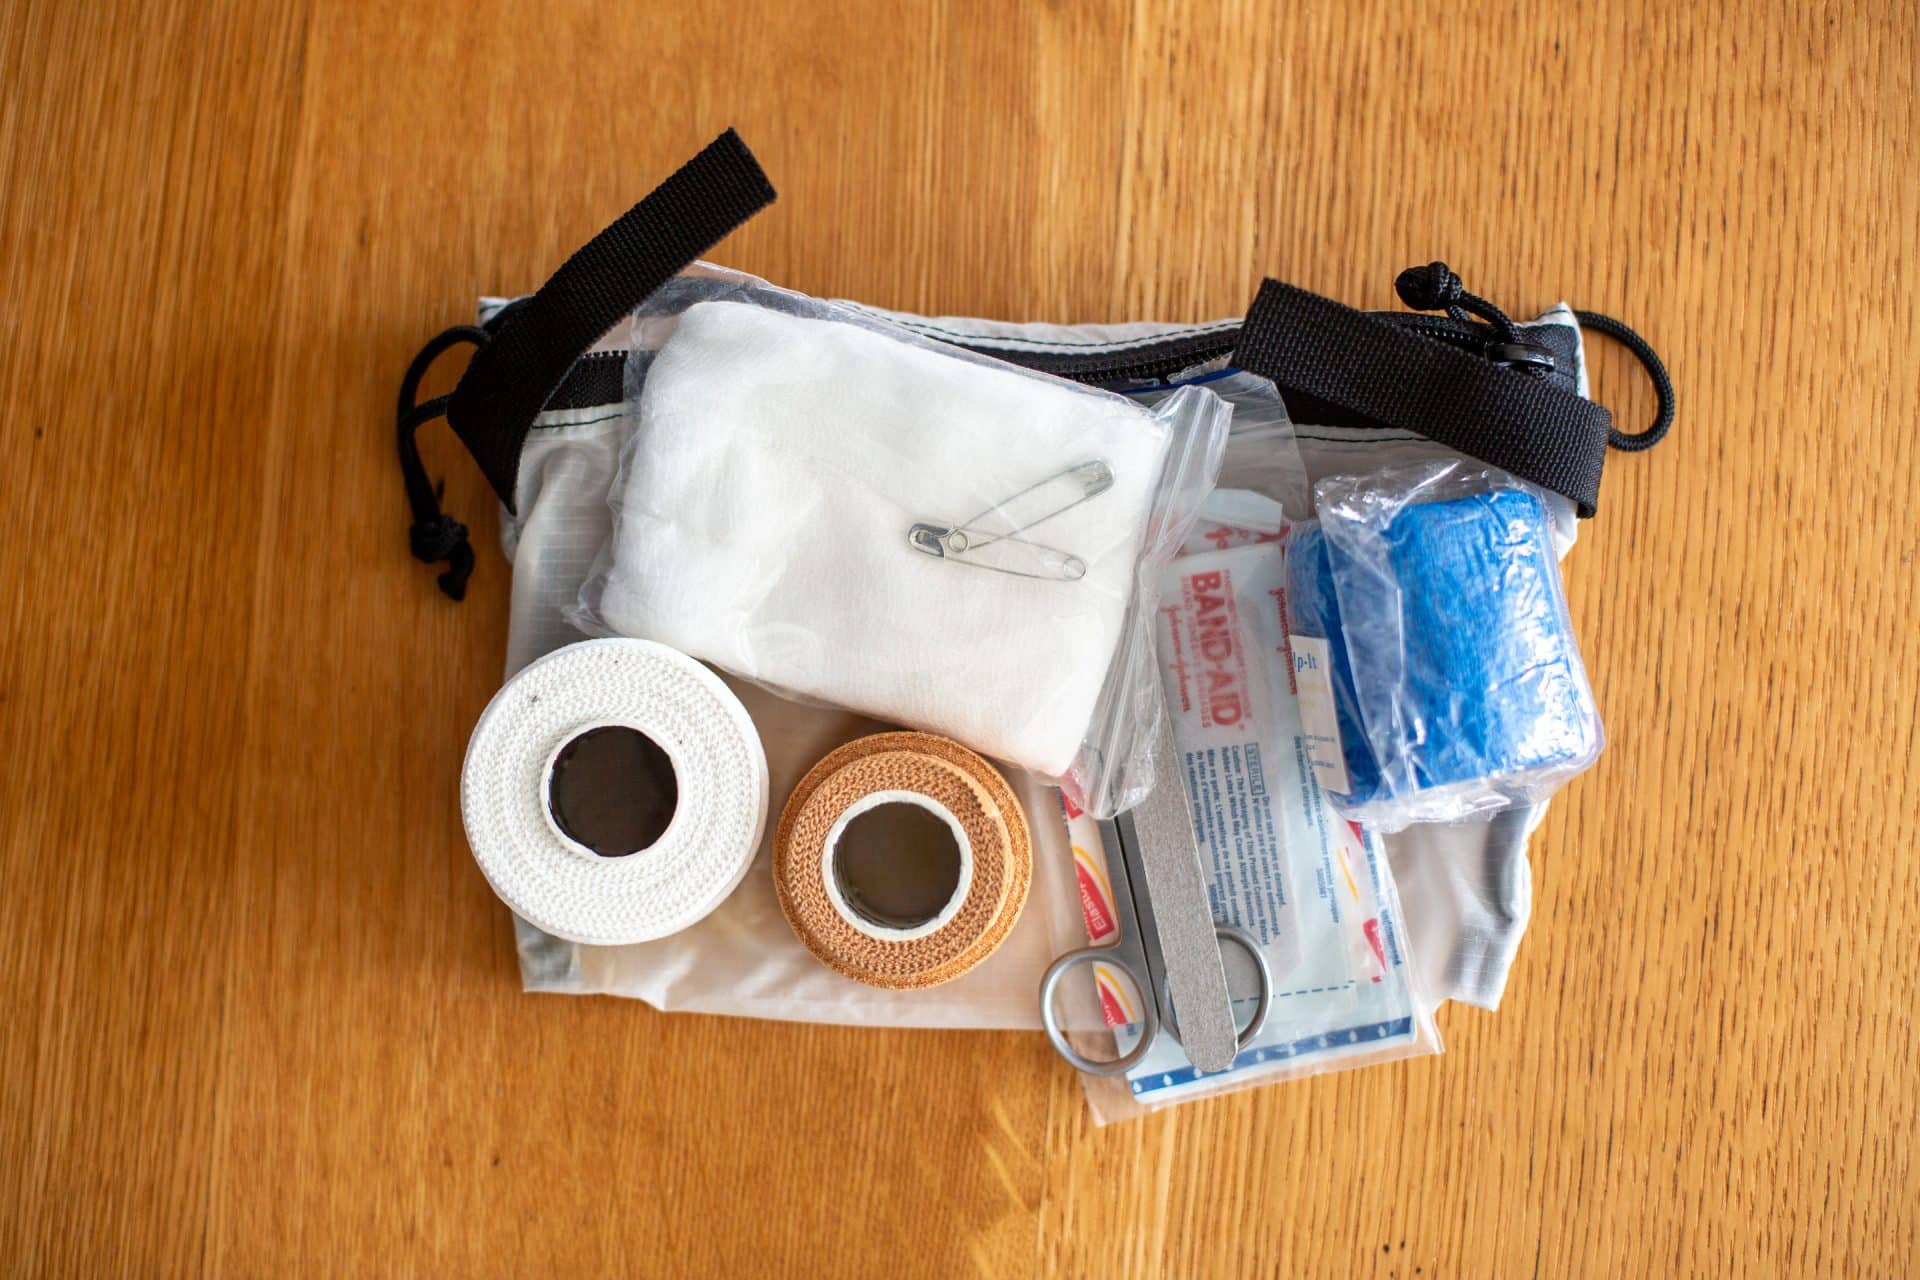
First Aid Kit Essentials
Imagine this – you’re heading off to your first Brazilian Jiu Jitsu lesson, and you’re packed with adrenaline, excitement and maybe – just maybe – a tiny dash of apprehension. As you go to the gym, consider this little pearl of wisdom I will share with you (it might just save the day). Ensure your gym bag is always armed with a basic first-aid kit. Sounds obvious, right? But you’d be surprised at how often this is overlooked.
We all experience our fair share of scuffs and scrapes in life, but trust me when I say they’re common in martial arts. Thus, the first rule of Jiu Jitsu? If you’ve got an open wound, cover it before stepping onto the mat! For this, my friends, adhesive tape is your trusty ally.
And here’s the thing – remember to bring your own tape! If you are burdened by an unexpected cut, your coach would probably not mind sparing a piece of their precious tape. However, if you’re aware of a wound, your own roll of tape will come in handy. I say tape because most sticking plasters will not hold on long in the conditions you subject them to.
Let’s shift gears for a moment – suppose you’re in the middle of training, and bam! The new, over-excited white belt accidentally gives you a nosebleed. What should you do? Ignore it and continue training? Absolutely not! I wouldn’t recommend smearing it around with a paper towel, either. Fear not, for there’s a simple solution – get hold of some antiseptic wipes or any mat-friendly disinfectant and promptly clean it up.
- Adhesive tape
- Antiseptic wipes
- Nail clippers
- Hand Sanitiser
There you have it, four must-have items in your first-aid kit for the gym. Small steps like these ensure a safe and enjoyable training experience for you and everyone else on the mat.
On Arrival At The Gym
Introduce Yourself
You might walk into your first Brazilian Jiu Jitsu (BJJ) lesson feeling a tad nervous – a cocktail of excitement and anxiety, perhaps. Nothing strange there, I assure you. We’ve all been there, done that, and worn our first Gi (which felt a bit like wearing a pair of rough curtains, I’ll admit).
One of the first steps in your soon-to-be-favourite martial arts adventure is as simple as saying ‘hello’. That’s right, you need to introduce yourself. It might sound too easy or even a tad trite, but trust me on this one, a good introduction often paves the way for an enjoyable BJJ journey.
While not every school will have the same introduction procedures, meeting the instructor before the class begins is standard practice. So be early. You’ll most likely need to fill out some basic paperwork and disclose any medical conditions or physical limitations you might have while you’re at it. Then, make sure to introduce yourself to your fellow students when you step onto the mat. While you might feel like the new kid in town, remember that every current student was once where you are now, and they’re there to support your journey, not hinder it. Your BJJ journey, after all, is not a solo trek but a team sport. Pro-tip – if people are not friendly, it might be worth looking for another gym to join.
Remember, the first step to being good at something is being bad at it. In essence, BJJ is a lifestyle, a discipline that teaches you life skills, values respect, and promotes the spirit of camaraderie. So take that first step, introduce yourself, and prepare to immerse in an oh-so-capacious world of Brazilian Jiu Jitsu. It’s not just about the fisticuffs, my friends.
What should I expect during my first Brazilian Jiu Jitsu lesson?
Personal Space
It’s going to get close and personal. One major difference I immediately noticed between any other martial art I had previously done, and BJJ is that you will very quickly be put into a rather close and personal situation with another person. Physically close. Like, real close. Chest to chest. It will be (naturally) a bit uncomfortable for a bit. Don’t worry. That’s normal – and – any discomfort from the situation will quickly get replaced with the discomfort of being in a situation trying to defend yourself. That tends to refocus your mind really fast! Remember, everyone in a BJJ class has been exactly where you are now, on the first day, feeling a tad out of sorts when getting up close and physical with a stranger. In no time at all, you’ll find that the physical closeness fades into the background as your focus narrows to strategy, techniques, and survival. Embrace the close quarters – it’s all part and parcel of this incredible martial art!
What About Rolling With Woman?
Assuming I am talking to a male here, I think the opposite is also likely true (though out of my experience) – to put it – most of us guys will initially be a little wary of being between the legs of a woman, other than our partner. Again, this discomfort is normal and natural, and we’re operating under an unspoken but implicitly understood contract of mutual respect here; we’re training partners, nothing else. As soon as you get choked- you will forget who they are – and focus on getting some blood back to your brain!
But where do I put my hands?
Just put your hands where the job needs them to be! Grappling lapels is A-okay, gripping legs is peachy and anything that the technique demands is fair game. Of course, there might be the odd unintentional brush-by as your hand voyages to its destination (and believe me, it’d better be unintentional). If this happens, offer a swift but sincere apology and crack on.
Here’s a little insider nugget – this isn’t just an etiquette for engaging with folks of the opposite sex. You’ve got to be just as conscious of personal space with your own gender – because accidents happen; knees collide, heads bang together, the unintentional elbow may occasionally meet face (or worse). So, remember: stay aware, keep it clean, look out for your partner, and keep it controlled.
Can I spar or roll during my first Brazilian Jiu Jitsu lesson?
Depends on the school you end up at. At Zero Gravity (where I train), the fundamentals class is for anyone to attend but aimed at the white belts and consists of line work (warmup), techniques (drills) and then ‘pass or sweep’, which is rolling but without submissions. One side intends to get pass the guard and the other to maintain guard and sweep the person on top to a better position (don’t worry – I have another article for terminology in the works). Limiting options allows new folk to focus on the basics and not simply get smashed by higher belts with chokes and arm bars. It’s an excellent way to be introduced to the world of BJJ.
Other schools, I would have to assume, let you go straight away. Again – this should all be explained to you – but – if in doubt – ask.
Understanding Tapping and Tap Early
This is not the time to show everyone how much pain you can endure. For many BJJ submissions, the ‘apparent’ discomfort can come on relatively fast – and you don’t get extra points for lasting longer than someone else at the beginner level. Tap (literally, tapping the ground or your opponent) is the universal language for – ‘that’s enough’ – yes – you can tap too early (you will quickly get used to a surprising amount of discomfort) – but don’t push through the pain. That is how permanent injuries occur.
Consider ‘tapping’ as your safety net in the world of Brazilian Jiu Jitsu. If you take nothing else away from this article, take this – when in doubt, tap out. Often, beginners feel a sense of trepidation or ego-driven reluctance to tap, equating it with defeat. It’s not. It’s an essential element of the learning process.
Don’t Spaz Out
The notion of the Spazy Whitebelt is very true. I probably still fall in the category a little bit – but – being older, I am not as dynamic as some of the younger guys that come in. But – no doubt I have moments where my brain switches back into basic survival mode, and I reflectively do something a bit random. The more you do this, the more (ironically) your movements become predictable and safer for your rolling partner.
Remember, Jiu Jitsu is a game of strategy, not strength, so it’s essential to keep your cool and think through your actions rather than wildly flailing about like a fish out of water. Calm down, breathe, and focus on practising the techniques you’ve learnt, even if you’re under pressure. It might take some time, but staying composed will help you get better and faster at Brazilian Jiu Jitsu.

Don’t Muscle Through
Here’s a lesson I learnt quite early on – pumping iron like Schwarzenegger won’t necessarily give you a leg up in Brazilian Jiu Jitsu. Sure, strength can work in your favour during a match. However, when you’re just starting, focusing too much on using your brute force can hinder, rather than facilitate, your learning.
Brazilian Jiu Jitsu is a martial art that concentrates more on skill, technique, and strategy rather than raw power. In other words, it’s a thinking person’s sport. The old adage “brain before brawn” very much applies here.
As a beginner, your primary goal should be to absorb as much knowledge as possible. Learn from your instructor, learn from your training partners, and learn from your mistakes. Hint: you will be making a good many of these at the start, but remember, it’s all part of the learning curve.
When the time comes for you to roll (spar/fight), avoid using all the strength you’ve been studiously building at the gym. Understandably, suppressing the instincts firing off from your caveman’s brain might be a tad difficult. But here’s the catch – using raw strength over technique only works until a certain point. You’ll find yourself out of steam pretty quickly. In this scenario, techniques and the chess-like strategy of Brazilian Jiu Jitsu triumph over muscle strength.
Muscle memory can be your best friend or worst enemy in this game. If you constantly rely on your raw power, your body will automatically default to that in tense situations. This is not what you want. Instead, make it your goal to engrain the techniques and strategies you learn in your muscle memory. It’s not about overpowering your opponent; it’s about outsmarting them. So, leave your uber muscles at home, my friend, and bring only a can-do attitude and an eager-to-learn mind to the mats.
In a nutshell, don’t muscle through. Instead, think, learn, absorb, and, most importantly, enjoy every moment on the mats. A Brazilian Jiu Jitsu journey is not a race; it’s a gripping, thrilling marathon. So, hold onto your gi, my friend; you’re in for an extraordinary ride.
On the flip, if you find you are facing a bigger, younger, stronger, whatever opponent – let them burn themselves out on you. Focus on posture and base and let them gas out.
Focus on Surviving, Not Submitting
From the moment you step onto the mats, you may have a specific idea of what success looks like in Brazilian Jiu Jitsu. You might think it’s about getting as many submissions on your training partners as possible. But here’s a surprise for you – in your first class, your primary focus should be on surviving, not submitting.
That’s right, I said surviving. Now, I can practically hear your mind screaming: “Wait, am I about to be thrown into a lion’s den?” Not quite. Though it might sometimes feel that way at first – I’ve been there!
When we talk about ‘surviving’, it’s about not allowing your opponent to submit you or to overwhelm you with superior positions. This often means letting go of the notion of winning and learning how to ‘lose less’ instead. The sooner you accept that everyone gets tapped out, the better you’ll focus on what matters: Learning.
I went from a progression of ‘oh shit’ to ‘survive longer’ to ‘improve my position’ to ‘put pressure on them’ and am now moving into ‘try to find a submission’. Of course – this depends totally on the person I am rolling with – because you will quickly find different people with differing levels of experience mean very different rolls, which is awesome.
You’ll find yourself wrestling with more experienced students; chances are, they won’t allow you to execute the moves you’ve learned just yet. It’s crucial (and humbling) to remember that this is normal. It’s not a Hollywood film where you can be the tough hero who surprises the veterans. You’re a beginner, and that’s perfectly alright.
Remember, mastering any martial art is about the journey, not the destination. And in Brazilian Jiu Jitsu, ‘surviving’ is the first step of the journey towards mastery. It’s about learning to be comfortable in uncomfortable situations, understanding your body, its limitations, and ways of moving that initially feel completely counter-intuitive.
Tapping out to a submission doesn’t mean you’ve failed. Instead, it means you have identified a gap in your defences that you can work on. It’s a learning curve, and every tap is a lesson learnt.
Fight the urge to berserk, straining every muscle to escape or submit your partner. It’s a marathon, not a sprint. So play the long game, focus on defending, escape when possible, and most importantly, enjoy the process!
Remember, a calm sea never made a skilled sailor.
Summary: The Awesome Jiu-Jitsu Journey Begins
There you have it, folks – an essential guide to your first Brazilian Jiu-Jitsu lesson. Like plunging into icy bathwater, this might seem a bit overwhelming initially. However, the shock quickly subsides, giving way to a euphoria you may not find in any other sport.
I end with a bit of philosophy. These twists, turns, falls, and rises may seem like a tall order. But remember, a journey of a thousand miles begins with a single step, and Jiu-Jitsu is no different. So, whether you’re a fresh-faced novice or a rusty old-timer, don’t hesitate to take that first step onto the mat. I am glad I did.
The Art of Resilience: Embracing Jiu Jitsu Principles for Personal Growth


In Jiu Jitsu, there is no losing. You either win or you learn.
Carlos Gracie Sr.
The Art of Control and Patience
In Jiu-Jitsu, one of the fundamental skills is learning to control and submit an opponent using leverage and technique rather than sheer strength. Similarly, in life, we are often faced with circumstances that are beyond our control. By embracing the ideals of Jiu-Jitsu, we can learn to navigate these situations with patience, composure, and adaptability.
I am starting to appreciate that there is plenty in this world that I can not directly control. While that often frustrates me, I need to focus on what I can influence – and channel my energy into that rather than worry about things I cannot. Otherwise, I waste my limited energy on something that no amount of fretting and worrying about will change. What skills can I learn or apply to my life, and how can I adapt and refine those I already have? Where is my leverage point?

The more you sweat in training, the less you bleed in battle.
Richard Marcinko
The Power of Mindfulness
Jiu-Jitsu teaches us the importance of being present in the moment. By focusing on our breath, body movements, and the subtle nuances of our opponents, we train ourselves to be more mindful. This mindfulness can be carried over into our daily lives, helping us to be more aware of our thoughts, emotions, and actions. Being fully present allows us to make better decisions and respond effectively to our challenges.
Now is the only place in time when I have a direct influence. I can’t change the past; the future is only a concept. Right here, the singularity is where I can shape and form my life. I can only engage with those around me right now, as this is the space we all co-inhabit in our lives.

Believe you can and you’re halfway there.
Theodore Roosevelt
Embracing Failure as a Catalyst for Growth
In Jiu Jitsu, as in life, failure is an inevitable part of the journey. Every practitioner has experienced setbacks, tapped out, and made mistakes. However, the beauty of Jiu-Jitsu lies in its capacity to turn failure into a catalyst for growth. By embracing our failures, we become resilient, learn from our mistakes, and evolve on and off the mats.
Every day, I try to suck a little less. The idea of slow but constant improvement has taken over from a drive to ‘be the best’. Sometimes, day to day, I don’t see movement, but I need faith in the process, and now and then, I check in and realise I have shifted and improved quite a lot. Every failure is simply one less I need to make on the path to success.

The belt only covers two inches of your butt; the rest you need to back up on your own.
Royce Gracie
The Importance of Collaboration and Community
Jiu Jitsu is not an individual sport; it thrives on collaboration and establishing a solid community. Training partners work together, support, and push each other to reach new skill levels. In life, cultivating meaningful relationships and relying on the support of others can make all the difference. We learn to appreciate a collective effort’s strength and a united community’s power.
We are all journeying and learning together. My training partners, my teachers, and those who start after me are simultaneously on unique and joined paths. By giving to our partners, we receive back.

Jiu Jitsu is not about being better than someone else, it’s about being better than you used to be.
Renzo Gracie
Adaptability in the Face of Uncertainty
In Jiu Jitsu, opponents constantly change positions, apply different techniques, and present new challenges. Similarly, life is full of uncertainties and unexpected twists. Practising Jiu-Jitsu teaches us to adapt and respond effectively to ever-changing situations. We become more comfortable with uncertainty, more open to new ideas, and more resilient when faced with adversity.
Indeed, Jiu Jitsu teaches you to be comfortable in the uncomfortable. Both physically and mentally, I am learning that despite the circumstances I find myself in, I need to take a breath or two, compose myself and decide what my next course of action is. Even when you have a behemoth of a man kneeling on your chest, there is a way out; you need not to panic, then decide and act on a course of action.

In the midst of chaos, there is also opportunity.
Sun Tzu
The Journey, Not the Destination
Lastly, Jiu Jitsu teaches us to embrace the journey rather than solely focusing on the result. It encourages us to enjoy the process, to savour each step of the way, and to find joy in the practice itself. We often get caught up in chasing goals and results, forgetting to appreciate the present moment. Jiu-Jitsu reminds us that true fulfilment is pursuing growth, self-improvement, and personal development.
It’s not about your rank, your belt colour, or for me, even if I can ‘beat’ my opponent. It’s about being fully present, giving it all I can, and learning more about my limits, mentally and physically and directly growing them.

Success is not final, failure is not fatal: It is the courage to continue that counts.
Winston Churchill
Explained: Tents and Moisture – Waterproofing, Seam Sealing, and More

Several factors can lead to a tent getting damp or downright soaking wet, and just because it’s dubbed ‘waterproof’ doesn’t exempt it from this. You’ve got your materials and your seam sealing to think about. Then there’s the issue of condensation inside the tent or morning dew outside of it. Even packing up a wet tent can lend it to unwanted moisture. Let’s dive into these factors and understand how to effectively manage them so that the next time you go camping, you’re not caught unawares by an unexpectedly moist tent.

Materials Matter: Choosing a Waterproof Tent
Alright, folks, let’s dig into the nitty-gritty now, shall we? When choosing your tent, the material is something you should not skim over. After all, it’s your only defence against the elements while tucked up in the wilderness.
Now, here’s the basic rule of thumb – the higher the Denier of your tent material, the more waterproof it’s likely to be. What’s Denier, you ask? Well, it’s a unit of measure for the linear mass density of fibres. Simply, it’s the thickness of your tent material. But remember, with a higher denier comes more weight, so balance is critical here!
Right off, we’ve got three heavy hitters when it comes to tent materials:
- Polyester: A common favourite. It’s lightweight, relatively durable, and, most importantly, water-resistant! But watch out – it degrades faster under UV exposure, so it’s not the best for long-haul, sunny trips.
- Nylon: Another popular choice. It’s also lightweight and more resistant to UV damage than polyester but not inherently water-resistant—no need to fret, though, as most nylon tents come with a water-resistant coating.
- Canvas: The heavyweight champion here. It’s durable, water-resistant, and handles better under UV exposure. But it’s also pretty hefty and more complicated to set up. So, the canvas is usually better suited for a family camping trip rather than a solo hike.
Remember, each of these materials will have its share of pros and cons, so lining up a tent that matches your camping style is essential. If lightweight hiking is your thing, a polyester or nylon tent is a good call. However, a canvas tent could be your rugged companion if you’re more into laid-back camping and don’t mind a little extra weight!
Remember – even water-resistant tents can end up with water on the inside!
It’s a common assumption – you pitch your tent, ensure the rainfly is tightly attached, and protect yourself from any incoming rainfall, right? Wrong! Water has a sneaky way of finding its way into your tent, even if you’ve chosen a tent with a laudable water resistance rating. How so? Let’s get into the details.
How does water get inside a water-resistant tent?
You may wonder – if I have a water-resistant tent, why is water sneaking in? Well, the culprit is mostly the seams. Yes, those spots where different sections of your tent are stitched together. These points are prone to leakages by default, especially if not adequately sealed.
The role of a footprint
Another surprising entry point for water underneath your tent. It’s a common misconception that your tent won’t get wet if it’s not raining. Not necessarily so! Moisture from the ground can easily make its way into your tent, especially if you’re camping on damp or soggy terrain. A footprint – a specially designed protective underlay – can significantly help to block this upward moisture migration.
Condensation – the unseen enemy
You know what we haven’t touched on yet? Condensation. Imagine this scenario – you’ve sealed the seams, laid out a footprint, and yet wake up somewhat wet. This is often due to condensation when warm air meets the cold tent surface. It’s akin to your breath and body heat conspiring to dampen your camping experience.
Time to act!
Now we know why your tent might get wet even when it’s water-resistant, it’s time we also learned how to fix these issues. Keep your eye out for the subsequent sections, where we unveil practical, sure-fire tips and tricks to make your camping nights as dry and comfortable as possible.

The Importance of a Rainfly: Shielding Your Tent from Rain
You might wonder why some tents have a rainfly, and some don’t. A rainfly could be one of your best pals for rainy camping! The rainfly is the additional protection layer covering your tent, helping shield it from raindrops, sleet, and even the morning dew. Whether you want one on your tent will depend a little on how much you expect to use it in the rain. It’s nearly necessary on a year-round setup, while fair-weather camping (what most of us do) design is less dependent on one.
Choosing the Right Rainfly
Much like tent materials, not all rainflies are created equal. A high-quality rainfly should be weatherproof – constructed from coated polyester or nylon and painstakingly seam-sealed to prevent any sneaky water droplets from finding their way through. Generally, you want it to cover the entire tent – but – remain aware you don’t want to kill off any ventilation completely – otherwise, you will end up with another moisture management problem – condensation!
The Setup Sector
The setup also significantly affects how well your rainfly shields your tent from the elements. It should be taut – not too tight that it rips, but firm enough to repel water and prevent it from pooling. Pooling is when water accumulates on saggy sections of the rainfly, which could potentially apply pressure and cause the material to leak. Remember the motto: ‘a saggy rainfly leads to a soggy tent. This is also applicable to a tent without a rainfly.
Dual-Purpose Rainfly
It’s also worth mentioning that the rain fly isn’t only a shield against moisture and a layer of insulation. When fastened, it forms an air gap between itself and the tent, reducing the heat transfer rate and helping retain warmth within the tent. It’s like your tent wearing its own cosy little winter coat! Some tents also allow you to set up the rainfly, not the inner tent – creating a separate, lightweight shelter option.
In summary, don’t underestimate the power of a well-chosen, well-fitted rainfly. It’s a big player in the camping game, fending off rain and adding a layer of insulation. Of course, remember this isn’t a magic solution – other factors are at play in ensuring your tent stays as dry as possible. But as far as your first line of defence goes, the rainfly is your stalwart soldier on the frontline of the battle against moisture.

Seam Sealing: The Key to Keeping Dry
Seam sealing is one of those camping essentials that often gets overlooked, but believe me, it can make or break your camping experience—ever woke up in the middle of the night to a damp sleeping bag, wondering how water got inside despite your tent’s claim of being “waterproof”? It was likely nothing more than an unsealed or poorly sealed tent seam.
What’s a tent seam, and why does it need sealing?
Please have a look at your tent. Notice those lines where different pieces of fabric join together? They’re seams. And while they are necessary for the tent’s construction, they are also the most vulnerable points for moisture to sneak in. Hence, applying a waterproof substance (usually clear silicone sealant) to these seams is known as seam sealing, a kind of insurance against those pesky midnight water leaks.
DIY Seam Sealing
Some high-end tents come with factory-sealed seams (don’t assume; it would be indicated in the tent description), so you won’t have to lift a finger. However, price is not the only indicator here – ten-person and two-person tents cost the same – but only one is likely to be thoroughly sealed at that price. If you’ve grabbed a bargain or a second-hand tent, chances are you’ll have to wield the seam sealer yourself. It’s not as daunting as it sounds. You’ll need a tube of seam sealer designed for tents (most outdoor shops stock it) and a steady hand. Here’s how you do it:
- Clean and dry the seams. Applying sealant over dirt or moisture will not end well.
- Apply the sealant along the seams. Try to keep your lines neat, and cover all stitch holes thoroughly.
- Let it dry. This can take up to 12 hours, so pick a good day for the task!
Checking Your Seams
Once it’s all dry, it’s time to check your work. A sprinkling of water across the seams should reveal any weak spots – if water beads up and rolls off, success! If it soaks through, it’s back to square one, I’m afraid. But an afternoon of prep can and will stave off countless restless, damp nights. Remember that it’s good practice to check your tent seams before each trip. Over time, even the best sealant can wear thin.
Condensation: Managing Moisture Inside Your Tent
So, we’ve discussed that condensation is the unseen enemy inside your tent. The million-pound question is, how do we prevent it? While you can’t eliminate condensation, managing and reducing its effects is possible. We need to understand how condensation forms in the first place.
The process is quite simple – when warm air hits the colder surface of your tent, it cools down and releases its moisture in the form of tiny droplets. This is what you see clinging to your tent walls in the morning. Not ideal, I know.
Use the Ventilation Features
First and foremost, all good tents will have some ventilation system – usually vents or mesh panels. These are not just there for good looks, folks. The vents allow the warm air to escape before it hits the cool tent fabric and decants its moist cargo, thus helping to reduce condensation. So, be sure to keep those vents open, especially during the night.
Keep Your Gear Dry
Another tip is to avoid bringing wet gear into your tent whenever possible. Wet clothes, wet dogs, or damp equipment will add to the moisture content inside the tent. It’s always a good idea to air out your clothes and remember to wipe down your stuff before bringing it inside.
Campsite Selection
Lastly, consider where you are setting up camp. A breezy bluff might help reduce condensation more effectively than a frigid valley or beside a babbling brook. The surroundings can make a big difference in the fight against condensation.
Remember, the goal is to manage condensation and keep it from becoming a problem, not to eliminate it – because that’s almost impossible. If you try the measures we discussed above, I bet your mornings will be less dewy inside the tent.

Morning Dew: How to Deal with Exterior Moisture
So you’ve woken up bright and early, ready to embrace another day outdoors – only to find your tent soaking wet from morning dew. In these situations, it’s not the heavy rain or leaking streams to blame; it’s the humble morning dew. Nothing puts a dampener (excuse the dry humour) on your camping spirits like a soggy tent. But fear not – here’s how to deal with the dreaded exterior moisture.
Understanding Morning Dew
Dew is formed when the air cools down overnight. The moisture from the air turns into water droplets and settles on your tent – and pretty much everything else. Hypothetically, you could sleep under a clear starry sky and still wake up with a damp sleeping bag. Fascinating. Now, let’s see how you can tackle this persistent foe.
Morning dew is moisture that forms on surfaces during the night when the temperature drops. Not all tents are fully waterproof, and their level of water resistance may vary.
Use a Tent Fly
First things first – if you haven’t already, invest in a quality tent fly. Your tent fly shouldn’t be just any old material – look for one with a decent water-repellent coating. This outer layer protects your tent from getting too wet by daybreak, and it’s a lifesaver when dealing with dew.
Dewing It Right with Proper Storage
So what do you do when you’ve packed up your tent only to find it’s still damp with dew? The key is practical storage. Never pack your tent away whilst it’s still wet. A damp tent is a breeding ground for mould and mildew, and trust me – you don’t want to learn that the hard way. If you can, hang your tent out to dry before packing it away. If that’s not possible, air it out as soon as you can when you get home.
All in all, morning dew, while unassuming, can prove to be quite a nuisance on camping trips. But by understanding what causes it and effective ways of dealing with it – you’ll keep your tent dry and your camping spirits high!

Packing Up a Wet Tent: Tips for Drying and Storing
So, you’ve had a brilliant adventure, but the weather had other plans, huh? I woke up and found the tent sodden. No worries; it happens to the best of us. Now, we will discuss packing a wet tent and a few tips for drying and storing. Get ready to take notes – as this could save your camping trip from future game of ‘dodge the mould’.
Packing Up a Soggy Tent – Can You Do That?
Well, you could, but it’s not particularly recommended – why? Well, moisture can cause mould and mildew to pop up and party. The damage can be considerably harmful not only to your tent but also to your health.
But hey, what can you do if you have no choice? It’s not like any of us can control the weather, right? So, if you must pack up a wet tent, try to shake off as much water as possible before you start. Rack up those muscles, give it a good shake and get rid of as much water as possible. Mind the neighbouring tents, though!
Packing Wet and Setting Up Dry
When you get home, or somewhere where you have the space and time (and hopefully some sun), set up your tent again as if it is still enjoying its night under the stars. Let the sun (or wind or warm room) do its magic and evaporate the clinging water. Don’t forget to turn it inside out; water loves hanging out in the darnedest places.
Proper Storage Equals Longer Tent Life
Storage is the final door that your tent must pass through before its next adventure. Remember, don’t just stuff it back in its bag without a thorough drying. In addition to drying, keep it loosely stored when not in use to allow for ventilation, which helps prevent the unpleasant odours that can arise from constant dampness.
Research suggests that temperature-controlled, dry environments are the best for tent storage. Avoid places that are humid or too hot. Think about your closet, garage, or even under the bed – as long as it’s dry and cool, it’s good to go!
Beyond Rain: Other Causes of Tent Moisture
While much of our moisture-mitigation focus falls on rainfall and condensation, it’s essential to consider other elements that could contribute to a damp tent. Let’s delve into those potentially overlooked causes of tent wetness – the ones that can sneak up on us completely unannounced.
Rivers and Moist Ground
You might think that setting up your tent near a river would make for a picturesque and serene camping spot. While that’s not entirely wrong—the sound of a flowing river can be enchanting—you’d also be inviting a higher risk of dampness into your tent. Remember that moisture can rise from the ground. The more damp or moist the soil is – as is common near rivers – the higher the possibility of waking up in a soggy sleeping bag.
Spilled Drinks
We’ve all done it. You’re settling for a cosy night in the tent; reach for your hot chocolate or water bottle, and whoops! Spillage. Don’t underestimate the damage liquids can do inside a tent, mainly if it soaks into your sleeping bag or mat. It’s worth being extra careful with your drinks. Or even, crazy thought, enjoy them outside under the stars where spills can be quickly dealt with.
Wet Clothes and Gear
Believe it or not, wet clothes can thoughtfully contribute to the dampness in your tent. If you’ve been hiking all day in the rain or have taken a dip in a cold mountain stream, be mindful about bringing your wet clothes into the tent with you. They can significantly increase the moisture level, creating an unpleasant experience. Waterproof bags for damp gear are an excellent way to contain excess moisture.
Human Factors: Breathing and Sweating
You might not realise it, but breathing releases much moisture. Combine this with the heat from your body, and your tent can become surprisingly damp on the inside. The same goes for sweating. If you’ve been exerting yourself during the day and then hop into your tent without taking off your sweaty layers, you’ll add extra moisture to the environment.
As campers, we must remember these additional sources of moisture, remain vigilant and take necessary actions to ensure a dry, comfortable camping experience. A bit of forethinking can be the difference between waking up refreshed or soggy – I know which one I’d prefer!
So there you have it, folks. Tent moisture may be inevitable in your camping adventure, but its pesky effects can be effectively combatted with the right strategies. Knowledge is power, as they say – so go forth, armed and ready for the next rainy camping day. Happy tenting!
Vivo Primus Trail II FG Mens Barefoot Shoes

What switch from boots to barefoot shoes?
Why the shift from my favourite boots to barefoot shoes? I have (as you may already know) been a massive fan of the Lowa GTX8 boots. Still am. If you want a lightweight boot for kicking around in most sub-alpine off-track spots, I would still suggest these. However, when it comes to on-trail hiking and ‘easier terrain’ hunting, I’ve realised that full-sized boots might be an overkill. Not to mention heavy. Here’s where the barefoot shoes come in. Since making the switch, I’ve noticed some definite benefits. The barefoot design, like that of the Vivo Primus Trail II FG, is lighter, closer to the ground, and surprisingly comfortable. It might sound counter-intuitive, but shedding the boot bulk has done wonders for my agility and speed on and off the trail.

As we tread down the twisted trails of the great outdoors, the thump of hefty boots on the ground has been the soundtrack for many of us. Here’s the thing, though – the times, they are a-changin’. Let me introduce you to barefoot hiking shoes, a burgeoning market with some true game-changers. On my journey, I moved from the bulky, binding sensation of boots to the feeling of the ground beneath my feet, barely filtered, delivered by the Vivo Primus Trail II FG Mens in the resplendent Moonstone variety.
In the world of outdoor footwear, less is now more. The bare, minimal, featherweight Vivo Primus Trail II FG has been my partner-in-crime on recent hiking adventures.
Why did I make the switch, you ask? It’s a question of versatility and natural movement. But, possibly, the rush of liberation one gets with each footfall. You’d think I’d miss the sturdy, old-fashioned boot, wouldn’t you? Not a chance. In saying that – how many Sika hunters have you read about that ditch the boots and hunt in socks? While the noise of the sole itself is a factor – the feel of the ground under your feet and the resulting ability and tendency to walk more carefully is another significant part.
Also – I am aware the colourway I got this shoe in (Moonstone) – is probably not the best option for muddy/off-track work. In hindsight, I should have gotten something a little more muted – but it is an excellent excuse to try another model soon!
Key features of the Vivo Primus Trail FG
Upon first glance, the Vivo Primus Trail II FG Mens Moonstone might seem like any ordinary outdoor compatible shoe. However, don’t let its deceptive simplicity fool you; this barefoot runner is jam-packed with state-of-the-art features that are anything but ordinary. You don’t just have to take my word for it – I’ll walk you through some of its key features.
Outsole Design

The Vivo Primus Trail II FG boasts a so-called ‘Firm Ground’ outsole with low profile, multi-directional lugs. These lugs provide superb traction, keeping you steady on trail and pavement. Plus – and here’s the kicker – these are designed with a somewhat rigid sole that retains an excellent ground feel, bridging the gap between traditional shoes and an actual barefoot experience. No mean feat, I assure you! The 4mm lugs form part of the overall ‘height’ of 6.5mm – but the drop from heel to toe, in true barefoot fashion, is 0mm.
The outsole is slightly ‘firmer’ than some other barefoot options out there. But – if you are planning on going off track with these, that’s a good thing. In addition, the firmer, thicker outsole adds a little to the weight – this is on the ‘heavy’ end of the barefoot spectrum – but again, also means this shoe is a little more versatile.
Innovative Upper Material
The upper material of these shoes is made from a quick-drain and durable mesh, coupled with a no-sew support structure. This combination allows the shoes to remain light, even when they inevitably get wet in the great outdoors -gone are the days of hiking about with water-loaded shoes post-stream crossing -and provides admirable durability.
Barefoot Comfort
The shoe’s design closely mimics the natural foot shape, allowing your feet to move as nature intended -it’s like giving your toes a vacation! It also features a Pro5 patented, ultra-thin, puncture-resistant layer. It is an excellent feature for hiking and hunting, allowing you to tackle rugged terrain without fear of a sharp object ruining your day.
These feature some of the wider toe boxes out there – Kiwi’s trend towards having some of the wider feet. Is this a match made in heaven? Maybe.
Simple Lacing System
No one wants to be frustrated by complicated lacing systems when they are about to hit the trail, and Vivo gets this. The Vivo Primus Trail II FG features a speed lace-up system with a toggle, which makes getting in and out of these shoes a breeze. I am still figuring out why/how to tuck those laces – but – it’s nothing major.
Ethically-Built
If you’re a fan of ethical products, this shoe covers you. Vivo is committed to building shoes that are good for both the feet and the earth. Their sustainably sourced materials and processes make them a winner not only in performance but in ethos, too.
The Vivo Primus Trail II FG men’s moonstone is a thoughtfully designed shoe, incorporating practical and innovative features that make it a strong contender in hiking and running circuits.
How does the Vivo Primus Trail II FG compare?
Let’s get something straight – comparing the Vivo Primus Trail II FG to traditional hiking boots is like comparing apples to oranges. Or, more specifically, comparing a panther to a grizzly bear. Both are formidable in their own right, but they offer wildly different experiences. And in this instance, the Vivo Primus Trail II FG is our nimble ‘jungle cat’, if you will.
First off, traditional hiking boots are designed to be sturdy and firm to protect your feet from the elements. They often have a robust exterior with a thick, rigid sole, which doesn’t necessarily sit well with the ‘barefoot’ ethos of the Vivo Primus Trail II FG. Instead of constricting your foot to provide support, Vivo’s barefoot shoes encourage your feet to move naturally.
Think of it this way – it’s like removing the training wheels from your bicycle. Initially, giving up the structured bulk of traditional hiking boots might seem scary. But, freeing your feet to adapt to different terrains naturally, as you do with the Vivo Primus Trail II FG, can be quite a thrilling ride.
The Vivo Primus Trail II FG also scores over traditional boots in terms of versatility. These wonders can hold their own on roads and trails, something that most hiking boots can’t claim. They also lend themselves well to cross-training capacities, again scoring brownie points over traditional boots.
Finally, let’s discuss the weight (or the lack thereof) factor. Traditional hiking boots, unfortunately, tend to tip the scales on the heavier side (my Lowa’s are 1450g), whilst the Vivo Primus Trail II FG (250g) is as light as a feather. Consider this – that is sitting on the end of one of the longest levers in the body – being constantly swung back and forth.
To summarise, traditional boots and the Vivo Primus Trail II FG offer different ways to explore the terrain under our feet. Where one offers a high-guard protection bubble, the other facilitates a natural, svelte, and connected experience, allowing the adventurer in you to bond with the great outdoors. Whether you’re a bear or a panther kind of explorer, I suppose, is a choice you must make yourself!

Are the Vivo Primus Trail II FG suitable for all terrains?
Many outdoor enthusiasts often grapple with whether a one-size-fits-all approach works when it comes to footwear. In the case of the Vivo Primus Trail II FG, the answer is a resounding yes!
These revolutionary shoes, from muddy trails to polished pavements, prove their mettle in all terrains. The marvel lies in the outsole design – a firm grip that handles versatility like a piece of cake. Whether tackling rocky inclines with ninja-like agility or sprinting across the smooth concrete of urban jungles, these shoes stand by you.
Off-road, the Vivo Primus Trail II FG come into its own. The firm ground sole, with lugs designed to provide maximal grip and sensory feedback, is ideal for trail running or off-path adventuring. Don’t believe it? Just tread on a few pebbles and bask in the surreal experience of feeling the earth beneath your feet while keeping your feet cosy – no twisted ankles or painful pokey stones in sight. The soles happily grip to muddy and wet rocks yet still let you feel the undulations underneath.
On-road, it’s a pretty similar tale. Whether concrete or tarmac, these shoes don’t shy away from a challenge. They perform just as well on the roads as on the trails, making them an excellent cross-over option.
The only potential downside is that they might not be the best option in very wet conditions – they’re not waterproof. But then, every shoe is limited in this regard – they have a giant hole on the top of them. However, because they are essentially mesh, they drain quick and dry even quicker. No one likes the inevitable wet boots from regular stream crossings.
So, regarding terrain, the Vivo Primus Trail II FG is like those rare all-rounder friends who thrive wherever they go. Boggy marshes, check; rocky mountaintops, check; concrete city streets, double-check. What more could a foot ask for?
How does the barefoot design of the Vivo Primus Trail II FG affect stability and support?
Now, talk about stability and support – essential factors when weighing up your choice of footwear for the great outdoors. You might wonder how something termed ‘barefoot’ could offer enough of both to compete with your trusty hiking boots.
Firstly, let’s shed some light on barefoot design philosophy. The mantra is this – less is more. Strip away unnecessary padding and support, encourage your foot to move naturally, and you have a barefoot shoe. Sounds precarious, right? Not quite. It’s all about allowing your feet to do their job – move flexibly, provide natural shock absorption, and deliver on the sensory front. Trust me, your feet are more capable than you think!
When it comes to the Vivo Primus Trail II FG’s stability, it’s all about the outsole design. With optimal grip and pattering, these shoes easily handle various terrains. The shoes are designed to mimic the natural movement of your foot, which results in better balance and reduced risk of ankle twists and spills.
The support aspect is interesting – these shoes won’t cradle your foot like a traditional hiking boot. Instead, they’ll allow your foot to react naturally and as it’s supposed to – adjusting to uneven ground, balancing the body, and absorbing impact. A barefoot shoe like the Primus Trail understands this and gives your foot the freedom to do its job effectively.
So, in the grand scheme of outdoor adventures, the Vivo Primus Trail II FG offers stability and support, but in a very different way. It takes some getting used to – and your feet (and legs) will need time to strengthen up – but once your feet discover their newfound freedom, traditional boots might seem as restricted as a Victorian corset!

Do the Vivo Primus Trail II FG provide enough protection for hiking and hunting activities?
I hear you, fellow outdoor enthusiast – you’re wondering, “Will these minimalistic Vivo Primus Trail II FG shoes protect my precious toes from rogue roots and sneaky stones when I’m playing Davy Crockett?” Not to keep you in suspense, let me tell you firmly – yes, they do.
Despite their lightweight features, don’t be mistaken for thinking these barefoot trail shoes have scrimped-on protection. Yes, they’re both small, but one has significantly more bite.
The innovative upper material offers excellent durability against the abrasiveness of rocks and branches that might conspire to stub your toes or graze your ankles. Added to the tough compound used in the construction, these shoes have a persona of durability that any hardcore adventurer is bound to appreciate.
Moreover, the outsole design of the Vivo Primus Trail II FG is something of a quiet marvel. It features a firm grip that clings to the terrain as if it’s been taught mountaineering by a rugged old sherpa. The lugs on the sole protect against sharp objects while allowing you to engage with the terrain underfoot.
It’s no secret that these aren’t your typical ham-fisted boots. They respect natural foot anatomy with their thin soles, which might seem counter-intuitive when looking for protection. However, they don’t skimp on protecting you from potential puncture hazards, making sure you can navigate safely and naturally.
So, whether you’re stalking a deer through the undergrowth or trekking through mountain trails, rest assured – the Vivo Primus Trail II FG have your back or your feet.
Understandably – a shoe is never going to protect your ankles as much as a boot will. So – if you are regularly hopping across rolling scree – a boot might be a better option (barefoot boots exist).
Are the Vivo Primus Trail II FG suitable for long-distance hiking or hunting trips?
If you’re used to strapping on chunky boots for those long-distance hiking or hunting trips, shifting to barefoot shoes may seem like a leap of faith.
Long-distance hiking and hunting require endurance, and what can aid better than footwear that’s comfortable and impeccably lightweight? And that’s precisely what Vivo Primus Trail II FG brings. Whether it’s a long trek across a national park or a hunting expedition in remote woods, this pair promises to be your best adventure buddy without making you feel like you’re carrying two bricks tied to your ankles.
There are, however, a few things to keep in mind. Much like any new endeavour, transitioning from traditional hiking boots to barefoot shoes for long distances can be a bit of a journey. Barefoot shoes give your feet more freedom to move and adapt to the terrain, which is great for muscle development and natural movement, but it might take some getting used to. Consider a bit of a ‘breaking-in’ period. Start with shorter distances and gradually increase your mileage. Much like you wouldn’t run a marathon without training, right?
Also, Vivo Primus Trail II FG has been specially created to handle varied, demanding terrains. With an innovative outsole that provides excellent grip, you won’t be sliding around like a toddler on ice—no matter how wet or muddy the trail gets. But always remember, with a thinner sole than traditional boots, you’ll feel more of the ground beneath you.
In terms of durability, the Vivo Primus Trail II FG stands strong. With its ethically built construction that balances flexibility and toughness, this Moonstone model is a champ in the rough and tumble world of long-distance outdoor activities.

Can the Vivo Primus Trail II FG be used for outdoor activities besides hiking and hunting?
The Vivo Primus Trail II FG isn’t a one-trick pony by any means – oh, no! These trainers are as versatile as they come. Their barefoot design, endurance, and sturdy build make them an excellent companion for outdoor activities besides the typical hiking and hunting.
Where to start? Well, first off-trail running. These babies are just as impressive on light trails as on rocky terrains. Thanks to their first-rate traction, running on uneven surfaces is a breeze. So, for those in the mood for an excellent ol’ sprint across woodland trails, rolling hills, or gravel paths – you’re in good hands.
Remember the ethically built note? Well, it serves more than just moral goodness – the innovative material is quick to dry and breathable. That’s good news for all you aqua addicts. Whether it’s river trekking or canyoning– these shoes won’t shy away from a bit of moist madness. Not to mention, the lightweight design makes them a doddle to swim with!
Look no further if you’re looking for an all-rounder pair to join you for your outdoor yoga or CrossFit sessions. The wide toe box allows your toes to spread out for balance and stability – essential for many fitness activities. Yoga in the park, perhaps?
Finally, the Vivo Primus Trail II FG is just the ticket for the everyday adventurer. Whether walking the dog, trotting around town, or running to the shops, these shoes have your back. And, of course, your feet.
So, my outdoorsy pals – let’s not box these shoes in with just the hiking and hunting tag. The Vivo Primus Trail II FG is like that multi-talented mate who can, quite frankly, do it all. Better yet, they do it all well. And in some style, might I add!
I am happy training in them in the morning, working in them during the day and heading out in a walk in them off-track on the weekends.
In Summary
These things are great. I probably could have got them in a different colour – but – have been bit by the barefoot bug – and am considering a pair of ankle-covering boot options in the near future. Will be interesting to see if they bring the best of both worlds. In the meantime, the Vivo Primus Trail II FG is a true cross-trainer and a good option if you are looking at getting into the world of barefoot shoes.
| Features | Advantages | Benefits |
|---|---|---|
| Lightweight | Less weight at the end of your legs | Ability to travel longer distances with ease |
| Natural foot shape design | Emulates barefoot walking, giving a natural feel | Improved gait and foot health |
| Eco rubber tread | Provides secure grip and control even on slippery surfaces | Safety and reliability during all weathers and terrains |
| Quick drain zones & breathable mesh | Fast drying and aids in better ventilation | Comfortable for extended use and reduces foot odour |
| Vegan construction using recycled materials | Environmentally friendly with minimal carbon footprint | Contribute to sustainability and environmental preservation |
Five Tips to catch less fish.
Since getting back into fishing, I have realised my youthful naivety at the simplicity of Fishing. I have learnt that fishing is a much more complicated art form. Take up every kind of fishing at once. Fishing is all about maximising your chances. If you want to catch more fish –try more types of fishing….
Unravelling the Secrets of Tent Waterproofing

Here’s a handy list of tent waterproof ratings to help guide you:
- Under 5,000mm: These tents are lightweight and suitable for fair-weather camping – think a peaceful night under the stars without a cloud in sight.
- 5,000mm to 10,000mm: Such tents are perfect for mild rain and summertime weather.
- 10,000mm to 15,000mm: A tent in this range will withstand most downpours and heavy snow – but don’t be fooled; they can eventually soak through if put under pressure. Like a stiff-upper-lip, they have their limits!
- Above 15,000mm: If you’re looking for the Tardis of waterproof tents – reliable at any time or place – this could be the range for you! They can take on heavy rain or snowfall and are perfect for long winter camping trips (remember your thermals).
Beyond Waterproofing: The Importance of Breathability
Have you ever wondered why a waterproof tent, something made of PVC, would be a rather unpleasant place to get your beauty sleep? Well, breathing in a fully waterproof environment is no picnic.
The key to avoiding this scenario is called ‘breathability.’ This term refers to the ability of a fabric to allow moisture vapour to pass through and escape the tent. A perfect balance of waterproofing and breathability ensures a comfortable living environment during your camping adventure. It prevents condensation (your secret enemy in colder conditions) from building up and dampening the inside of the tent.
How do I know how breathable my tent is? Well, just like waterproof ratings, there’s a breathability rating too. Look out for a metric called MVTR (Moisture Vapour Transmission Rate) when shopping for your next adventure tent. The higher the MVTR rating, the more breathable the fabric is.
The Unwanted Sauna: A Fully Waterproof Tent
Ever woken up in a tent that feels more like a tropical rainforest than a snug shelter? You’re not alone. That hellish sauna-like experience is what you’d get in a PVC tent.
A fully waterproof tent lacks breathability. Hence, the moisture your breath produces (and let’s not forget those wet hiking boots) builds up. It has nowhere to go and condenses on the interior, resulting in a build-up of dampness inside your tent. So, while a PVC tent might keep the rain out, inside, you’re left with a mini indoor monsoon!
So yes, waterproofing is essential (we’re all for dry socks and warm sleeping bags). But without decent breathability, your well-intentioned fortress can rapidly transform into a rainforest retreat.
Other factors to consider
Seam sealing is one of the most crucial factors in ensuring water doesn’t invite itself in for an unwanted sleepover in your tent. Waterproof ratings are all well and good, but an unsealed seam can be the wolf in a sheepskin, the silent whistle inviting droplets to take a sneak peek into your abode. You see, tent seams are like highways for water. When the tent’s fabric is sewn together, needle holes are created. These can act as entry points for water, completely ignoring your tent’s otherwise impressive waterproof rating. Many tents come with factory-taped or sealed seams, but even these can degrade and let water in over time. Regular checks and maintenance – resealing seams with silicone sealant for silicone-coated fabrics or polyurethane sealant for polyurethane-coated materials – can ensure your tent remains your dry haven.
The strength of the groundsheet can be just as pivotal, as a weaker one may allow water to seep upwards from the ground: an integrated or well-attached groundsheet, water-resistant zips, and a well-proportioned rainfly.
Making Informed Decisions for Dry and Comfortable Camping
Understanding the intricate relationship between waterproofing and breathability ratings is crucial for every camper. Navigating this maze enables one to avoid the discomfort of fully waterproof tents, akin to sleeping in unwanted saunas. Remember, your tent needs to expel moisture beyond just repelling water. As with all knowledge, using this understanding to make informed decisions is the key to ensuring dry and comfortable camping adventures, rain or snow blow.
Did Orange the Color or the Fruit Come First?

Today’s journey will safely lead us through the paths of history, language, and the wonderfully colourful world of fruits.
We’ll explore:
- The origin of the word ‘orange’
- Historical use of the word ‘orange’
- How the colour and fruit are interconnected
Let’s start this vibrant voyage of discovery and paint a picture as bright and engaging as the colour itself. Ready? On we go!

The origin of the word ‘orange’
Indeed, the intriguing tale of the word ‘orange’ takes us far back in history. This trip started around 2000 years ago in Asia, where ancient Sanskrit scholars labelled a striking citrus fruit ‘naranga’.
As this word journeyed through various languages, it transformed. In the Arabic-speaking territories, the fruit was referred to as ‘naranj’, and over in Persia, it morphed into ‘narang’. As the fruit spread across continents, so did its name, changing subtly with each cultural exchange – just like a riveting game of linguistic ‘pass the parcel’.
Our narrative travels through Europe, where the intoxicatingly scented fruit found its way to Spain, Italy, and France. It transformed into ‘naranja’, ‘arancia’, and the French’ pomme d’orenge’, respectively. This last term, splendidly, translates to ‘fruit of gold’. But, in the name of linguistic ease, it was shortened to ‘orenge’, bringing us a step closer to the word ‘orange’ that we know today. This evolution of the word illustrates how languages can change just like the world around us.

The history of the fruit
Did you know that oranges have been around for a very long time? We’re talking thousands of years here! In Southeast Asia, these citrus fruits were originally a crossbreed between a pomelo and a mandarin. Neat, huh?
Oranges started their global journey via trade routes. First, they reached the Middle East and the Mediterranean region. They were cherished here for their sweet and tangy flavour (and unique colour!).
They eventually made their way to the Americas, thanks to Christopher Columbus. In 1493, he took seeds of oranges, lemons, and citrons with him on his second voyage. Imagine sailing across the vast ocean to introduce new fruits to a new land! Imagine that first juicy bite into a fresh orange! Doesn’t it make your mouth water?
The cultivation of oranges in the Americas took off in the 1500s when Spanish explorers planted the first orange trees in Florida–now a major producer of oranges. It’s mind-blowing how much history is tucked away within those juicy segments.
And lest we forget Europe! Sweet oranges were a luxury and a sign of prestige for a long time there. Indulging in orange was considered a rare treat and often associated with the holiday season (imagine getting an orange as your Christmas present–that must have been delightful!).
The orange is a reminder that life is full of zest.
Oranges Today
Fast forward to today, and oranges are one of the most cultivated fruits worldwide. Oranges and their products (think orange juice) are famous for their sweet-sour kick and high vitamin C content. You see, it’s not just the colour or the fruit’s origin that makes oranges fascinating; there’s a vibrant history behind each juicy bite you take!
Isn’t it amazing how something as seemingly simple as a fruit can have such an exciting journey, full of twists and turns, all the while bringing joy (and a lovely fresh scent) to people worldwide? It makes you appreciate every slice, every drop of juice a bit more.
The many versions of an ‘Orange’ fruit
Now, I bet you’re thinking, “Surely, there’s only one type of orange, right?” No, my friends, oranges come in a dazzling variety just waiting to be discovered. Let’s sink our teeth into this succulent world, shall we?
- The Bitter Orange: This variety originated in Southeast Asia and has acquired quite a global fan base – and we’re not just talking about folks who enjoy their marmalade a bit tangy. It has a rough, thick skin that’s usually used in candying or to produce orange zests.
- The Navel Orange: Ah, the navel orange—my personal favourite. This popular variety is so named because of the ‘navel-like’ formation opposite the stem end. Navel oranges have sweet, juicy flesh and are perfect for eating out of hand. Plus, they’re seedless, a real game-changer for some of us.
- The Valencia Orange: Named after the Spanish city, Valencia oranges are prized for their bright orange, smooth skin and vibrant, tasty juice. So, next time you’re sipping on a refreshing glass of orange juice, chances are, it’s made from Valencia oranges.
- The Blood Orange: Sounds a bit ominous. But fear not! The name refers to the beautifully deep, ruby-red flesh and juice of the fruit, which owes its unique colour to anthocyanin (the same antioxidant that gives blueberries their vibrant hue). Perfect for desserts, salads, or cocktails, these oranges add a lovely splash of colour to any dish!
We could go on about the many varieties of oranges (like the Seville, Bergamot, or Mandarin, to name a few), but you’ll get the idea. The world of oranges is more complex than you may have believed.

So, what came first?
Did you ever play the classic chicken or the egg causality dilemma? It’s like that when we ask what came first, the colour orange or the fruit? Well, it’s time for a drum roll as we unveil the mystery of the century!
As we’ve journeyed through the history of the fruit and delved into the origin of the word ‘orange’, the snippets of information gathered have led us to this — the fruit came first! Yes, the citrusy deliciousness we all relish scooped the title ahead of the vibrant hue.
Before the introduction of the energetic fruit – oranges- there was no word for ‘orange’ in English to describe the colour. It simply didn’t exist. People referred to the colour as a form of yellow or red. Amusing. Imagine, if we didn’t have the fruit, we might not have had an easy way to describe the autumn leaves or a stunning sunset.
Do we need words to see colours?
As intriguing and baffling as it might sound, this ability to perceive and comprehend colours strongly ties back to our knack for articulating them with words. Imagine, if you could not name a particular colour, would you still be able to identify it? Many language experts believe so. They say that even though you might not have a word for it, your eyes can see the shades and hues of different colours. We all remember being fascinated by rainbows as kids, right? Those stunning arcs of colours in the sky, even though we might not have known the names of all the colours at the time, we still admired their beauty.
However, imagine if we had more words for colours, could we see more shades? Well, it’s a question that piques my curiosity.
Knowing the names of colours may enhance our ability to discern, appreciate, and remember them, just like when we learned to name ‘orange’ for both a fruit and a colour. When you learned the word ‘orange’, you didn’t just learn to identify the fruit; you also created a relationship with a specific hue. You even began distinguishing it from closely related colours like red and yellow.
In essence, naming a colour doesn’t change what our eyes see but how we interpret what we see. Once you knew the word ‘orange’, you must have started noticing it everywhere. Cars, flowers, sunsets – they all started popping! Your vocabulary for colours had expanded, and you might have felt like your world had become a little more colourful.
So, to wrap it all up, whether it’s the fruit or the colour, the ‘orange’ puzzle makes for a fascinating exploration of language’s influence on our perception of the world and, more specifically, colours. Remember, though, regardless of whether the fruit or the colour came first, we’re just glad we have both. After all, what would a perfect summer’s day be without the sight of vibrant orange marigolds and the taste of freshly squeezed orange juice?
When life gives you oranges, make orange juice.

Controlling the mind through language
Isn’t it fascinating how words can shape our perception and understanding of the world? You see, way back in the annals of history (and in routes less obvious), controlling the language people use has been a powerful tool for moulding their thoughts and behaviour. It sounds like something out of a science fiction novel.
Well, it’s not as far-fetched as it might seem. Remember George Orwell’s dystopian masterpiece, ‘1984’? (It is a heavy read for youngsters like us. But stick with me here.) In ‘1984’, the government used ‘Newspeak’ to manipulate their citizens and control their thoughts. A diabolically clever idea, wouldn’t you agree?
By simplifying language and limiting vocabulary, the government can prevent rebellious thoughts before they even happen. If you don’t have a word for ‘freedom’, how could you even conceive of wanting it? It’s like trying to imagine a new colour when all you’ve ever seen are shades of orange!
Hang on a minute, I hear you say. That’s all good in a fictional world, but this doesn’t happen today. I wish you were right. But let me introduce you to ‘hate speech’ laws, which are in place in many countries today. These laws prohibit offensive, threatening or vile speech that targets someone based on their race, religion, gender, and the like.
Now, don’t get me wrong, hate speech is awful, and we should always strive for kindness and respect in the way we communicate. But we should also understand that moderate and rational-legal controls can, sometimes, be the first step on a slippery slope towards more oppressive speech regulations. If only all things were as simple as figuring out whether the colour or the fruit orange came first, eh?
Remember, always keep asking questions, exploring, and learning because that is how we grow. Language is an excellent tool, but it can be misused. Be sure to think for yourself, my young friends, no matter what words others use to try and paint your world. Because just as the word ‘orange’ doesn’t define the entire spectrum of light, words alone can’t define your perception of the world around you.
Unveiling Tomorrow: Reflections on ‘Homo Deus’ by Yuval Noah Harari
")
“Homo Deus” is Yuval Noah’s 2015 book, following “Sapiens” from 2011 (first published in Hebrew, then later, in 2015 in English).
I first read Sapiens a few years ago, then again over last year’s holiday break. I initially got Homo Dues from the library, didn’t manage to finish it, and then spotted it again late last year while exploring Hard to Find Books. It’s sat next to my bed for the last half of a year, slowly being digested.
To say these are dense books would be an understatement. While they are not a ‘quick’ read, they have both kept drawing me back to them and with his latest, “21 Lessons for the 21st Century”, sitting next to it, waiting, it was time to finish it.
In ‘Homo Deus’, Yuval Noah Harari explores the future of humankind, building on his previous work ‘Sapiens’, which focused on our past. The book delves into the potential destiny of humans as we develop and integrate technology into our lives, becoming more god-like in our abilities.

A Rundown of Central Ideas
In ‘Homo Deus’, Harari brings to light the compelling notion of the ascendancy of Homo Deus, or the ‘god-man’. This is rooted in our burgeoning capabilities to engineer and rule over life. Harari hypothesises an evolutionary leap of humans into a technologically amplified species–a prelude, perhaps, to the dawn of ‘superhumans’.
Dataism emerges as another central tenet in this fascinating narrative. Harari conjectures that an era where data reigns supreme is looming over us. According to him, information flow will dictate global functions, while algorithms, fed on this data, will decide our course. This evokes intriguing questions about shifts in power balance–more so around the potency of those at the helm of this data deluge.
The endurance of mortality, or ‘immortality’, is an additional string entwined in the rich tapestry of Harari’s message. He fleshes out the relentless human pursuit of conquering death, underpinned by advancements in fields like AI and biotech. The propensity for genetic modifications and artificial organs points towards this reality. Simultaneously, he poses bold questions about the ethical minefield this uncharted terrain might hold.
In the sweep of his narrative, Harari also explores the chilling possibility of human irrelevance. In an increasingly advanced AI world, advanced automation could relegate humans to obsolescence. His ominous predictions about a burgeoning ‘useless class’ outpaced by machines frame an alarming image that stirs profound questions about how work and society will shape up.
In essence, ‘Homo Deus’ pushes us to confront the future of humanity, keeping us rapt with provocative themes around the future trajectory of Homo Deus, the dominance of dataism, the journey towards immortality, and the disturbing prospect of human irrelevance. Harari’s introspection into our technology-driven evolutionary trajectory demands our attention and cognition.

Reading Between the Lines: The Subtexts in Homo Deus
Delving deeper into Homo Deus, one cannot help but be captivated by Harari’s well-articulated concerns about our scientific triumphs being operated under a deficient ethical compass. With assertions on the disparity between our scientific advancements and moral sensibilities, Harari seems to be on a mission to awaken us to our stunted ethical growth.
While Homo Deus might not explicitly enter the raging debates of AI ethics, it’s impossible to disregard that the book serves as an uncomfortable reminder of the seminal question – who should control our data? As we tread the unseen pathways of Homo Deus, do we see the footprints of AI which might lead us to prosperity or peril? It’s a question worth pondering. For isn’t it true that how we mould the AI revolution would determine whether we evolve into Homo Deus or devolve into redundancy?
Interestingly, Homo Deus also covertly disenfranchises the belief that AI might surpass its human creators. Harari instead focuses on how AI has the potential to amplify our capabilities, transforming us into more evolved beings. This mirrors the sentiment that AI significantly affects our behaviour and interaction.
In essence, the subtexts in Homo Deus are both enlightening and disquieting. They seek to trigger an introspection about the ‘Age of AI’ and our preparedness to ethically and humanely navigate it. As we turn the last page, we are left with a deeper understanding of Harari’s central ideas and questions about our readiness for this imminent future unfolding before us.
Irrespective of where we currently stand, from the technologically enthusiastic to the sceptical, Homo Deus seems to serve as a reminder to tread cautiously. The future revolves around a utopia or dystopia and will be primarily written now, in our present actions and decisions. And that’s a responsibility we cannot afford to ignore.

Relevance of Homo Deus in the AI-Dominated Era
Drifting into the realms of our suspense-filled future, it becomes clear that Yuval Noah Harari’s opus, Homo Deus is not merely an insightful historical account but a prophecy of an AI-dominated world. The narrative, composed before the onslaught of the artificial intelligence revolution, bears uncanny relevance as these predictions are becoming an intimate part of our lives.
AI eventually surpassing its human creators is a theme echoed strongly within Homo Deus. Harari weaves a narrative where the Homo Sapiens evolve and mutate into ‘Homo Deus’ (god-like humans) courtesy of this technology revolution that, even as we share these thoughts, engulfs the globe.
The advent of extended intelligence, described by Joi Ito, and AI’s profound impact on human interaction is another cornerstone that Harari cleverly anticipates. Human behaviour, moulded by artificial intelligence, endorses that Harari’s foresight was not fiction but fact tied in well-argued hypotheses.
Indeed, one cannot elude the looming anxiety around AI’s potential threat to human autonomy. The varying opinions across a spectrum of experts on AI enhancing or limiting human agency are a testament to Harari’s precognition. Curiously, it is almost as if Homo Deus serves as a roadmap to navigate us through these alarming debates.

We stand on the verge of a revolutionary epoch where AI reforms every aspect of human existence, from art creation to warfare strategies to medical marvels. The magnitude and reach of these changes are laced with an undying responsibility – a foresight implied in Homo Deus to steer the course of this AI revolution responsibly.
Exploring the profound implications of AI on economy, warfare, privacy, and security, where the prediction of AI being a tool to tackle multiple global challenges finds a grounding. This resonates with Harari’s profound exploration of the future, threading a narrative that weaves the scientific, philosophical and ethical aspects of an AI-dominated future.
Although written years ago, Homo Deus resonates more than ever before with the AI revolution that is unfolding at breakneck speed. As the debate rages on about how this revolution will shape our future, Harari offers us a profound, if somewhat unsettling, glimpse into the world we may soon live in.

Maximizing Your Catch: An In-Depth Guide on Using Saltwater and Chilled Environments to Preserve Freshly Caught Fish

Whether you get your kicks from the thrill of catch and release or are a seasoned fisherman looking to bring home dinner, properly handling your catch is crucial. Here, though, we are discussing the harvesting and storing fish destined for the table. While it may seem complex, it all comes down to some simple yet important factors like temperature control, careful handling, and, above all, the use of saltwater.
Beyond the Rod and Reel: Essential Post-Catch Care for Your Fish
This article is intended to discuss what to do with your catch post retrieve and post Iki-Jimi and bleeding – separate but equally essential steps in optimising your catch. Understanding that some of the biggest challenges come after the catch is the first step to maximising your yield and preserving the quality of your fish.
Hauling up a gleaming prize from the abyss below, you know that feeling. The thrill of the fight, the satisfaction of success, that salty, primal connection to nature’s raw and ruthless beauty. But here’s a wrinkle: that exhilarating catch doesn’t end when the fish leaves the water. The most crucial journey of your prized catch is only just beginning.
Catching a fish is one thing. Preparing it in a mouth-watering prime condition for the plate requires a different skill set. You might think, “Hold on, I’m a fisherman, not a marine biologist!” Fear not, good reader. While the world of post-catch fish care can seem complex and bewildering, underneath it all, the principles break down into common sense, respect for your catch, and a bit of basic science. And the first lesson in that science? Temperature matters.
Keeping It Cool: How Temperature Affects Your Catch
Take a moment and imagine a beautiful warm day out on the water; think of how the blazing sun bears down on you, the constant lap of the waves against your boat, and the tension in the fishing line as a fight ensues between you and a particularly relentless fish. You prevail in the end, hauling in your catch with a triumphant grin. But amidst the joy and triumph, it’s essential to remember one cog in this wheel of recreational or professional angling – the relentless heat of the sun, which, believe it or not, poses quite a threat to your victorious catch.
Why this is the case? Simply put, higher temperatures speed up the metabolic processes within fish, causing them to decompose faster. Even if the bite is a long way off, remember the hesitating heat and how quickly it can ruin the spoils of a good day’s work.
This is where chilling comes into play, taming the infernal heat of a sunny day and maintaining the quality of your fish. Superior to simply tossing your prize catch into a cooler, maintaining the right temperature slows down any unwanted microbial action and enzymatic reactions in your fish. When adequately reduced, the heat gives way to a slower, more measured pace of decomposition, helping to maintain the freshness of your catch even hours after it is removed from its natural habitat.
And what’s more, there is no one-size-fits-all approach to cooling your fish. It might be an icebox filled with crushed or flaked ice or an ice slurry that further slows down bacterial action, rendering high temperatures moot and preserving your catch in pristine condition.
Getting the best out of your fish is a race against the clock – and knowing how to cool it correctly could well mean the difference between a triumph tinged with regret and a fresh, flavoursome catch that’s sure to be the highlight of your next meal. So whichever method you choose, remember – with the right amount of knowledge, preparation and care, that triumph can be yours for the taking.
The Cold, Hard Facts: Direct Cold vs Ice Slurry in Fish Preservation
Retaining the freshness and integrity of your catch demands speed and mastery of temperature management. As fish are cold-blooded creatures, they originate from an environment with constant temperature regulations. However, fishing throws them into a new world with drastically different temperatures. You might be open to the temptation of dunking your prized catch on the ice, but let’s pause the instinctive reaction momentarily. Direct cold is only sometimes the answer.
The effects of an immediate temperature shock from an excessive direct cold temperature can be rather destructive. Exposing your catch to an abrupt cold snap may cause the flesh to contract sharply. This disruption to its structure can cause it to become rigid and lose some of its succulent characteristics. And that, dear friends, is the last thing we want.
The answer to avoiding shocking our piscatorial prizes lies in a single intriguing term – you may already know it – the ice slurry. But what makes the ice slurry so unique, you ask?
Comprising a mixture of crushed ice and seawater or saltwater, an ice slurry ensures a slower and gentler reduction in temperature while holding at an ideal constant cold environment that’s simply perfect for slowing metabolism and bacterial growth.
A direct cold application can shock a fish, while an ice slurry provides a gradual and controlled cold transition. An ice slurry also gives a full-body coverage that direct cold can’t, thereby ensuring an even spread of optimal temperature throughout your catch, preventing ‘hot’ spots where bacteria might thrive.
| Cooling Methods | Materials Needed | Pros | Cons |
|---|---|---|---|
| Direct Cold | Ice, cooler | Easy to manage, quickly lowers temperature | Doesn’t chill the fish evenly |
| Ice Slurry | Ice, water, sea salt, container | Chills fish faster and more evenly | Requires more materials, slightly more complex |
| Bottles of Saltwater | Saltwater, bottles, freezer | Convenient, portable, reusable | More time-consuming to prepare |
| Flaked Ice | Flaked ice machine | Highly effective cooling preserves fish quality | Requires a specialised machine, potentially expensive |

Creating Your Own Arctic Ocean: The Benefits of Bottled Saltwater and Ice
A handy trick that savvy anglers swear by involves the preparation of ice. It hinges on the fact that a brine solution – water with salt dissolved in it – has a freezing point below zero degrees Celsius.
Firstly, find out the temperature of your freezer. Then, prepare a saltwater solution with a freezing point that’s 5 degrees higher. Pour this solution into your containers, leaving about a fifth of the volume as buffer space to avoid an explosive situation during freezing. Cap off those containers and place them in your freezer. The beauty of this is that as the salt-infused ice thaws, it maintains a sub-zero temperature and, in turn, keeps your ice box cooler for longer.
Let us dive deeper into the ‘icy’ heart of the matter. To calculate the freezing point of a brine solution, you need to take the initial freezing point of the water, typically 0 degrees Celsius, and subtract the product of the molality of the salt solution, the freezing point depression constant for water, and the number of ions formed when salt dissolves. Boiling it down to a formula, you’re sailing along these lines:
∆TF = iKTm
In that equation, ∆TF is the change in the freezing point, i represents the number of ions per formula unit, K is the freezing point depression constant (a mighty 1.86°C for water), and Tm is the molality of the solution.
Yup. I can see us all working that one out – here are a couple of quick ‘rough’ working examples –
- If your freezer’s temperature is -20 degrees Celsius, aim for a brine with a freezing point of -15. For 100ml of water, you’ll need 22g of salt.
- For a freezer temperature of -15 degrees Celsius, your brine should freeze at -10. In this case, 100ml of water will require 15g of salt.
- If your freezer cools to -10 degrees Celsius, aim for a brine freezing point of -5. Here, 8g of salt should be mixed into every 100ml of water.

Don’t Spoil the Spoils: Why Fresh Tap Water is a Fish’s Foe
If fresh water is essential to humans, why wouldn’t it be the same for our precious cargo, the fish? Ironically, fresh tap water can be more damaging to your bounty than helpful, and it’s all down to the hidden organisms that inhabit its depths.
When you turn that tap, unknowingly, you’re releasing much more than just water – you’re releasing a microscopic melange of microbes, a hidden universe of bacteria, fungi, and waterborne parasites. And while these are mostly harmless to us (largely thanks to our immune systems and water treatment processes), it’s a different story for your catch of the day.
Remember, fish, especially those from salt environments, have evolved to thrive in conditions broadly absent of such microbial fauna. Their systems haven’t had to deal with the same microbial challenges as ours, and thus, a sudden microbe influx can lead to fast spoilage and unwanted health implications when consumed.
Is it translating all this scientific jargon into layperson’s terms? Putting your fish under tap water is akin to dousing them with a foul potion, one that hastens decay and impacts the quality of the meat. It’s like offering a banquet, inviting many bacteria and enzymes to feast upon this aquatic treasure. It’s the most effective way to ruin your day’s hard work.
Unlocking the Secrets of Salt: Why It’s a Fisherman’s Best Friend
This brings us to salt, a simple compound that’s been used for centuries for seasoning and food preservation. Unlike freshwater, saltwater and salty environments present a harsh terrain for those unwanted microbes.
Consider it, if you will, like a guardian angel for your catch. Imbued with protective qualities, it works tirelessly to fight off microbial invaders, slowing decay and maintaining freshness. And surprisingly, it does this in the most unassuming way: by pulling water out of bacterial cells through osmosis, effectively sucking the life out of them, thus halting their proliferation.
In contrast to tap water, a nice bath in saltwater can significantly extend the shelf life of your catch, ensuring optimal quality when it finally graces your dinner table.

Seawater vs Saltwater: Choosing the Right Brine for Your Catch
I recently read an online debate about freshwater vs saltwater vs seawater – with many people simply repeating what they have previously heard, without any actual substance about their justification that seawater is flat-out better for your fish.
Let’s recap what we have already learned, though – fresh water is a no-go because of the potential microbes that it carries – it’s not simply just because it’s ‘freshwater’. Seawater, due to its salt content, doesn’t generally have this problem – though it could still carry contaminants that you don’t want near your (inner Harbour Auckland anyone?) – so – logically, purified water, with a measured amount of salt added back in, and nothing else would be the best option yet, would it not? Well – what is salt ice made out of?
| Water Type | Microbe Level | Contaminant Level | Suitability for Fish |
|---|---|---|---|
| Fresh Water | High | Varies | Poor |
| Seawater | Low | Can be high | Moderate |
| Saltwater (made with purified water) | Minimal | Low | Best |
Your Catch, Your Kitchen: Preparing Your Fish for the Culinary Spotlight
- Cooling your fish properly slows down the bacterial and enzymatic decomposition processes that can ruin the taste and texture of your catch.
- An ice slurry is an effective method for chilling fish. It consists of a mixture of ice and water and can reduce the core temperature of your catch more quickly than direct cold.
- Bottles of salt water can also be used to cool fish. Stored in the freezer, these can provide a quick and easy cooling solution in the heat of the moment.
- Flaked ice is excellent for cooling fish rapidly, as its high surface-area-to-volume ratio allows quick heat transfer. As such, it is a good solution for larger catches.
- Saltwater is far more beneficial for your catch than fresh water. The latter, especially from a tap, can contain harmful microbes that could negatively affect your catch.
- Sea salt possesses hypotonic properties that help to combat bacteria on your caught fish, making it an advantageous option for preserving your catch.
- Direct cold (as exerted by putting your fresh catch directly into a cooler or fridge) does offer effective initial cooling. Still, it should be supplemented with other adequate, long-term temperature maintenance methods.
