Less guessing, more certainty
While modern reticles, ballistic turrets and gadgets make things much quicker and more accessible, things can still get a little hairy when hyperventilating as the biggest Stag of your life slowly starts to walk back into the forest line. It’s not the time to start second-guessing yourself; it certainly isn’t the time to start trying to remember how your ballistics chart relates to your reticle marks.
It’s also certainly not the time to be taking a shot in the hopes that it will hit an animal and disable, hopefully, kill it. That is cruel, unethical, and just plain inhumane.
So, a method of maximising the setup of your hunting rifle, cartridge and scope to ensure you can point and shoot for most of your shooting makes sense. Unsurprisingly, such a methodology exists.
Understanding Maximum Point Blank Range.
Essentially, the maximum point-blank range is where you can hold dead centre on a target and still hit it within a certain predefined distance up or down. Most commonly, this is calculated to correlate with the ‘kill zone’ of the primary target species.
Consider it this way – imagine a rifle centred down a pipe, which has a diameter the size of the vital organs of your target (often said around 6 inches for the smaller deer) (150mm for us metric folk). MPBR is the maximum distance you can hold dead centre on that animal and never hit the top or the bottom of that pipe over that distance.
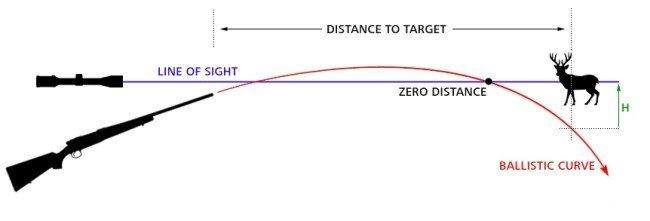
So, how does this work? Well, first of all, remember that a projectile’s tractory follows a parabolic curve. The projectile (bullet) leaves the barrel heads up over the line of sight, then curves slowly back down to the zero distance. The photo above is an exaggerated example, but it illustrates a point.
So, to then continue the example:
No, not my original diagrams – but then, I will make up the same thing, so I might as well recycle.
In the second image – we can see that the path in the middle has a trajectory that doesn’t pass higher or lower than three inches from the line of sight. This continues further than where the actual rifle zero is set to.
Don't worry - there is plenty more to read.
This means that for every firearm system, there is an optimal zero that will allow us to set and forget the elevation and be comfortable that we will be within a ‘margin of error’ when we centre and pull that trigger.
What do we need to know then?
One significant factor must be decided before we go further into the calculations.
How big is my target ‘kill zone’?
Ah. Good question. The size of a rabbit is very different from that of a Wapiti. So, part of this process is deciding how big to calculate the kill zone for. Within this sizing, we also need to account for the accuracy of the rifle and the shooter.
How big is the boiler room/kill zone of your target species?
If it’s a Red, the boiler room will be about 220mm. You need to add some leeway for that simple fact: you can’t put every single shot on top of each other – certainly not off-hand, while short of breath, having just climbed over a ridge and spotted a deer (be realistic).
If you shoot necks, it’s less; heads, even less (how about we just rule out headshots for rushed shooting altogether, aye, lads?).
All in all, I would allow something like 150mm to cover everything down to fallow size and ensure good shot placement on all the deer.
So, we have our maximum allowable spread distance. Now, we also need to know about the ballistics of the gun we are shooting.
At a bare minimum, the box of ammo you shoot should have enough details. Realistically, I would expect you to have also run your rifle over a chronograph with the ammo you are planning on shooting a live animal with because, again, we are humane, ethical hunters and do all we can do to ensure a clean kill.
Finally, some basic details of the rifle, particularly the sights, are needed.
The maths
Let’s take my Rem700 in .308 – not that I would hunt with it – but I have the load data handy.
It shoots a Lapua 155 Scenar at 899mps (2949 fps). Chrono is a Magnetospeed. The sight height is 5cm above the bore.
I pop over here – http://www.jbmballistics.com/cgi-bin/jbmtraj-5.1.cgi – and start entering things in.
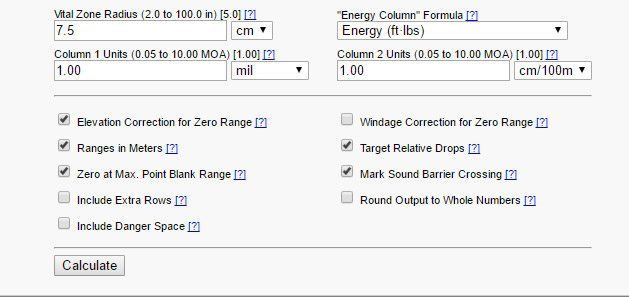
You don’t need to enter everything. Projectile, velocity, sight height, and vital zone radius are all you need. Remember to check ‘Zero at Max. Point Blank Range’ – then hit calculate.
The results will give you all the information you need to set up the MPBR on your rifle. In my case – I get the following:
So, if I set my zero at 233 meters, I can shoot an animal anywhere out to 272 meters and still hit within 75mm of my point of aim. I will still have nearly 2000fps of energy at the maximum distance – so there is plenty to put the animal down.
Then what? How do I set a Zero?
Easy. Go back to our online calculator and uncheck ‘Zero at Max. Point blank range’ then zero the rifle at 100 and use the drop chart! Looking at my example – I will zero to 100, then give myself 7 clicks up (my pick between the 225 and 250 ranges). If I want to take the time and dial up a distance, I can still work from a known 100 zero. If you wanted, you could just use the dial up’s and downs from the original chart – or re-zero the scope after adjusting – whatever will make the most logical sense to you. You don’t want to be second-guessing yourself when faffing with scope dials.
Who can the MPBR system work for?
If you are a hunter that does a mix of bush stalking, into clearings, up into tops and back down again, having your rifle set up this way may be of benefit. Suppose you don’t want to mess with the scope before pulling the trigger and have multiple distances to contend with. In that case, the system will let you set and forget, in the understanding that you will not be able to get the pinpoint accuracy dialling it would.
If you are primarily a bush hunter, then pulling that zero back down to where you shoot might make more sense – it would allow for closer, more ‘picked’ shots where you need to round to go precisely where you aim it. For the mountain ‘long-range’ hunter, you will have the time to figure out an exact ballistic solution and setup for the shot.
So – the MPBR setup isn’t for everyone. However, for many hunters, it provides a simplified method of setting the rifle up to hit the animal without doing too many mental calculations in the field.


